Dressmaking, Guides
How to Make Pleats Your Complete Sewing Guide
You've probably had this moment. You spot a skirt with sharp, even pleats or a blouse with a soft pleated sleeve, and it looks polished, expensive, and slightly mysterious. Then you sit at your machine with a length of fabric and realise the mystery is mostly in the preparation.
Pleats aren't difficult because the folds are complex. They're difficult because small inaccuracies stack up fast. A marking line wanders, a slippery fabric shifts, the iron slides instead of presses, and suddenly the whole panel looks skewed. The good news is that once you understand what each fold is meant to do, pleats become one of the most useful dressmaking techniques you can keep in your toolkit.
The Enduring Appeal of a Perfect Pleat
Pleats have lasting power because they solve real dressmaking problems. They add fullness without gathers, create shape without darts in some areas, and can make a plain panel look deliberate and polished. A knife-pleated skirt swings differently from a gathered one. A box pleat at the back of a coat gives movement without fuss. A pair of stitched tucks can subtly control volume at a bodice or cuff.
They also aren't some modern sewing trick. Pleats are among the oldest documented dressmaking techniques, with evidence of pleated garments in Ancient Egypt around 2000 BCE, and the core principle has stayed the same for more than 4,000 years: fabric is doubled back on itself and the fold is secured, as noted in this history of pleats. That's reassuring, because if you can fold accurately and secure the fold cleanly, you already understand the heart of how to make pleats.
What changes from project to project is the effect. Crisp pressed pleats feel structured. Softer pleats feel fluid. Cotton lawn behaves one way, viscose another, and deadstock can surprise you in either direction depending on weave, finish, and fibre blend.
Why pleats feel harder than they are
Most sewists don't struggle with the folding itself. They struggle with three things:
- Spacing: each pleat has to land in the right place, or the whole garment starts pulling off balance.
- Pressing: pleats need pressing, not casual ironing.
- Fabric behaviour: cotton forgives. Viscose, jersey, and slippery remnants often don't.
Pleats reward patience early so you don't have to rescue the garment later.
That's one reason pleating shows up beyond clothing too. If you've ever looked at custom pleated window coverings, the same visual logic is at work. Even spacing, controlled folds, and a finish that holds its shape are what make pleats look intentional rather than accidental.
What good pleats should do
A well-made pleat should do at least one of these jobs clearly:
- Control volume where a flat pattern piece would feel stiff or plain.
- Direct movement so the fabric opens and falls where you want it to.
- Add structure without adding bulky seam lines everywhere.
If your pleat isn't improving one of those things, it's usually worth reconsidering the type, depth, or fabric.
Pleat Foundations Measuring and Marking
Modern pleating is usually described as having three main production methods: hand pleating, pattern pleating, and machine pleating, and for home dressmakers the starting point is understanding hand-made pleats, including pressed pleats and stitched pleats that create controlled fullness, as outlined in this overview of pleating methods.
That matters at the cutting table. Before you make pleats, decide whether you want a pressed result, such as a knife pleat, or a stitched effect, such as a tuck. They aren't interchangeable. A pressed pleat depends on accurate folding and pressing. A stitched pleat depends more on seam placement and bulk control.
Pleat depth and pleat spacing
These two get muddled all the time.
Pleat depth is how much fabric is taken up in the fold.
Pleat spacing is the visible distance from one pleat to the next on the finished garment.
If you mix them up, you'll either cut far too little fabric or end up with heavy, crowded folds that don't suit the project.
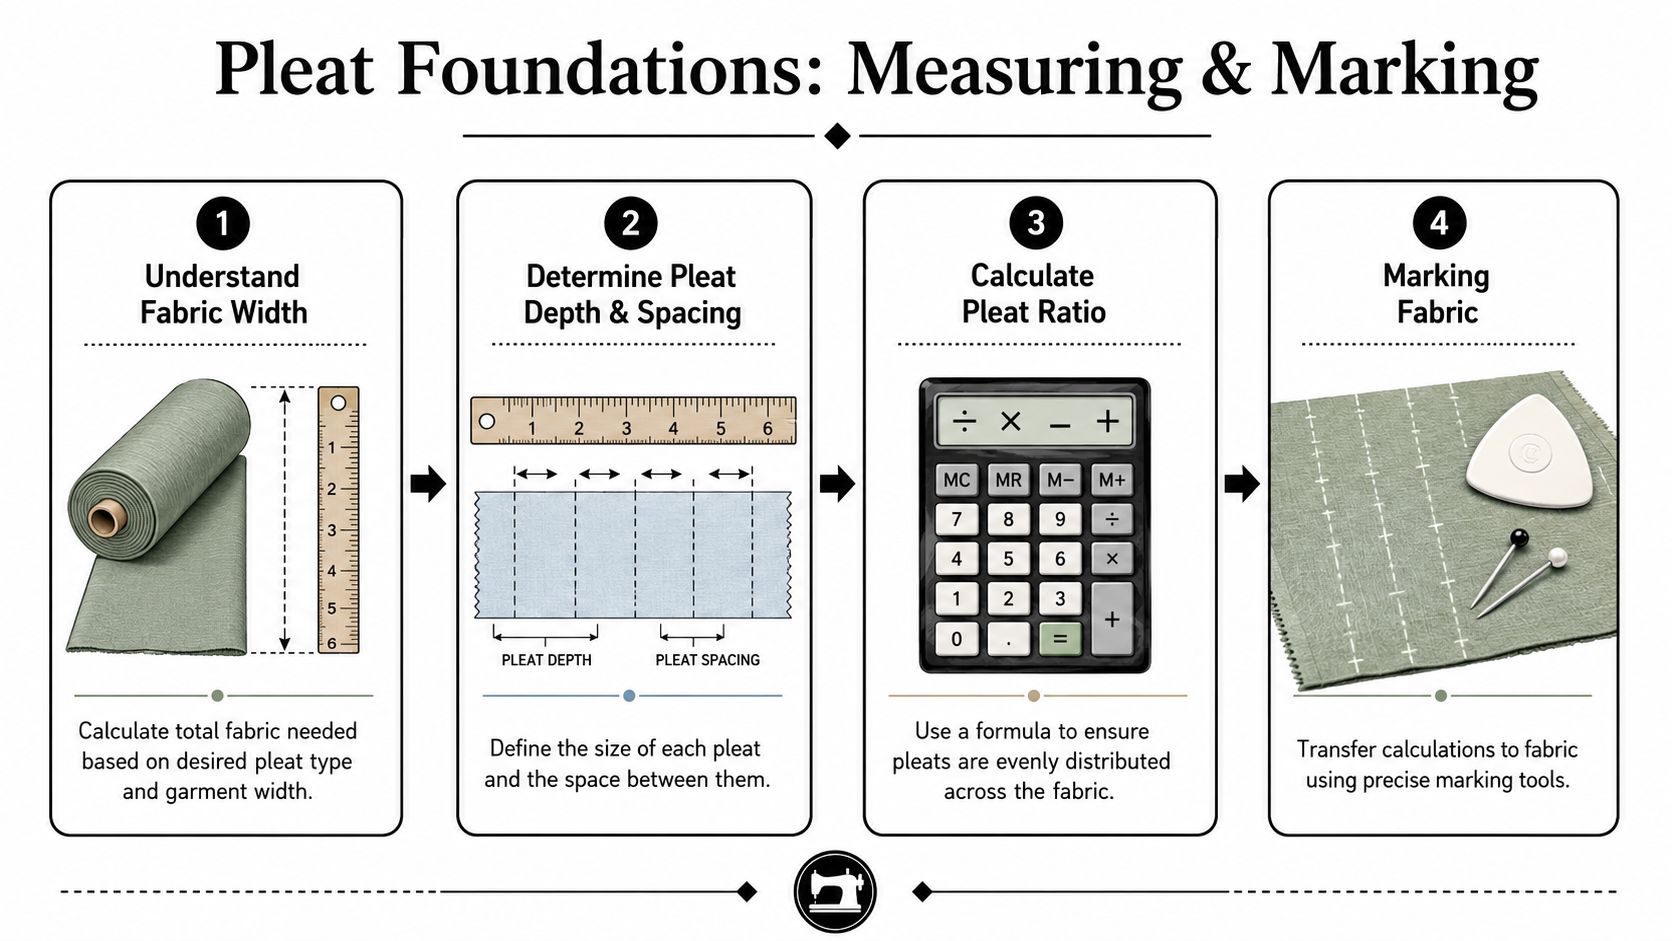
A simple worked example
Say you have a 50 cm panel and you want 10 pleats across it. The visible finished width for each section would be 5 cm. From there, you decide how much depth each pleat needs.
For a soft skirt in cotton lawn, you might choose a shallower pleat so the panel doesn't become bulky at the waist. For a more sculptural look in a firmer fabric, you might build in more depth. The exact amount depends on the style and the cloth, but the key is consistency. Every pleat on that panel must use the same plan unless the design intentionally varies.
A practical way to map this is:
- Mark the finished width first: divide the panel into equal visible sections.
- Add the fold allowances next: this is the hidden fabric that creates the pleat depth.
- Check the total before cutting: pleats can consume far more fabric than beginners expect.
Tools that actually help
You don't need specialist kit to start, but a few tools make the work cleaner.
- Tape measure and clear ruler: use both. A tape measure is flexible, but a rigid ruler helps keep vertical markings straight.
- Tailor's chalk or removable pen: choose something you can see clearly on the right or wrong side as needed.
- Fine pins or clips: fine pins are better for lightweight lawn and viscose. Clips can distort narrow pleats if they're bulky.
- A seam gauge: useful when repeating the same depth over and over.
- Pleat fork or homemade spacing guide: handy if you're making repeated folds on a simple project.
Practical rule: If your markings aren't neat, your pleats won't be neat. Don't expect pressing to fix bad measuring.
Marking habits that save frustration
A reliable method is to mark in batches instead of one pleat at a time. Mark the whole panel, then go back and check the rhythm visually before folding anything. On striped or checked fabric, step back and confirm the marks sit where you want them relative to the print. Sometimes the mathematically perfect pleat lands awkwardly on the motif, and it's better to adjust before you sew.
If you're using very mobile fabric, mark on a flat surface and let the fabric rest fully supported. Hanging the fabric off the table while you measure invites distortion before you've even begun.
Creating the Three Essential Pleat Types
If you can make one accurate knife pleat, you can make most of the pleats used in everyday dressmaking. Box and inverted pleats are really variations in direction and pairing. The folding logic stays manageable once you stop treating each one as a separate mystery.
For a reliable knife pleat, sewing guidance consistently uses a two-line marking system: a fold line and a placement line. You fold the fabric from the fold line to the placement line, pin it, press it with a hot iron suited to the fibre, and stitch across the top edge to secure it before assembly, as shown in this knife-pleat sewing guide.
Knife pleats
Knife pleats all face the same direction. They're common in skirts, uniform styles, and any design that needs movement with a clean top edge.
Use this order:
- Mark each fold line and placement line clearly.
- Bring the fold line over to meet the placement line.
- Pin vertically or baste near the top edge.
- Press straight down rather than sliding the iron.
- Stitch across the top edge to hold the pleat in place before you attach a waistband or join the panel.
Knife pleats work beautifully in cotton poplin, cotton lawn, lightweight wool, and some denims. They can also work in viscose, but only if you stabilise the fabric well and keep your pressing controlled.
Common mistake: sewing before the pleat is fully flattened and aligned. That gives you a twisted pleat top, which is surprisingly hard to correct neatly later.
Box pleats
A box pleat is made from two knife pleats facing away from each other. The fullness sits underneath, while the visible outer shape looks balanced and architectural.
This type suits:
- Skirt fronts and backs where you want symmetry
- Coat or dress backs where you need movement
- Home sewing projects such as cushion panels or bed valances
To form one, mark the centre of the pleat and then create matching folds on either side so the folds meet or align evenly. Press from the top down, checking both sides before stitching the top edge. On medium-weight cotton, box pleats are very forgiving. On heavier cloth, reduce the number of pleats rather than forcing too much bulk into one seam.
Inverted pleats
An inverted pleat is the reverse of a box pleat when viewed from the outside. The folds meet underneath, and from the right side you see a single central fold opening into hidden fullness.
This is useful when you want a cleaner front appearance with movement tucked inside the garment. It's a smart choice for skirt fronts, schoolwear-inspired styles, and the back of dresses that need walking ease without obvious volume.
Check the right side and wrong side before pressing hard. An inverted pleat folded the wrong way can look almost right until the garment is assembled.
Essential Pleat Types at a Glance
| Pleat Type | Structure | Fabric Usage | Best For |
|---|---|---|---|
| Knife pleat | One fold brought to a placement line, all facing the same direction | Moderate to high, depending on depth | Skirts, uniform styles, directional movement |
| Box pleat | Two folds opening away from each other | High | Symmetrical skirts, coat backs, statement detail |
| Inverted pleat | Two folds meeting underneath, one fold visible outside | High | Clean-front skirts, dresses, hidden movement |
A useful cross-reference comes from interiors sewing too. If you've ever looked at pleated curtain construction, ring placement and fold direction make the structure much easier to understand. Joey'z Shopping's drapery ring guide is a good visual reminder that pleats behave best when spacing and support points are planned together.
Pressing and Stitching for a Professional Finish
Pressing is where pleats either become crisp and intentional or start looking homemade in the unhelpful sense.
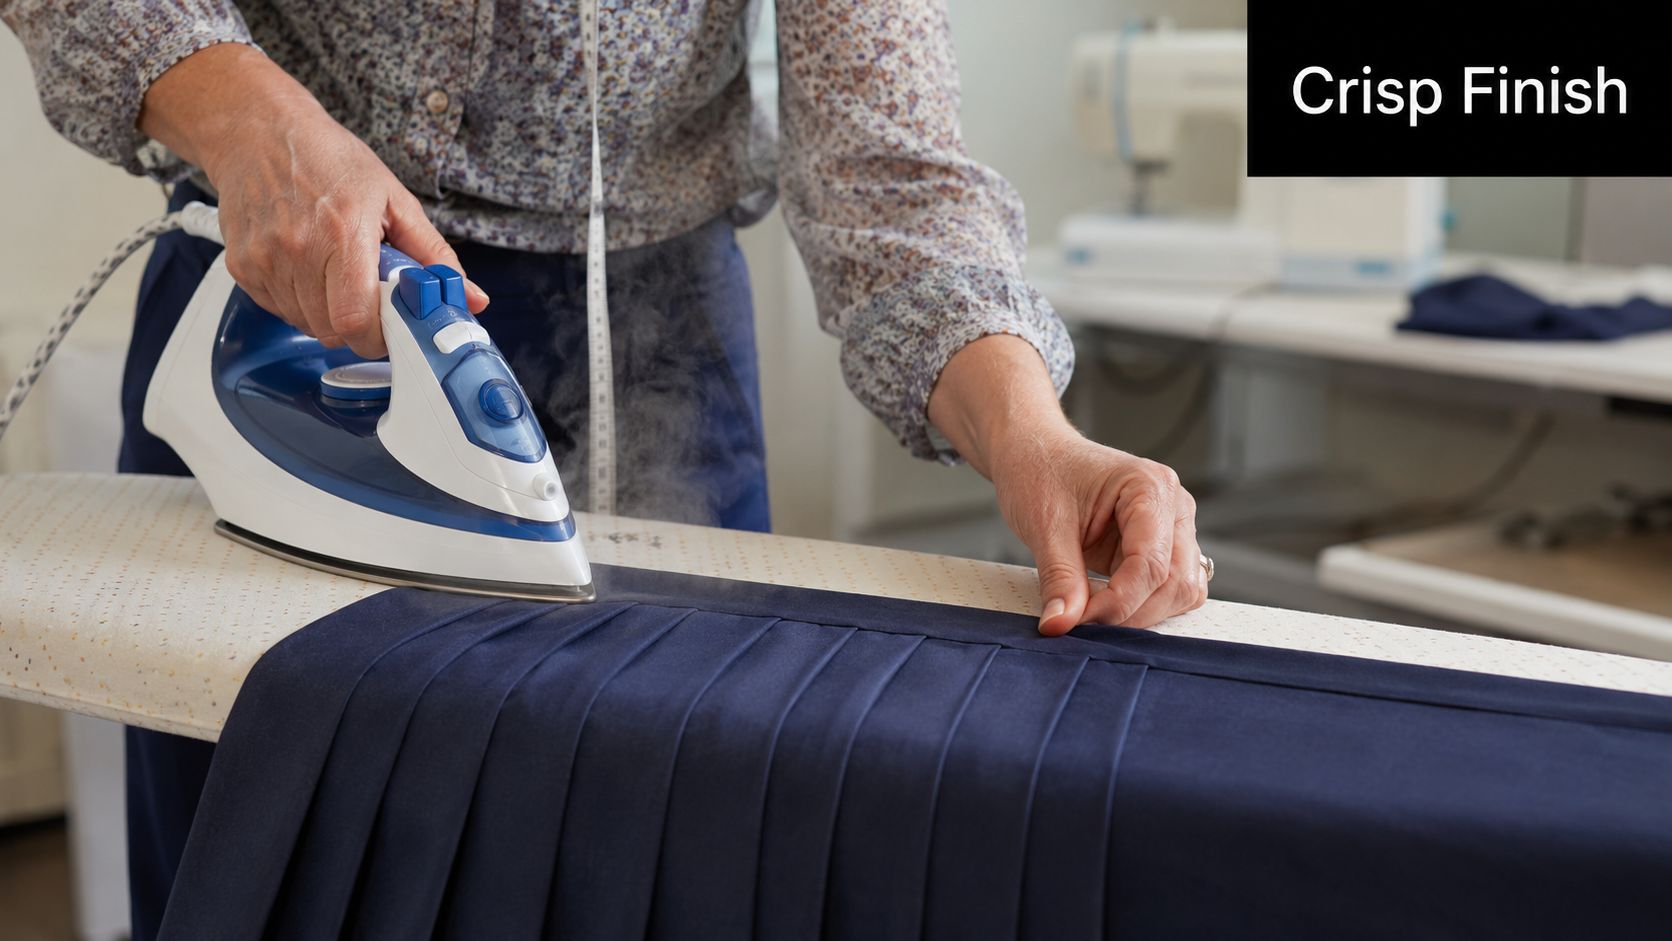
Press, don't iron
Ironing usually means moving the iron back and forth. That's fine for some seams. It's not fine for fresh pleats. Sliding the iron drags the fold off line and can stretch the edge, especially on bias-prone weaves or fabrics with a soft finish.
Pressing means lowering the iron onto the pleat, holding it briefly, then lifting it away. If the fabric can take steam, use it carefully. If the cloth marks easily, use a press cloth. A tailor's clapper helps set a crisp edge on cotton and wool by holding the heat in the fold for a moment after pressing.
Basting before final stitching
A pleat that looks flat on the board can still shift under the presser foot. Basting prevents that.
Use one of these approaches:
- Hand baste across the top edge if the fabric is delicate or slippery.
- Machine baste within the seam allowance if the area will be enclosed by a waistband or facing.
- Stay-stitch near the pleat line when several layers want to move independently.
This part is dull, but it saves a lot of unpicking.
Sharp pleats come from controlled heat and temporary restraint. Pins alone usually aren't enough.
Sewing across a pleated edge
When you stitch the top edge of pleats permanently, keep the panel flat and supported. Don't let the weight of the fabric drag off the machine bed. If you're attaching pleats into a waistband, sew with the pleated layer uppermost if that helps you see whether the folds are staying tucked correctly.
For extra definition, some garments suit a short line of stitching down from the top edge of the pleat. That can work well on school-skirt styles, structured wool skirts, and utility-inspired dresses. It's less suitable on airy fabrics where you want the pleat to release quickly.
A short visual demo can help if you want to compare pressing and stitching rhythm in motion:
Finishing details that make pleats last
Small choices affect durability:
- Match heat to fibre: too cool and the crease won't set. Too hot and the fabric can shine or distort.
- Trim seam bulk where sensible: especially at waistband joins or enclosed pleated sections.
- Use interfacing selectively: a waistband, placket, or upper pleated section often benefits from extra support.
If you need materials for this sort of finishing work, More Sewing stocks dressmaking fabrics and haberdashery including interfacing, thread, and pressing tools, which is useful when you want to test a fabric and notion combination before committing to a full garment.
Troubleshooting Pleats on Tricky Fabrics
Most pleat tutorials behave as if everyone is working in stable cotton. Real wardrobes don't. Home dressmakers often use viscose, Tencel blends, jersey, and unusual deadstock, and those fabrics create different problems. That gap matters because pleating these cloths without distortion needs different stabilising methods, stitch choices, and pressing temperatures than traditional cotton, as discussed in this video on pleating difficult fabrics.
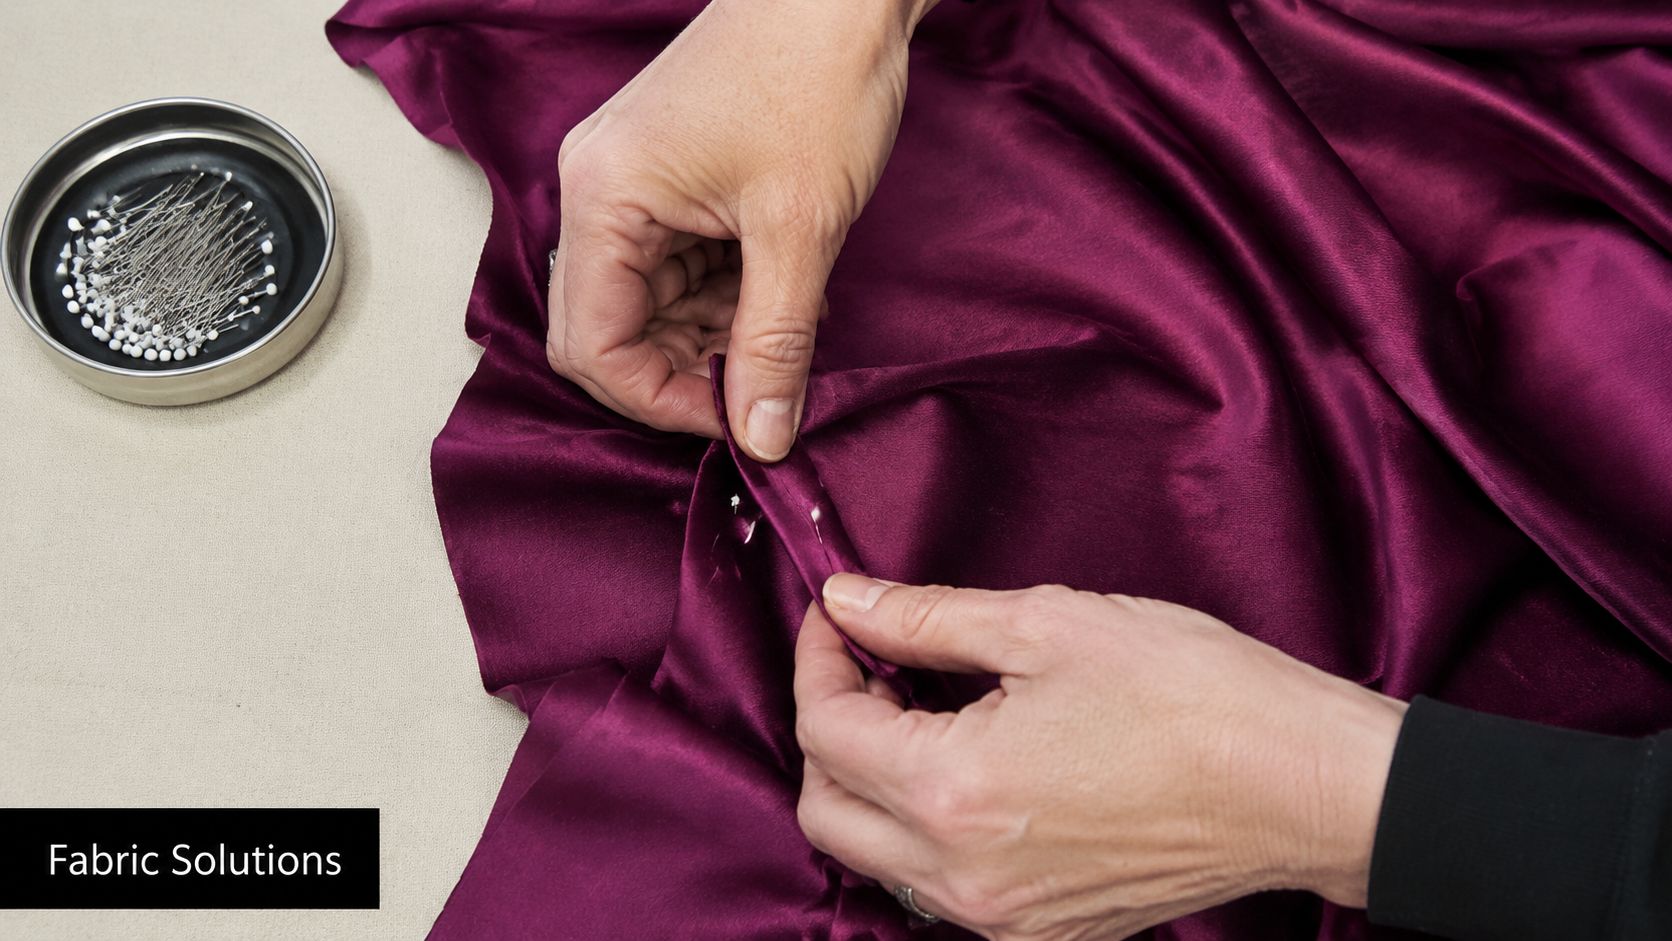
Viscose and other drapey fabrics
Viscose can make lovely pleats, but crispness isn't automatic. The fabric often grows while you handle it, and the fold can soften quickly if you overwork it.
What helps:
- Let the cut fabric rest flat before marking.
- Use fine pins and lots of them rather than a few large pins.
- Try spray starch or sizing first on a test piece if you want a sharper fold.
- Press in stages instead of trying to force one hard press from top to hem.
What doesn't work well is rushing. If you fold viscose roughly and hope the iron will sort it out, you usually get a shiny, skewed compromise.
Jersey and stretch fabrics
Stretch fabric asks a more basic question. Do you want a true pressed pleat, or do you want controlled fullness that behaves like a pleat visually? Often a stitched tuck, soft fold, or partially stitched pleat is the better answer.
Use these habits:
- Stabilise the top edge with interfacing or tape where appropriate.
- Consider tissue paper under the fabric when sewing to reduce stretching and feeding issues.
- Use a walking foot if the layers shift against each other.
- Avoid over-pressing because jersey can flatten or ripple.
Deadstock and slippery cloth
Deadstock is exciting because it's unusual, but it can be unpredictable. Finishes vary. Fibre content may be mixed. Recovery can be poor. That means testing matters more than usual.
Before pleating a full garment panel:
- Make a sample with two or three pleats.
- Press and let it cool fully.
- Hang it or wear-test it briefly.
- Check whether the pleats relax, distort, or hold.
A sample tells you more than confidence does, especially with deadstock.
Keeping pleats crisp after wear and washing
Long-lasting pleats depend on the whole build, not just the fold. If the upper edge is unstable, the pleat collapses. If the fabric has no memory, the crease softens. If the garment strains across the hips or waist, the folds spread open in use.
For better results, support the top of the pleat properly, avoid unnecessary bulk that fights the fold, and choose pleat styles that suit the cloth instead of forcing a sharp uniform pleat into a fabric that wants to drape softly. Sometimes the most professional choice is to let the fabric have a gentler pleat rather than insisting on knife-edge sharpness.
Simple Projects and Pattern Adjustments
A full pleated skirt isn't the only place to practise. In fact, smaller projects often teach more because you can focus on one behaviour at a time.
Good first projects
Try one of these if you want low-stakes practice:
- A cushion cover with one central box pleat: great for learning symmetry.
- An elastic-waist skirt with a few front pleats: easier than pleating the whole waistline.
- Pleated sleeve cuffs or a pleated back yoke: useful for learning controlled fullness in a small area.
If you're sewing with children or teaching a beginner who needs approachable, tactile projects before moving into garment details, kits that maximize creativity and connection can be a helpful stepping stone into confident handling of fabric and simple construction.
A simple slash-and-spread adjustment
Take a plain A-line skirt pattern and mark where you want the pleats. Cut along those lines from hem toward waist, leaving a hinge if you prefer. Spread each section by the amount of extra fullness you want in the pleat, then tape the pattern onto paper underneath.
That added width becomes the hidden fabric for the pleats. Keep the waistline smooth, true the hem if needed, and transfer your fold and placement markings to the new pattern piece. This is an easy way to design your own pleated variation instead of relying on a pre-pleated pattern.
The nicest thing about learning how to make pleats is that the skill transfers. Once you trust your measuring, pressing, and fabric testing, pleats stop feeling like a special occasion technique and start becoming a design choice you can use anywhere.
If you're ready to try pleats on cotton lawn, viscose, jersey, or deadstock, More Sewing is a practical place to start for fabric, haberdashery, and dressmaking supplies.