Dressmaking, Guides
How to Sew a Buttonhole by Hand: A Tailor’s Guide
You've pressed the garment, trimmed the threads, admired the shape, and then hit the part many sewists dread. The buttonholes. It's often the last step, and it can feel like the one mistake that will undo all the careful work that came before it.
That's exactly why learning how to sew a buttonhole by hand is so worthwhile. Hand work gives you time to think, place each stitch with intent, and build strength into a small area that takes a surprising amount of strain. On delicate cloth, bulky coating, or any project where you don't trust a machine to behave, hand-sewn buttonholes give you control that's hard to match.
Why Learn to Sew a Buttonhole by Hand
You finish a jacket front, the cloth is sitting beautifully, the collar is balanced, and then one small opening has to do a lot of work. It must let the button pass through without forcing the fabric out of shape, then recover neatly after repeated wear. That is why hand buttonholes still matter.
A well-made hand buttonhole is a structural detail, not just a decorative finish. The stitches bind the cut edge, support the strain around the opening, and let you match the build of the buttonhole to the cloth. On soft silk, that means restraint. On dense coating, it means enough body and firmness that the edge does not collapse.
Machine buttonholes have their place. For shirts, everyday cottons, and quick work, they are often perfectly serviceable. But a machine makes the same sort of hole unless you interrupt it. A hand-worked buttonhole lets you change the density, the width, the corded support, and the finish at each end according to the fabric in front of you.
That is the true skill.
Three things improve when you understand how a buttonhole is built:
- The edge wears better because the stitches protect the cut fabric instead of merely surrounding it.
- The shape suits the garment because you can work a flatter buttonhole for light fabrics or a raised, firmer one for tailoring.
- The opening functions properly because you control how tightly the stitches sit and how much room the button needs.
Good tailoring always comes back to purpose. The purl edge is not there for ornament alone. It helps create a compact ridge that stands up to friction. A bar tack or fan at the end is not just traditional. It strengthens the point that takes the most strain. Cord can add lift and durability, but on very fine cloth it can make the buttonhole look heavy, so it is a choice, not a rule.
Practical rule: A good buttonhole should sit flat, hold its shape, and look as though it belongs to the fabric it is worked in.
That is why hand sewing is still taught in couture rooms and serious tailoring workrooms. If you enjoy discovering couture craftsmanship, this is one of the clearest places to see how small techniques affect the life of a garment.
It is especially useful on garments where the fabric asks for judgement rather than speed:
- Jackets and coats, where layers, interfacing, and thicker cloth can throw off machine stitching
- Fine dresses and blouses, where a stiff, dense machine buttonhole can look harsh
- Vintage or historical projects, where the finish needs the right character
- Alterations and repairs, where placement and control matter more than convenience
Once you learn to read the cloth and build the buttonhole accordingly, this stops feeling like a nerve-racking final task. It becomes part of the garment's engineering.
Gathering Your Essential Tools and Materials
You don't need a huge kit, but you do need sensible tools. Buttonholes reward precision. A blunt needle, fluffy thread, or vague marking line will show up immediately.
Mechanisation changed sewing, of course. A sewing-history discussion notes that John Reece patented the first automatic buttonhole machine in 1882, while an earlier American machine to stitch a buttonhole was patented in 1854 by Charles Miller. Even so, hand buttonholes remained the standard for fine tailoring because speed and finish aren't the same thing, as outlined in this sewing-history discussion of buttonhole machines and hand methods.
The tools that matter most
Start with the basics, but choose them with purpose.
- Marking tool. A chalk pencil, fine tailor's chalk, or removable fabric marker gives you a clean line. Thick or fuzzy marks lead to drifting stitches.
- Cutting tool. A buttonhole chisel gives the cleanest slit. If you don't have one, use very sharp embroidery scissors and work slowly.
- Needle. A Milliner's or Straw needle is particularly useful because the shaft stays even along its length, which helps make consistent stitches.
- Thread. Buttonhole twist is ideal when you want a firm, lustrous edge. On lighter fabrics, a standard polyester thread can work well, especially if doubled.
- Stabiliser. A small piece of interfacing behind the buttonhole area often makes the difference between crisp and collapsed.
- Optional gimp or cord. For a raised, structured edge, a core thread under the stitches adds shape and resilience.
Recommended supplies by fabric type from More Sewing
| Fabric Type | Recommended Thread | Recommended Needle | Recommended Stabiliser |
|---|---|---|---|
| Fine cotton lawn | Standard polyester thread, doubled if needed | Fine Milliner's needle | Lightweight fusible interfacing |
| Linen | Buttonhole twist or firm polyester thread | Milliner's or Straw needle | Lightweight to medium fusible interfacing |
| Wool suiting | Buttonhole twist | Milliner's needle | Medium stabiliser suited to tailoring cloth |
| Coating or dense wool | Strong buttonhole twist with optional gimp core | Sturdy Milliner's needle | Firm stabiliser appropriate for heavy cloth |
| Silk or delicate dress fabric | Fine smooth thread | Fine sharp hand needle | Lightweight stabiliser chosen carefully to avoid show-through |
| Denim or sturdy cotton twill | Strong polyester or buttonhole twist | Sharper, slightly stronger hand needle | Medium stabiliser |
That table isn't about brand loyalty. It's about matching the structure of the materials to the structure you need in the buttonhole.
The wrong thread usually fails before the wrong stitch does. If the thread abrades, snarls, or sits flat and fuzzy on the edge, the buttonhole won't look finished no matter how careful your handwork is.
One more point often gets ignored. If you're adding labels to handmade garments, the same careful thinking about stress points and neat finishing applies. This guide to durable garment labeling techniques is useful for the same reason. Placement, reinforcement, and neat stitching all affect how a garment wears over time.
Preparing Your Fabric for a Flawless Cut
Most bad buttonholes are decided before the first stitch goes in. The placement is off, the slit is rough, or the fabric wasn't stabilised enough to withstand handling. By the time the sewing starts, you're already trying to rescue it.
For a hand-worked buttonhole, a practical benchmark is to mark the long sides about 1/16" to 1/8" (roughly 1.5 to 3 mm) from the centre line, then stitch tightly along both edges. Guidance also recommends marking the ends, centre, and long sides first, then cutting only after the placement is confirmed, as shown in this hand buttonhole tutorial.
Mark first, then check again
Before you cut anything, mark:
- The two ends of the buttonhole
- The centre line
- The long stitch lines on each side of that centre
That gives you a full map rather than a single slit line. It also shows immediately if the buttonhole has crept off grain or drifted away from the garment's edge.
If I'm working on a jacket front, I always test the button against the marking before cutting. Not loosely. I want to know whether the planned opening is just enough.
Stabilise with intent
Interfacing on the wrong side isn't fussy over-preparation. It stops the cloth stretching while you stitch and helps the cut edge behave itself. On wool and linen, that extra support helps the stitches sit upright. On finer fabrics, it reduces distortion.
Choose the lightest stabiliser that still controls the fabric. Too soft and it does nothing. Too heavy and the area can become board-like.
Workshop habit: Make at least one test buttonhole on a scrap made from the same fabric and interfacing layers as the garment. Not a random offcut. The same layers.
Cut cleanly
A buttonhole chisel is excellent because it opens the slit with a clean, controlled edge. If you're using scissors, use the very tip and keep the fabric flat. Don't chew at it.
A neat cut matters because hand stitches are there to bind and reinforce the edge, not to disguise a ragged opening. If the slit is rough, the finished buttonhole will often look furry no matter how carefully you work.
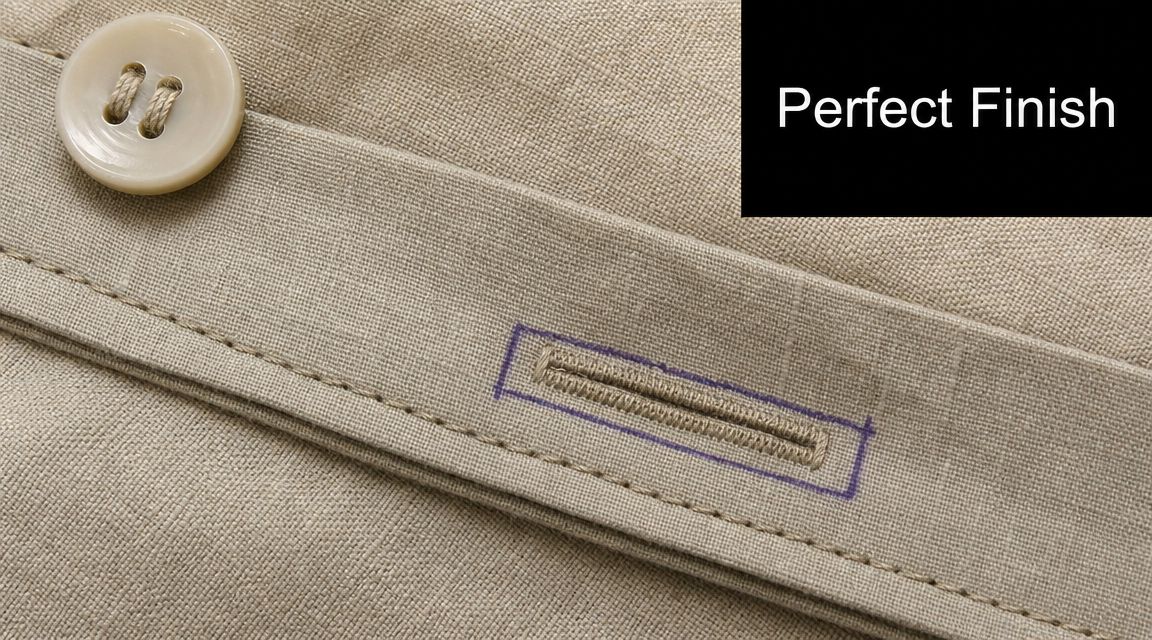
Mastering the Straight Buttonhole Stitch
A straight buttonhole shows very quickly whether your hand sewing is under control. If the spacing wanders, the edge looks ragged. If the tension is off, the fabric buckles or the slit starts to spread. That is exactly why I teach this style first. It trains the hand to place each stitch for strength, not just appearance.
Use it on shirts, blouses, aprons, children's clothes, and other garments where the button sits flat to the cloth. On lighter jackets, it can also be the right choice, provided the fabric is stable and the button is not asking too much from the opening.
The structure is simple. Two closely worked edges protect the slit. The purl sits on the cut edge and acts as a tiny corded guard. The ends take the strain, so they must be reinforced cleanly. Once you understand those three jobs, the stitch makes sense across many fabrics.
What the stitch is doing
Buttonhole stitch differs from an ordinary blanket stitch because of where the knot forms. It must lock right on the raw edge. That little ridge gives the buttonhole a clean outline and helps stop fraying as the button passes through again and again.
Placement matters more than speed.
If the purl sits inside the slit, the edge stays exposed and wears early. If it rolls onto the face of the fabric, the buttonhole looks soft and untidy. Dense stitching protects the cut edge, but stitching packed too tightly can make the opening stiff and slightly twisted, especially on fine cotton lawn or silk blends.
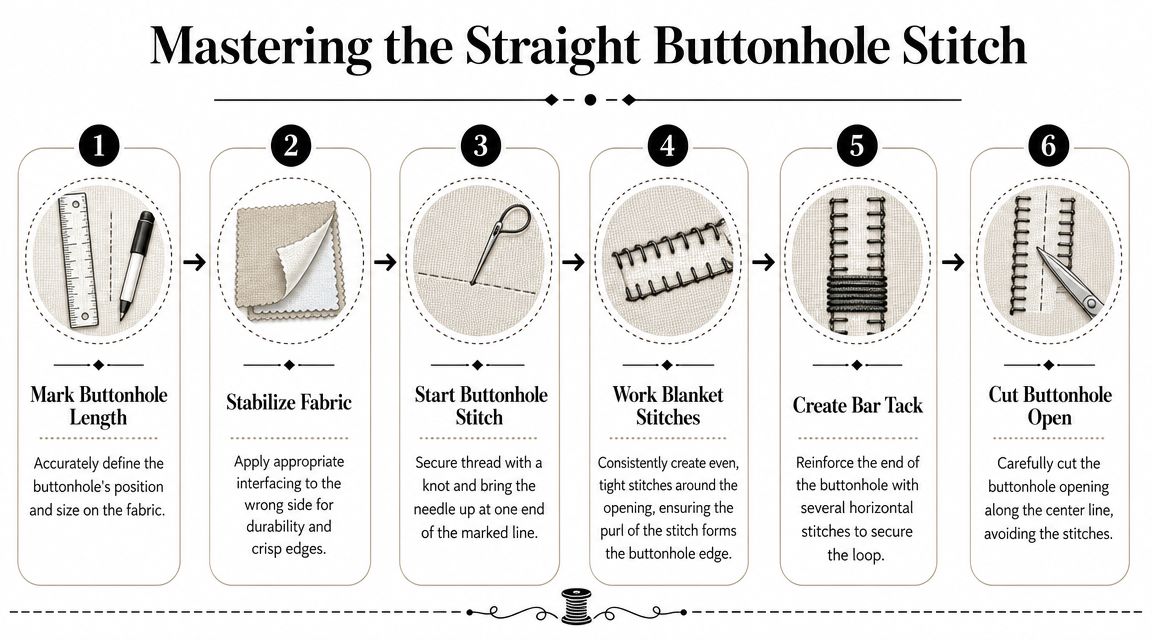
Step by step at the worktable
Use a shorter thread than you think you need. A long thread gets fuzzy, weakens with every pass, and is more likely to knot. On cottons and linens, I often run the thread lightly over beeswax, then press it between my fingers to smooth it. On very fine fabrics, skip heavy waxing if it leaves drag or shine.
Work in this order:
- Start near one end of the slit and secure the thread discreetly between the layers or under the first few stitches.
- Bring the needle up close to the cut edge on the right side.
- Take the needle down and let the working thread pass under the needle point so the knot forms as you pull through.
- Tighten the stitch just enough for the purl to sit exactly on the cut edge.
- Continue with even spacing and the same angle along the first side.
- Build a firm bar tack at the end with several close stitches laid across the width of the buttonhole.
- Turn and stitch the second side so it matches the first in height, angle, and density.
- Finish by burying the thread tail under the worked stitches if you can, rather than tying a knot on the surface.
This video shows the hand movement well when you want to see the stitch in action:
How to keep the stitch clean
What works
- Even stitch spacing that fully covers the cut edge
- Thread with enough body to form a crisp purl
- Matching the stitch density to the fabric, closer on loose weaves, slightly more open on tightly woven shirting
- Firm, compact bar tacks where the strain will fall
What causes trouble
- Pulling so hard that the lips of the buttonhole draw together
- Leaving visible gaps and expecting pressing to hide them
- Using soft, fluffy thread on a fastening that gets regular use
- Making one side taller or more slanted than the other
I tell students to watch the edge, not the needle. The edge will show at once whether the purl is landing in the right place.
Fabric changes the method. On plain woven cotton, a straightforward worked edge is usually enough. On loosely woven linen, closer stitches help contain the fibres before they start to feather. On light wool, a slightly raised edge often wears better and looks more settled into the cloth. This is the core tailoring principle behind hand buttonholes. The stitch count, thread choice, and amount of support should answer the fabric, not the other way round.
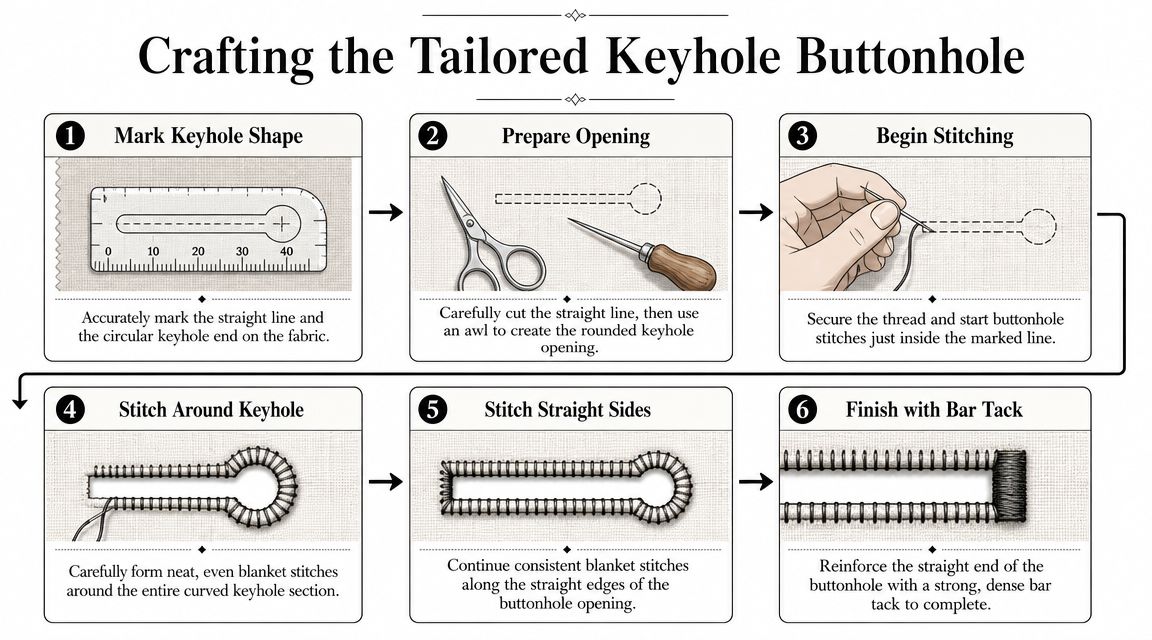
Creating the Tailored Keyhole Buttonhole
For coats, jackets, and heavier structured garments, the keyhole buttonhole is the standard I trust most. The rounded end gives the button shank somewhere to sit. That means the strain settles where it should instead of dragging awkwardly against the straight slit.
This style asks more from your hand, but the logic is simple. You're still building two firm stitched sides and reinforced ends. You're just shaping one end so the button sits naturally.
When to choose a keyhole
Use a keyhole buttonhole when:
- The button has a shank or sits proud of the cloth
- The fabric is thick enough that a plain slit would strain
- The garment is of high quality and needs a more traditional finish
- You want a more sculpted appearance on the front edge
It's less useful on tiny blouse buttons or very fine dress fabrics where the rounded end can feel oversized.
How to build the shape
An advanced hand method structures the buttonhole as two long stitched edges with reinforced terminal bars. Expert guidance also recommends conditioning the thread, using a gimp core for shape, and burying thread tails into the stitch base rather than relying on a visible knot. The finished opening should let the button pass cleanly without excess slack, as described in this detailed vintage sewing guide to hand-worked buttonholes.
Here's the practical approach:
- Mark the straight portion and rounded end clearly.
- Create the opening. For the rounded end, a punch is ideal. If you don't have one, open the shape carefully and conservatively.
- Lay in the gimp cord if you want a raised bespoke look.
- Work one straight side first, catching the gimp under the stitches.
- Fan the stitches around the rounded end so they radiate neatly and cover the curve smoothly.
- Return down the second side with matching density.
- Finish the straight end firmly with a compact bar tack.
The curved section is where rushing often happens. Don't. Each stitch needs a slightly adjusted angle so the purl edge forms a clean circle rather than a lumpy bend.
Fabric-specific choices
A few examples make the decision-making clearer:
- On melton or coating. Use stronger thread and consider gimp. Thick cloth swallows fine stitches.
- On wool suiting. A keyhole often looks more at home than a plain slit, especially with a shanked button.
- On denim jackets. A keyhole can work, but keep it functional rather than overly ornate.
- On silk or rayon garments. Usually skip this style unless the design calls for it. The fabric often wants a lighter treatment.
A tailored keyhole should feel deliberate, not decorative for its own sake. If the garment doesn't need the shape, a straight buttonhole often looks better.
Troubleshooting Common Issues and Final Tips
Your first hand-sewn buttonholes probably won't all match. That's normal. Buttonholes are tiny pieces of engineering, and small inconsistencies show up fast. The fix is nearly always in one of three places: spacing, tension, or preparation.
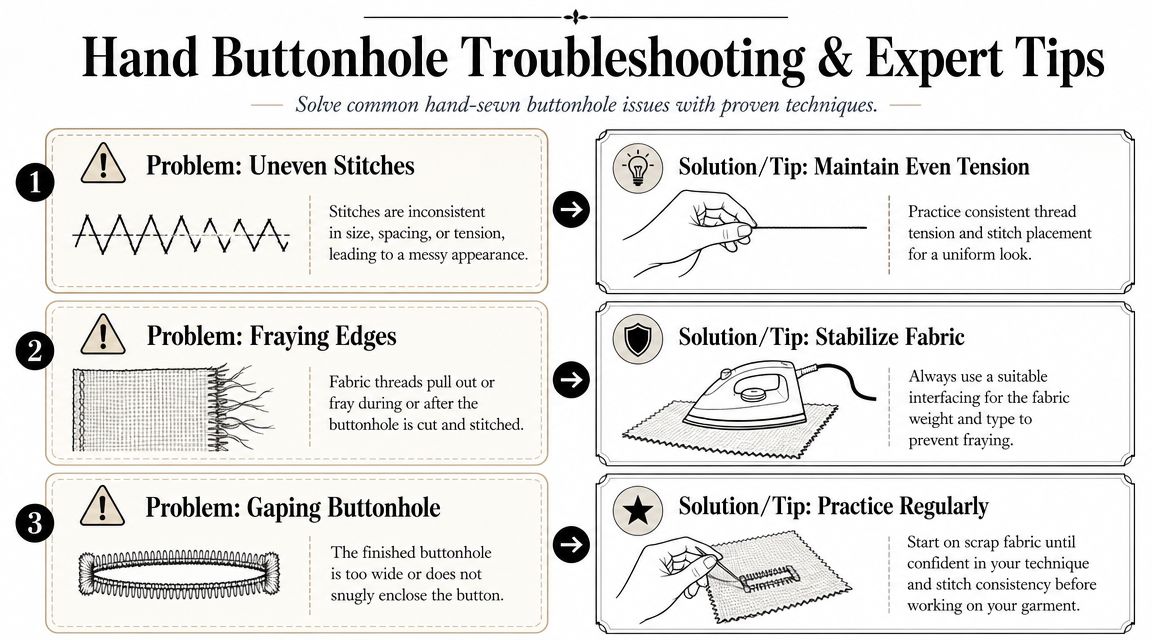
Quick diagnosis guide
| Symptom | Likely cause | Cure |
|---|---|---|
| Uneven stitches | Irregular hand movement or inconsistent spacing | Mark clearly, slow down, and practise on a matching scrap |
| Fraying at the edge | Purl not sitting on the cut edge, or stitches too far apart | Work stitches more densely and place the knot right on the edge |
| Puckering fabric | Thread pulled too tight, or poor stabilisation | Relax tension and stabilise the area better |
| Corners look distorted | End stitches rushed or bar tack too loose | Build the end carefully and compact the bar tack |
| Buttonhole gapes | Opening too long for the button | Test the button before final stitching and keep the slit only as long as needed |
| Thread unravels at the finish | Weak anchoring | Bury or lock thread tails into the stitch base |
Habits that improve results
- Practise on the actual fabric stack. Surface cloth alone won't tell you how the finished garment will behave.
- Use fresh needles. A dragging needle makes neat work harder than it should be.
- Press before and after. Not aggressively. Just enough to settle the area.
- Stop when you're tired. Buttonholes punish haste.
The good news is that improvement comes quickly. Once your hand learns the motion and your eye learns where the purl should sit, the work becomes calm and methodical. A neat hand buttonhole doesn't just close a garment. It finishes it with authority.
If you're ready to practise with better fabrics, reliable haberdashery, and the sort of sewing supplies that make careful work easier, take a look at More Sewing. It's a solid UK source for dressmaking materials, tools, and project essentials, whether you're making your first blouse or finishing a structured coat.