Dressmaking
How to Sew a Gathered Skirt: A Beginner’s Guide
You've bought a fabric you love, cleared the table, threaded the machine, and decided this time you're finally making the skirt you want to wear. Not a compromise. Not something almost right from the shops. A gathered skirt that fits your waist, suits your height, and works with your wardrobe.
That's exactly why this project stays popular. It's simple enough for a beginner, but it still teaches proper dressmaking habits. Grainline matters. Marking matters. Stitch choice matters. And once you understand why each step works, you stop feeling like you're just copying instructions and start sewing with confidence.
Your Guide to Sewing the Perfect Gathered Skirt
A gathered skirt is one of those garments that looks soft and easy, but the finish depends on a handful of practical decisions. The fabric changes the drape. The amount of fullness changes the mood. The waistband changes whether the skirt feels relaxed, polished, or dressy.

The version many beginners picture is a softly full skirt with an easy waist and a swishy hem. That's a very achievable first make. The trouble starts when tutorials skip over the bits that decide whether your skirt looks handmade in the best sense, or homemade in the frustrating sense. Uneven gathers, a bulky waistband, fabric that fights the machine, a hem that waves instead of hanging cleanly.
Those problems are fixable. Most come down to preparation and handling.
Practical rule: A gathered skirt looks best when the fullness is controlled before it reaches the waistband.
A good result doesn't need fancy equipment. A domestic machine, a decent iron, matching thread, pins or clips, and a washable marking tool are enough. If you've got a basic zip foot, overlocker, or a gathering foot, they can help in certain situations, but they aren't the reason a skirt turns out well.
What matters more is choosing a sensible fabric, cutting accurately, marking quarter points, and gathering in a way your machine can handle. That's the difference between sewing a skirt and understanding how to sew a gathered skirt so it hangs well, feels comfortable, and gets worn often.
Choosing Fabrics and Calculating Yardage
A gathered skirt can feel joyful to sew or oddly stubborn, and the fabric often decides which way it goes. Beginners usually do best with cloth that presses cleanly, feeds evenly, and does not slip away while the gathers are forming. That is why fabric choice is not just about appearance. It affects bulk at the waist, how easy the skirt is to control under the machine, and whether the finished shape suits the way you dress.

Pick the fabric by the look you want
For an easy first skirt, choose cotton lawn, cotton poplin, chambray, or a stable lightweight linen. These fabrics hold a crease when pressed, which helps when you are dividing fullness and attaching a waistband without twisting it. They also tolerate unpicking better than slippery fabrics, which matters when you are learning.
For a softer, more fluid skirt, viscose, rayon blends, and Tencel give lovely movement. They also show every small inaccuracy. A slightly uneven top edge or a stretched section can turn into gathers that look crowded in one area and flat in another. If you want that drapey look, use plenty of pins, handle the cut edges gently, and allow extra time.
Weight matters just as much as fibre.
- Crisp fabrics give bounce and keep the skirt away from the body.
- Fluid fabrics drape closer and reduce some waistband bulk.
- Heavier fabrics can make the waist thick and harder to gather neatly, especially on a domestic machine.
- Open weaves or very soft linens may grow after handling, so accurate measuring and pressing become more important.
If you enjoy exploring luxury cotton types, compare finish as well as fibre content. A smooth poplin, a brushed cotton, and a textured cotton dobby can all sew into very different skirts.
Use fullness to estimate how much fabric you need
Most gathered skirts use roughly 2 to 3 times the waist measurement for the skirt width before gathering, as explained in By Hand London's gathered skirt tutorial. The lower end gives a softer, easier everyday shape. The higher end creates a fuller skirt, but it also asks more from your fabric and waistband.
A practical example helps. If the waist measurement is 80 cm, a skirt at 2x fullness needs about 160 cm of total skirt width before seam allowances and waistband pieces are added. At 3x fullness, that rises to about 240 cm. On wide fabric you may cut fewer panels. On narrower fabric you may need two or more widths, which increases yardage and seam bulk.
| Your Waist (cm) | Gather Ratio | Total Fabric Width Needed (cm) | Estimated Metres to Buy |
|---|---|---|---|
| 60 | 2x | 120 | depends on skirt length, fabric width, and waistband |
| 60 | 3x | 180 | depends on skirt length, fabric width, and waistband |
| 70 | 2x | 140 | depends on skirt length, fabric width, and waistband |
| 70 | 3x | 210 | depends on skirt length, fabric width, and waistband |
| 80 | 2x | 160 | depends on skirt length, fabric width, and waistband |
| 80 | 3x | 240 | depends on skirt length, fabric width, and waistband |
| 90 | 2x | 180 | depends on skirt length, fabric width, and waistband |
| 90 | 3x | 270 | depends on skirt length, fabric width, and waistband |
Make three decisions before you buy
Write these down before you order fabric or ask for it to be cut at the counter.
Waist measurement
Measure where the skirt will sit. A natural waist skirt and a high hip skirt need different widths and give a different feel when worn.Finished length
Measure from waist to hemline, then add enough for the waistband or casing and the hem. If you like a deeper hem on linen or a narrow turned hem on viscose, account for that now.Fullness level
Choose with wear in mind. A skirt with moderate fullness is easier to style, easier to sit in, and often easier to sew neatly. A very full skirt suits some prints beautifully, but it can feel bulky in thicker cloth and can overwhelm a small frame.
If you are undecided in the shop, buy for the look you will wear most often. Fabric that suits your wardrobe is far more likely to become a finished skirt than fabric bought only because it looked pretty on the bolt.
Always pre-wash and press before cutting. Cotton can shrink, viscose can relax and shift, and linen often softens after the first wash. This step prevents one of the most annoying beginner problems: a waistband cut to one measurement and skirt panels that behave like another after laundering.
Cutting and Marking for a Professional Finish
A gathered skirt is forgiving in some places, but not in cutting. If the grain is off or the top edge is uneven, the gathers won't distribute properly and the hem can drop oddly after hanging.
Cut with the grain in mind
Lay the fabric flat and check the grain before you do anything else. On woven fabric, the skirt panels should be cut so the length runs with the straight grain. That keeps the skirt hanging cleanly and stops one side twisting around the leg as you walk.
If your fabric is wide enough, you may cut one large panel. If it isn't, cut two panels and join them with side seams. Two panels are often easier to manage anyway, especially on the ironing board and under a domestic machine.
A practical cutting routine looks like this:
- Press first so folds and creases don't throw off your measurements.
- Square the edge if the cut edge from the shop is skewed.
- Use a large ruler or tape to mark length consistently across the width.
- Keep seam allowances consistent so the waistband matches what you planned.
Mark the points that control the gathers
The most useful markings on this project are the quarter points. Mark the centre front, centre back, and both sides on the top edge of the skirt. Then mark the same points on the waistband or casing section.
Those marks do two jobs. First, they tell you where the fullness should sit. Second, they stop you from shunting all the gathers to one section and ending up with a flat front and bulky back, or the reverse.
For marking, use whatever suits your fabric:
- Tailor's chalk for stable cottons and linen
- Washable fabric pen for smooth, light fabrics
- Small snips in seam allowance only if you know exactly where your seam line sits
- Pins or clips if the fabric marks easily
Even gathers rarely happen by eye alone. Quarter marks are what make the skirt look balanced.
If you're using a print, check whether the motif needs matching at the side seams or centre front. A gathered skirt doesn't require perfect pattern matching, but a large print that suddenly tilts or cuts off awkwardly can distract from an otherwise lovely make.
Mastering the Art of Even Gathers
This is the step people worry about most, and it's also the step that becomes much easier once you stop rushing it. The aim isn't just to shrink a long edge to fit a shorter one. The aim is to create gathers that are evenly spread, lie neatly, and feed through the machine without pleating by accident.
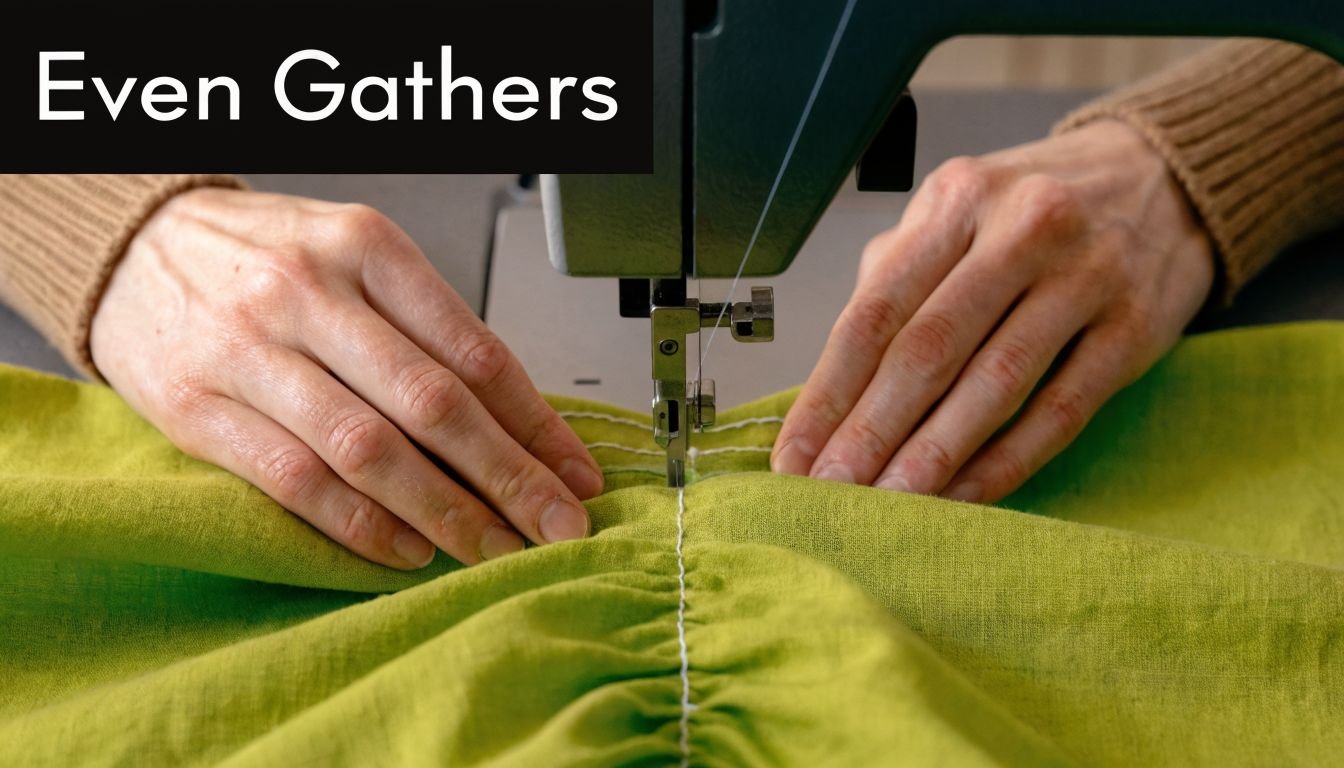
The most reliable method
For a stable finish, sew two parallel gathering rows with a long stitch length, then pull the bobbin threads to distribute fullness evenly. If your fabric width exceeds 2x your waist circumference, gather the fabric down to the final waist measurement before attaching a fixed waistband to reduce bulk and help the waistband lie flat, as advised in Anicka Design's drafting guide.
That method works because two rows give control. One row tends to twist. Two rows keep the gathers straighter and make it easier to sew the final seam between or just alongside them.
A sensible setup on a domestic machine is:
- Long stitch length for the gathering rows
- Normal upper tension unless your machine manual suggests otherwise
- Matching thread so any temporary stitches are less obvious
- No backstitching at the start or end, because you need long tails to pull
Sew both rows inside the seam allowance area. Leave long thread tails at both ends. Then separate the top and bobbin threads and pull only the bobbin threads. That usually creates smoother gathers with less chance of thread snapping.
Distribute the fullness before you stitch for real
Don't try to gather the whole skirt in one sweep and hope it evens out later. Work section by section, matching the quarter marks on the skirt to the quarter marks on the waistband.
Once those points are pinned, adjust the gathers inside each section until the density feels consistent. On a soft viscose, that might mean tiny close gathers. On poplin, the folds will look chunkier and more architectural. Neither is wrong. What you're after is balance.
If one area looks crowded and another looks flat, slide the gathers along the threads before pinning more densely. Don't try to fix it by stretching at the machine.
This visual walkthrough can help if you prefer seeing the motion before trying it at your machine.
Two useful alternatives
The standard two-row method is the one to learn first, but there are other techniques worth knowing.
Zigzag over a cord
This is especially handy on heavier fabrics or when ordinary gathering threads keep snapping. Lay a strong cord, thick thread, or narrow string on the fabric, then sew a zigzag over it without catching it in the stitches. Pull the cord to gather the fabric.
Why it helps: the cord takes the strain instead of the sewing thread. It's useful for denser cotton, light denim, or fabrics with a rough surface.
Gathering foot or specialist presser foot
If you own a gathering foot, it can speed things up. On some machines it creates soft gathers as you sew. It's convenient, but it's less precise when you need the gathered edge to match a specific waistband length exactly.
Use it when speed matters more than absolute control. Skip it for your first skirt if you're still learning how much fullness your fabric creates.
What doesn't work well
A few habits cause trouble repeatedly:
- Pulling both top threads and bobbin threads at random often leads to tangles.
- Skipping the second gathering row makes the edge twist.
- Forcing bulky gathers under a fixed waistband creates ripples and thickness.
- Ignoring quarter marks usually leaves the skirt unbalanced.
When people say gathering is fiddly, this is usually what they mean. The fabric isn't the problem. The handling is.
Attaching Waistbands and Hemming Your Skirt
You have the gathers sitting nicely, then the waistband goes on crooked or the hem kicks up at the front. That is the stage where many first skirts start to look homemade in the frustrating sense. A careful finish fixes that. It is also where fabric choice and construction method really show.
The waistband controls comfort, bulk, and how the skirt sits through the day. An elastic waist feels relaxed and forgiving. A fixed waistband gives a cleaner line under tucked-in tops. A shaped waistband with a zip looks smart, but it asks more of your fitting and sewing.
Elastic casing
An elastic casing is usually the best first choice for beginners, especially on cotton prints, double gauze, soft linen blends, and everyday skirts you want to pull on and wear. It is comfortable, simple to fit, and forgiving if your measurements sit between sizes.
The trade-off is thickness at the top edge. On a very full skirt, or on anything with body like needlecord or heavier linen, too much fabric packed into a casing can create a round, bunchy waist. If that happens, the skirt can feel bulky under jumpers and jackets.
A neater result comes from a few habits:
- Choose elastic that springs back well. Cheap elastic often looks tired quickly, and a waistband that relaxes after two wears spoils the whole skirt.
- Make the casing slightly wider than the elastic so it can move during wear without folding on itself.
- Mark the elastic and the skirt in equal sections before joining. This helps keep the fullness balanced instead of crowded at the front.
- Secure the elastic at the side seams with a vertical line of stitching if the fabric is slippery or the casing is deep. That small step helps prevent the twisting that beginners often discover only after laundering.
If I am sewing for a child or making a casual summer skirt, this is usually the option I recommend first. It is practical, adjustable, and easy to repair later.
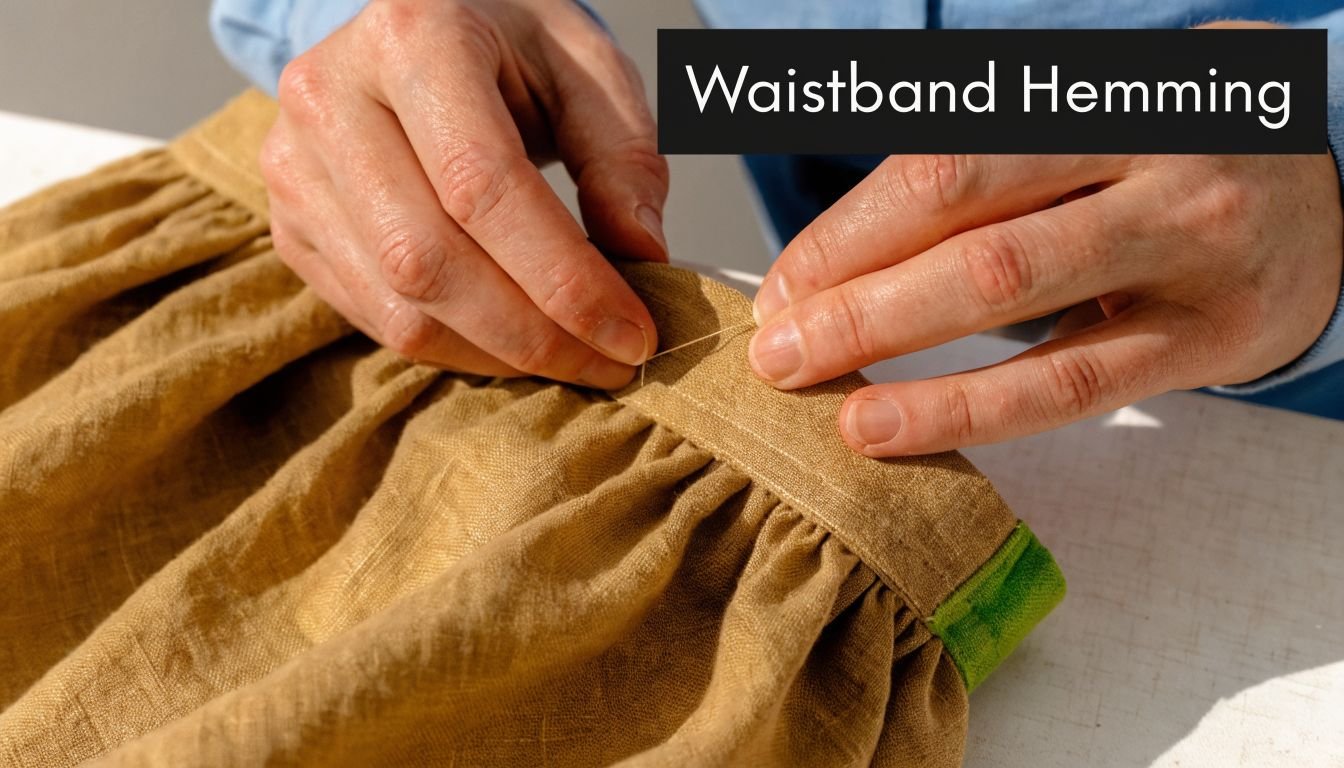
Fixed straight waistband
A straight waistband suits a skirt that needs a flatter, more polished waistline. It works well on poplin, lawn, chambray, lighter denim, and linen that presses sharply. It also behaves better than a casing when you want side seam pockets, because the top edge has more structure.
Preparation matters here. The gathered edge needs to be evenly spread, pinned in sections, and pressed into shape before the waistband goes on. If the gathers are still clumped, the waistband can ripple, and the inside edge often ends up shorter than the outside.
A few practical choices make this easier:
- Interface the outer waistband if your fabric is light or soft. This keeps it from collapsing and helps stop that wavy top edge.
- Grade the seam allowance after attaching the waistband, especially on fuller skirts. Trimming one layer narrower than the other reduces bulk.
- Understitch where you can. It encourages the inner edge to roll inward and helps the waistband stay put.
- Hand-finish the inner waistband if the fabric is lively or thick. Machine stitching from the front is faster, but hand sewing gives more control and avoids missing the back edge.
This method takes longer, but the result is worth it when you want the skirt to feel more finished and less casual.
Good times to choose a fixed waistband
- You want a flatter waist under fitted tops
- Your fabric presses crisp folds well
- You are happy to measure and pin carefully
- The skirt has pockets or a zip and needs more support
Less suitable times
- The fabric is bulky, lofty, or resists pressing
- You want the quickest possible finish
- You expect to rely on the waistband stretching for comfort
Contoured waistband with zip
A contoured waistband is shaped to follow the body rather than sitting as a straight strip. It reduces bulk at the waist and gives a smarter finish, particularly on skirts meant to sit at the natural waist.
It is also the least forgiving option. Accurate seam allowances matter. So does proper pressing. If the waistband pieces are not cut and interfaced well, they can twist or flare away from the body. For a first gathered skirt, I would usually suggest mastering a straight waistband before adding a zip and a shaped band into the mix.
If you do choose this route, use a stable interfacing that matches the fabric weight. A very stiff interfacing can make the waistband feel cardboard-like, while one that is too soft will not give enough support.
Hemming by fabric type
A hem should match the fabric's weight and drape. The easiest method is not always the best-looking one.
For cotton poplin, chambray, and stable linen, a double-fold hem is reliable and tidy. It stands up well to washing and gives enough weight to help the skirt hang properly. Measure the hem depth in several places before pressing. A skirt cut slightly off grain will show up here.
For drapey viscose, rayon challis, or Tencel, a narrow hem usually works better. A deep turned hem can form a ridge and make the skirt swing awkwardly. On slippery cloth, press in short sections, use plenty of pins or hand-basting, and sew slowly. A fine Microtex needle often makes a cleaner line on these fabrics than a standard universal needle.
For heavier fabrics, including denim or weighty linen, reduce bulk before turning the hem by finishing the raw edge first and turning only once if needed. A very deep double fold on thick fabric can look clumsy and feel stiff around the legs.
These steps improve almost every hem:
- Let the skirt hang before hemming if the fabric is soft or drapey, because some areas may drop after the skirt is on the hanger
- Check the length from waist to hem at several points, not just side seam to side seam
- Press the hem in place before stitching
- Use the right needle for the fabric, finer for delicate fabrics, stronger for denser cloth
- Steam and press again after sewing so the hem settles instead of flaring out
A gathered skirt does not need complicated finishing to look good. It needs a waistband suited to the fabric and a hem that hangs calmly. Get those two areas right, and the whole garment looks more confident.
Troubleshooting Common Issues and Adjustments
You finish the waistband, try the skirt on, and one side looks fuller than the other. Or the elastic flips inside the casing halfway through the day. These are the points where many beginners assume they have done something wrong. Usually, the skirt just needs a small correction.
Gathered skirts are forgiving, but they do show rushed preparation. Uneven distribution, a waistband that was not stabilised well enough, or a needle that does not suit the fabric can all show up at this stage. The good news is that these problems are usually local. You can fix the area causing trouble without taking the whole skirt apart.
If the gathers look patchy
Patchy gathers nearly always come from uneven distribution. One section has too much fullness, another has been stretched flatter, or the gathers were stitched down before the quarter marks were properly matched.
Unpick only the section that looks wrong. Then redistribute the fullness between the markings with your fingers before pinning again. I prefer to work from quarter mark to quarter mark rather than trying to smooth the whole waist at once, because it is much easier to judge balance in smaller sections.
If the fabric is soft or slippery, hand-baste the gathered edge to the waistband first. That extra step saves time on viscose, lightweight lawn, and any cloth that shifts the moment it goes under the presser foot. If the gathers keep collapsing into tiny pleats, shorten the stitch slightly when attaching the waistband so the seam holds them in place more firmly.
If the waistband twists or rolls
A twisted waistband usually has one of two causes. The elastic is free to turn inside a casing that is too deep, or the waistband was attached with the skirt edge and waistband edge slightly out of alignment.
For an elastic waist, make the casing only a little deeper than the elastic itself. Too much extra room invites rolling. If the elastic has already twisted, open a small section of the casing, straighten it fully, then stitch vertically through the casing at the side seams to anchor it. On children's skirts or very soft fabrics, I often add a line at centre back too.
For a fixed waistband, twisting often points to bulk or poor pressing. Grade the seam allowances, press carefully before topstitching, and check that the waistband is supported evenly all the way round. Lightweight fusible interfacing helps on many cottons and linens. On drapey viscose, choose a softer interfacing so the waistband keeps its shape without feeling cardboard-stiff against the gathered skirt.
If the machine skips stitches
Start with the needle. That solves the problem more often than people expect.
Fine or tightly woven fabrics often sew better with a fresh Microtex needle. Stable cottons and similar dressmaking fabrics usually behave well with a universal needle. Heavier cloth may need a stronger needle size and a slower pace so the machine can form each stitch cleanly through the layers.
Check these setup points before unpicking anything:
- Rethread the machine with the presser foot up
- Fit a new needle suited to the fabric
- Test on scraps with the same number of layers
- Reduce speed if the waistband area feels bulky
- Adjust presser foot pressure if your machine allows it
If the skipped stitches happen only over the gathered seam, the bulk may be lifting the foot unevenly. A hump jumper or even a folded scrap of fabric behind the foot can help keep it level as you sew across thicker areas.
If the fabric fights back
Different fabrics misbehave in different ways, and gathered skirts make that obvious.
Viscose, rayon challis, and similar soft fabrics can stretch out of shape while you handle them. Use plenty of pressing, keep the pieces flat on the table, and avoid letting the waistband edge hang off the ironing board while you work. Fine glass-head pins, a Microtex needle, and hand-basting are all worth having in the sewing box for these fabrics.
Crisp cotton poplin and lightweight linen are usually easier for a first skirt, but they can still bunch if the gathers are packed too tightly into one area. Spread the fullness evenly and press the gathers lightly before attaching the waistband so they sit in the direction you want. Heavier linen, denim, or needlecord bring a different issue. Bulk. In that case, reduce seam allowance bulk wherever you can, and do not force too much fabric into a narrow waistband.
If the fit needs adjusting
A gathered skirt is simple to alter, which is one reason it is such a good beginner garment.
If the waist feels too loose, shorten the elastic or take in the waistband slightly, depending on the style you made. If the skirt feels too full for your frame, reduce the width next time rather than trying to flatten the gathers after the fact. If it feels skimpy, add more width in the skirt panels on the next version. The best gathered skirts suit both the fabric and the wearer. More fullness is not always better, especially in stiffer cloth.
Small fixes are part of sewing well. A skirt that needs a little rebalancing at the waist or a better needle choice is still a successful make.
Your Gathered Skirt Questions Answered
Can I sew a gathered skirt without a pattern
Yes, you can. A gathered skirt is one of the easiest garments to draft from your own measurements because it's based on rectangles, waistband planning, and hem allowance rather than complex shaping. The important part is measuring carefully and marking clearly before you gather.
Which fabric is best for a first gathered skirt
A stable woven fabric is the easiest place to start. Cotton poplin, cotton lawn, chambray, and lightweight linen all press well and are easier to cut accurately than slippery fabrics. If you're tempted by viscose, it can look lovely, but it asks for slower handling and more care at the cutting table.
Should I add pockets to my first one
You can, but only if you're happy to slow down. In-seam pockets are practical and don't change the style much, yet they add bulk at the side seam and give you more layers to manage. If your goal is to learn how to sew a gathered skirt cleanly, making one plain version first is often the calmer route.
If you'd like to make your first gathered skirt with dependable fabric, haberdashery, and practical tools in one place, More Sewing is a useful UK shop to bookmark. Their range suits beginners and experienced dressmakers alike, especially if you want quality dressmaking fabrics, notions, or help keeping your sewing machine in good working order.