Dressmaking
How to Sew Darts: A Perfect Finish Every Time
You've cut out your blouse front, you unfold the tissue pattern, and there they are. Little triangles. Odd diamond shapes. Lines pointing towards the bust or waist. If you're new to dressmaking, darts can look far more mysterious than they are.
They're one of the friendliest tools in sewing. Once you understand what they do, a lot of garment construction starts to make sense. That flat piece of fabric becomes a blouse that skims the bust properly, a skirt that sits neatly at the waist, or a dress that follows your shape without twisting or bagging.
If you've been trying to learn how to sew darts and keep ending up with puckers, pointy tips or a fit that feels “nearly right but not quite”, you're in the right place. The sewing itself matters, of course. But so do the marking, pressing, and fitting choices that come before and after the stitching.
Why Darts Are Your Secret to a Great Fit
You try on a handmade blouse, and one part feels wrong straight away. It may pull across the bust, stand away at the waist, or bunch at the lower back even though the size seemed right on the pattern. In many cases, the missing piece is dart shaping.
A dart is a folded wedge of fabric stitched to remove fullness in one spot so the cloth can curve smoothly somewhere else. That small tuck performs a structural job. It changes a flat cut piece into something that can follow the rounder parts of a real body.
This matters most in garments that need shape rather than straight drop. A woven blouse often needs bust darts so the front can sit over the chest without dragging from the side seam. A skirt usually needs waist darts so it can fit neatly at the waist and still pass over the hips. The fabric is not misbehaving. It needs some of its extra width redirected.
What darts really do
Darts help create:
- Bust shaping so the front of a bodice sits smoothly instead of pulling or collapsing
- Waist shaping in skirts, dresses, and jackets where the waist is smaller than the area below it
- Back shaping so fabric does not puddle above the waist or gape at the centre back
- Smoother garment lines through the torso, especially in fitted or semi-fitted styles
A good dart is a bit like taking a pinch out of gift wrap so the paper lies flat around a rounded box. You remove extra material in one place to make the whole surface sit better.
That is also why darts come in several forms. A single-pointed dart shapes toward one fuller area, such as the bust or hip. A contour dart removes fullness at both ends, which is useful when fitting closely through the waist. A princess seam does the same shaping in seam form rather than a folded tuck. If you have ever wondered why one pattern uses a dart and another uses a curved seam, the goal is often the same. Control the fabric so the garment fits the body cleanly.
Why beginners often find darts awkward
Confusion often stems from two sources. First, dart markings on the pattern can look abstract until you have sewn a few and seen how the shape forms. Second, a dart has both a sewing role and a fitting role. You can stitch it neatly, press it well, and still end up with a blouse that points in the wrong place or a skirt that bubbles at the waist.
That second point catches many home sewists out.
If the dart point sits too close to the bust apex, the tip can look pointy. If it ends too far away, the shaping may feel weak and the fabric can look a little baggy. If the legs are uneven, the dart can twist. If the pressing is heavy-handed, the whole area can look ridged even when the stitching is correct. This is why learning darts properly means more than learning where to sew a straight line.
Once you start reading darts as fit clues, they become much less mysterious. They show you where the garment is trying to shape around the body, and they also show you what to adjust when the fit is off. That is the key secret. Darts are not just construction details. They are one of the clearest tools you have for turning “almost right” into “that fits me.”
Marking and Preparing Your Darts Accurately
Messy darts often begin long before the machine starts. If the markings are off, even slightly, the stitching line can wander and the finished shape won't sit smoothly. Care taken here saves unpicking later.
The aim is simple. You need to transfer the dart legs, point, and sometimes the centre fold line from the paper pattern onto the wrong side of the fabric clearly enough that you can match everything precisely.
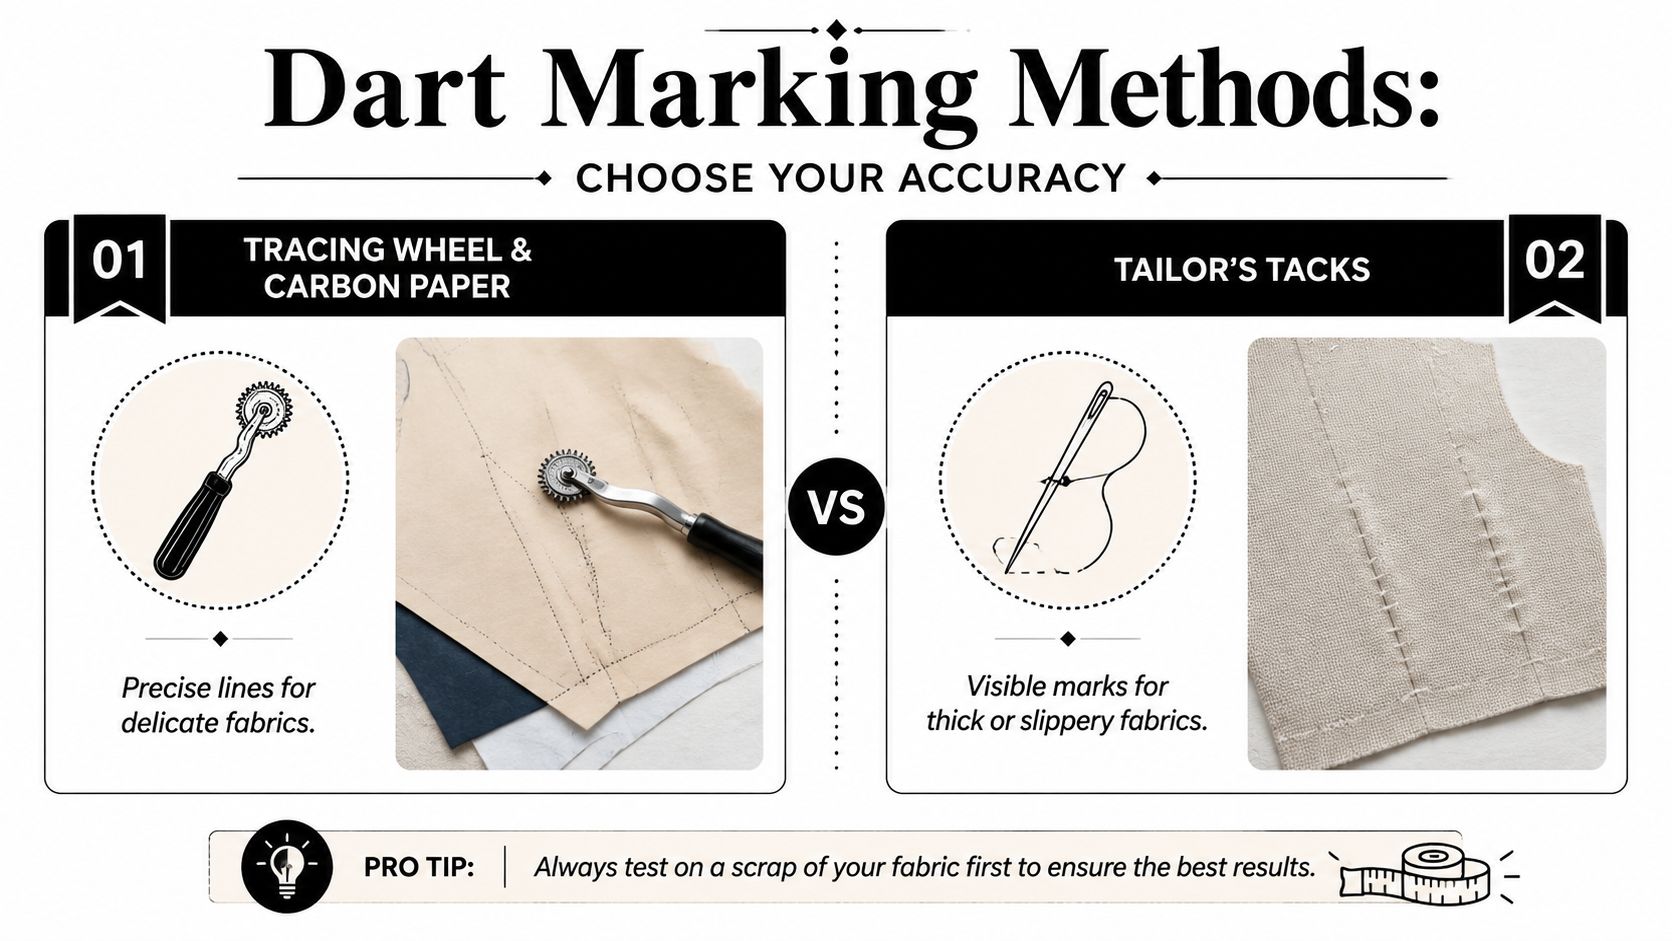
Choose a marking method that suits the fabric
Not every fabric likes the same approach. A crisp cotton lawn is quite forgiving. Silk crepe or velvet isn't.
Here's a practical comparison:
| Method | Best for | Why it helps | Watch out for |
|---|---|---|---|
| Tailor's chalk or chalk pencil | Cotton, linen, stable dressmaking fabrics | Quick and easy to see | Can rub off before you sew |
| Tracing wheel and dressmaker's carbon | Smooth woven fabrics | Gives a clean line through pattern and fabric | Test first so marks don't linger |
| Tailor's tacks | Slippery, textured or delicate fabrics | Very visible and gentle on the cloth | Takes longer |
| Wash-away or air-erase pen | Practice toiles and pale fabrics | Handy for clear points and lines | Always test on a scrap |
| Pins through the dart point and legs | Thick coatings or layered fabric | Useful when surface marking is awkward | Can shift if handled too much |
If I'm helping a beginner with a cotton skirt, I'll often suggest chalk and pins because it's quick and easy to correct. If someone is working on a viscose blouse that shifts around, tailor's tacks or thread tracing are usually calmer and more reliable.
A reliable marking routine
Use one routine each time and your accuracy improves fast.
- Keep the pattern flat on the fabric before marking anything.
- Mark the dart point first so you know exactly where the stitching must taper.
- Transfer both dart legs clearly. These are the lines you'll match together.
- Mark on the wrong side if possible, so you don't risk visible marks on the right side.
- Check the pair. On a blouse front or skirt back, compare left and right pieces before removing the pattern.
A dart can only be as accurate as the lines you sew. If the legs don't match, the point won't finish cleanly.
Small choices that make life easier
A few habits help more than fancy gadgets:
- Use a firm surface so the fabric doesn't ripple while you mark.
- Handle slippery fabric in a single layer if it keeps shifting.
- Leave pins in key points until the dart is under the presser foot.
- Label unusual darts on the wrong side if a pattern has several nearby shaping lines
When students tell me they “can't sew darts neatly”, I often find their issue is that they're trying to sew from faint or inaccurate markings. Clear guides are half the battle.
Mastering the Single-Pointed Dart
You have the blouse front under the presser foot, the dart is pinned, and everything looks fine until the point finishes with a little pucker. That moment catches many home sewists. A single-pointed dart looks simple, but it teaches nearly every habit that gives shaped garments a clean, flattering fit.
You'll see this dart on skirts, dresses, and blouse fronts. It is wide at one end, where fabric is taken in, and it narrows to a point, where the shaping fades away. If you can sew this one neatly, you have the foundation for contour darts, princess shaping, and for solving fit problems such as puckering or a dart point aimed at the wrong spot.
A dart works like a tiny wedge removed from the fabric. Once stitched, that flat cloth starts to curve over the body. On a skirt, that curve helps the waist sit in without collapsing into folds. On a blouse, it gives shape over the bust so the front hangs more smoothly.
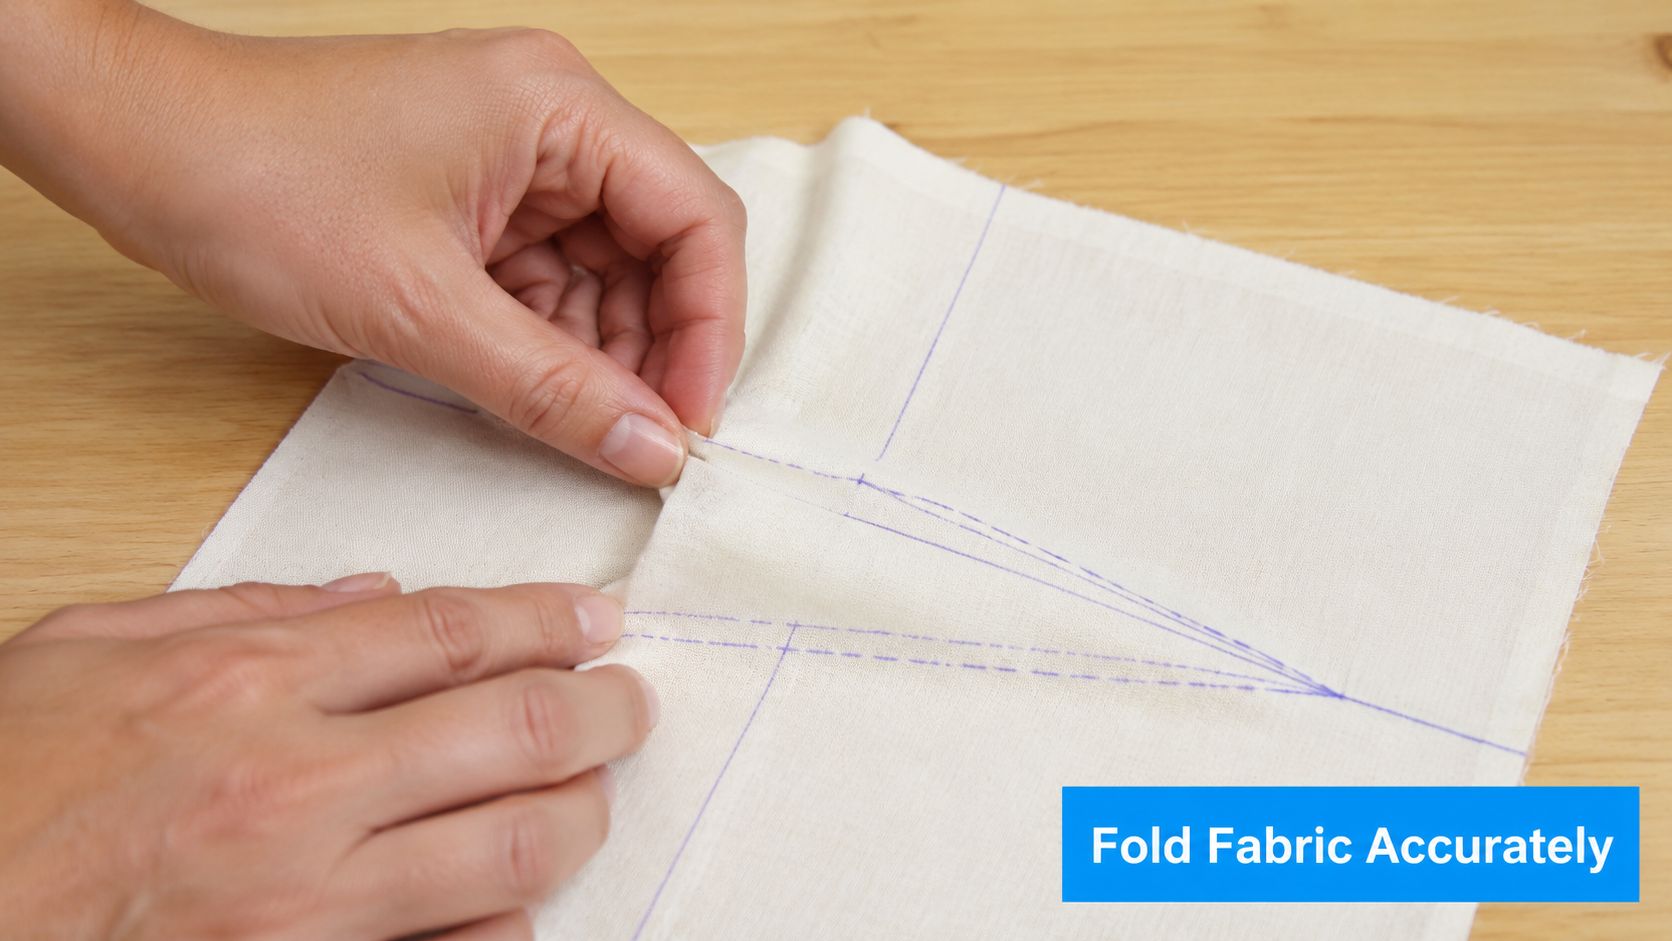
Folding and pinning the dart
Bring the two dart legs together with right sides facing so the marked lines sit exactly on top of each other. The fold should run through the centre of the dart, not drift to one side. If the legs do not match perfectly here, the stitched dart will twist and the point can end up slightly off.
Pin across the dart to hold those lines in place. Many sewists place pins at right angles to the stitching line so they can remove them easily at the machine. If the fabric is slippery, soft, or loosely woven, hand basting is often the calmer choice.
A cotton skirt dart usually behaves well with pins alone. A bust dart in viscose or rayon often behaves much better if you baste first.
How to stitch the dart smoothly
Start at the wide end, right on the marked line, and sew toward the point. That direction matters. It lets the fullness taper away gradually instead of ending with a blunt stop.
Use this sequence:
- Begin at the widest part of the dart on the stitching line
- Sew steadily toward the tip with the fabric folded accurately under the presser foot
- Keep the stitching line smooth rather than making tiny corrections at the last second
- Shorten the stitch length near the point for a softer finish, as shown in WeAllSew's dart tutorial
- Sew off the fold or end at the very tip with long thread tails
- Tie the thread tails by hand instead of backstitching
That last step makes a real difference. Backstitching adds bulk exactly where you want the dart to vanish into the fabric. Hand-tied thread tails keep the tip flatter and reduce the little dimple beginners often notice after pressing.
If your dart ends in a tiny beak, bump, or pucker, check the last inch first.
A good sewing rhythm helps too. Stitch at your normal pace through most of the dart, then slow down as you approach the tip. On a blouse side dart, this gives you better control over where the shaping fades out, which matters because the point sits close to the fullest part of the bust.
Here's a close-up demonstration you can watch before trying your next one:
Where beginners often get confused
The dart point usually does not end exactly on the fullest part of the body. For a bust dart, the stitching typically stops a little before the bust apex so the garment shapes smoothly instead of forming a sharp point. For a skirt waist dart, the point fades out before the fullest part of the hip.
That is why dart placement matters just as much as neat stitching. A beautifully sewn dart in the wrong place can still make a blouse pull oddly or a skirt look lumpy through the waist.
Two everyday examples
Bust dart on a blouse
This usually begins at the side seam and points toward the bust area. Its job is to let the fabric curve over the front of the body instead of straining straight across.
Waist dart on a skirt
This usually starts at the waist and points downward toward the hip. It removes excess width at the waist while leaving enough room where the body needs it.
The sewing method is the same, but the fitting check is different. On a blouse, you are watching where the dart point sits in relation to the bust. On a skirt, you are watching for smooth shaping through the waist and upper hip with no drag lines or bubbling.
Tackling Contour Darts and Princess Seams
Once you're comfortable with a single-pointed dart, the next shapes look much less intimidating. They're built on the same idea. Fabric is being removed or redirected so the garment follows the body more closely.
The main difference is where the shaping sits and how it travels through the garment.
Contour darts
A contour dart, sometimes called a double-pointed dart, is widest in the middle and tapers at both ends. You'll often see it in fitted dresses, jacket backs, and long bodice sections where shaping needs to happen at the waist without creating a sharp take-up at only one end.
You can think of it as two darts joined together.
When sewing one, start at one wide centre area and stitch toward one point. Then go back to the centre and sew toward the other point. Don't try to sew straight from one tip to the other in a single pass. That tends to drag the fabric and makes one end look better than the other.
A few practical notes help:
- Mark the centre clearly because that's your starting area for each pass
- Keep both tapers symmetrical so the shaping feels balanced on the body
- Finish each point gently with thread tails rather than a bulky lock
- Press over a curve so the waist shaping doesn't flatten awkwardly
If you're sewing a sheath dress with back contour darts, check them as a pair before stitching. One slightly longer than the other can throw off the whole centre back line.
Princess seams
A princess seam is often described as an extended dart. Instead of stitching a folded dart into one piece of fabric, you join shaped pieces with a curved seam. The result can be very elegant on bodices, dresses, and fitted tops.
If a dart is like pinching shape out of fabric, a princess seam is like building the shape into the seam lines themselves.
Here's a quick comparison:
| Feature | Contour dart | Princess seam |
|---|---|---|
| Construction | Fold and stitch within one fabric piece | Join two shaped fabric pieces |
| Typical use | Waist shaping in dresses and jackets | Bust and waist shaping in fitted bodices |
| Visual effect | Dart remains visible on inside only | Seam line becomes design feature |
| Main challenge | Even taper at both ends | Sewing and pressing smooth curves |
What stays the same
Even with more advanced shaping, the familiar rules still help:
- Accurate marking matters
- Smooth tapering matters
- Pressing over a shaped support matters
- Fit matters as much as neat stitching
Princess seams often suit sewists who dislike the look of a bust dart ending on the bodice front. Contour darts are excellent when you want shaping without adding extra seam lines. Neither is “better”. They solve the same fitting problem in different ways.
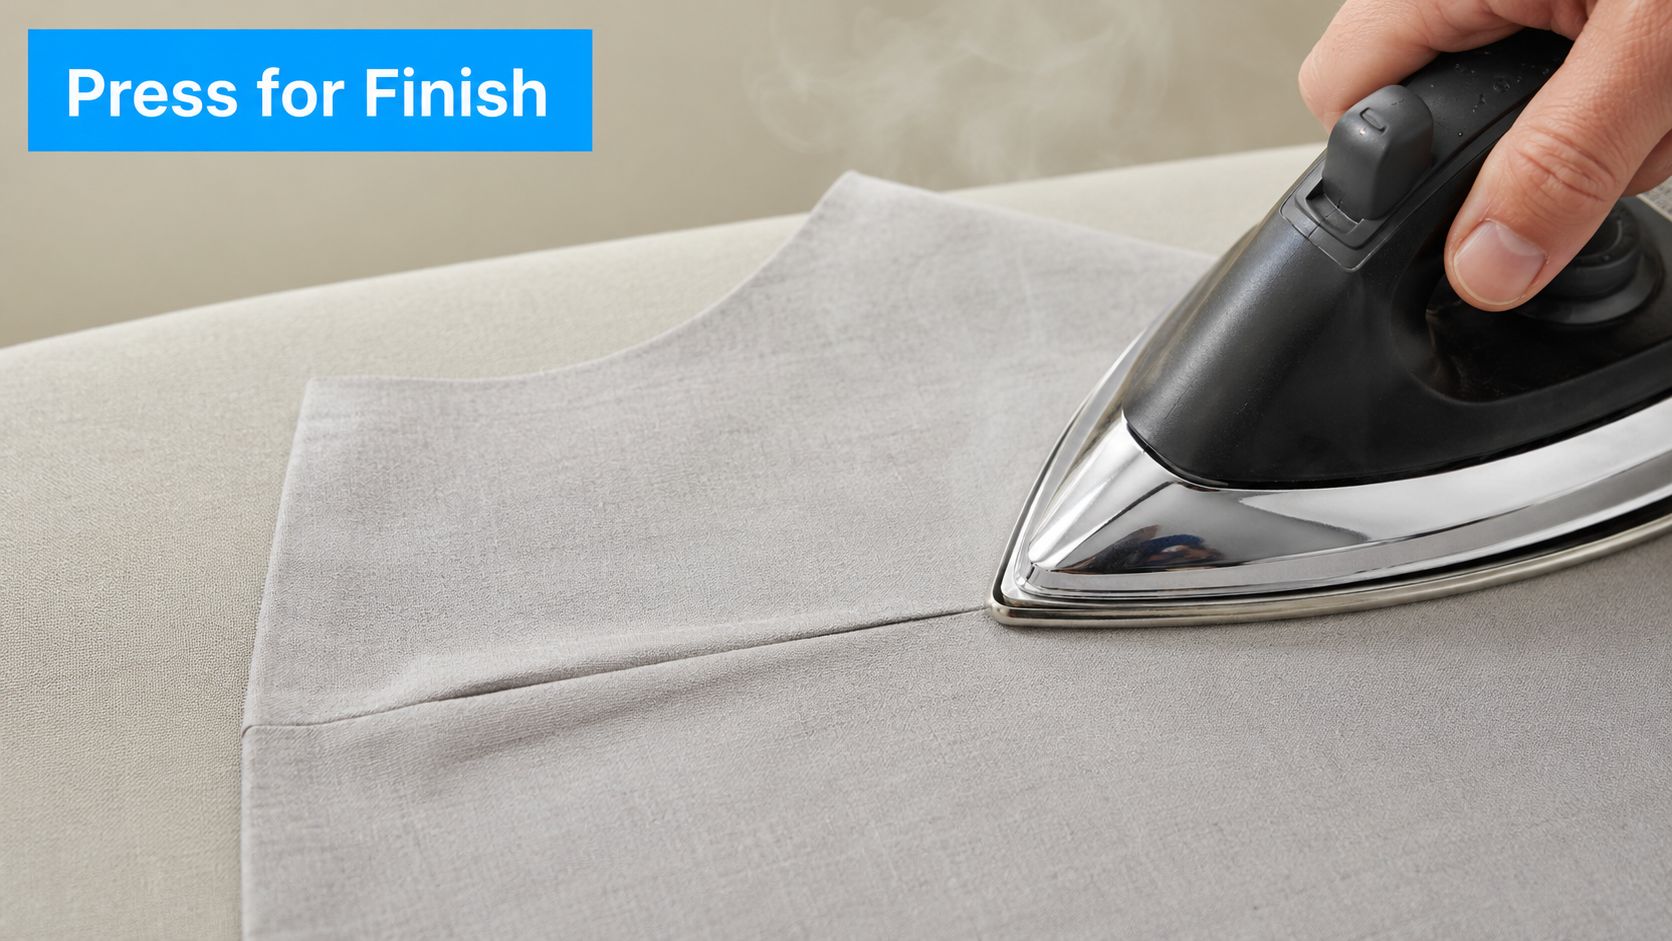
The Art of Pressing for a Professional Finish
You can sew a dart with a neat stitch line, trim every thread, and still end up with a blouse that looks slightly bumpy at the bust or a skirt that sits stiffly at the waist. Pressing is often the step that turns “nicely made” into “that looks ready-to-wear.”
A dart is shaped fabric. Pressing needs to respect that shape.
Why the tailor's ham matters
A flat ironing board is fine for many seams. A dart is different because it creates a mound or hollow to fit the body. Pressing that curve flat can leave a ridge at the fold or a point at the dart tip.
A tailor's ham works like the body inside the garment. It supports the curve while you press, so a bust dart can stay rounded and a contour dart can keep its smooth shape. If you have ever wondered why a dart looked fine in your hands but odd once worn, this is often the missing step.
Place the dart over the curved part of the ham, matching the fullest part of the dart to the fullest part of the ham. Lower the iron and lift it again rather than sliding it about. Heat and a little steam will shape the cloth. Rubbing the iron back and forth can stretch the fabric and blur the clean line you just sewed.
If your fabric marks easily, add a press cloth. A scrap of clean cotton usually does the job.
How to press a dart step by step
Pressing goes more smoothly if you do it in two stages.
- Press the dart as sewn first. Lay it flat, exactly as it came from the machine, and press along the stitching line. This sets the stitches into the fabric.
- Then press it in its final direction. Fold or direct the dart as intended, place it over a ham if it needs shape, and press gently into place.
- Let it cool before moving it. Fabric holds its shape better once it cools, especially wool and other shape-friendly cloths.
That cooling pause is one of those small workshop habits that makes a surprising difference.
Which direction should you press
Pattern instructions come first, especially with fitted garments where several shaping lines must work together. If the pattern does not specify, these rules are a reliable starting point:
- Vertical waist darts are often pressed toward the centre front or centre back
- Bust darts are often pressed downward
- Contour darts should be pressed over a curved support so both ends stay smooth
- Princess seams are usually pressed open or to one side as directed by the pattern, while keeping the curve rounded rather than flattened
For a practical example, skirt back darts usually sit neatly when pressed toward the centre back. On a fitted blouse, a bust dart often looks softer and less bulky when pressed downward. Princess seams need a bit more patience. Press the seam first to set the stitches, then shape the curve over the ham so the bodice cups the body instead of collapsing inward.
Fabric-specific pressing tips
Different fabrics respond in different ways, and darts make that very obvious.
- Fine cotton lawn can go shiny or limp if over-pressed, so use a lighter touch
- Wool blends usually mould beautifully with steam, then hold the shape well as they cool
- Denim and heavy twill may need the dart bulk reduced with grading before pressing
- Silk and viscose benefit from lower heat, a press cloth, and careful handling to avoid water marks or impressions from the seam allowance
If a dart still looks bulky after pressing, the problem is not always your stitching. Thick fabric may need less bulk inside the dart, while a curved dart may need a better pressing surface.
Good pressing helps every dart type. It softens the point of a single dart, keeps a contour dart smooth at both ends, and lets a princess seam keep its sculpted line without looking forced.
Troubleshooting and Adjusting Common Dart Problems
This is the part that saves people the most frustration. A dart can be sewn exactly as instructed and still look wrong on the body. That doesn't always mean your sewing is poor. Often, it means the dart and the body aren't matching each other yet.
A common problem area is dart fitting at the body apex, especially with bust darts. Even when the stitching is technically neat, drag lines or puckers can appear if the dart's size, direction or position isn't right for the wearer, as discussed in Closet Core Patterns' fitting article on sewing darts.
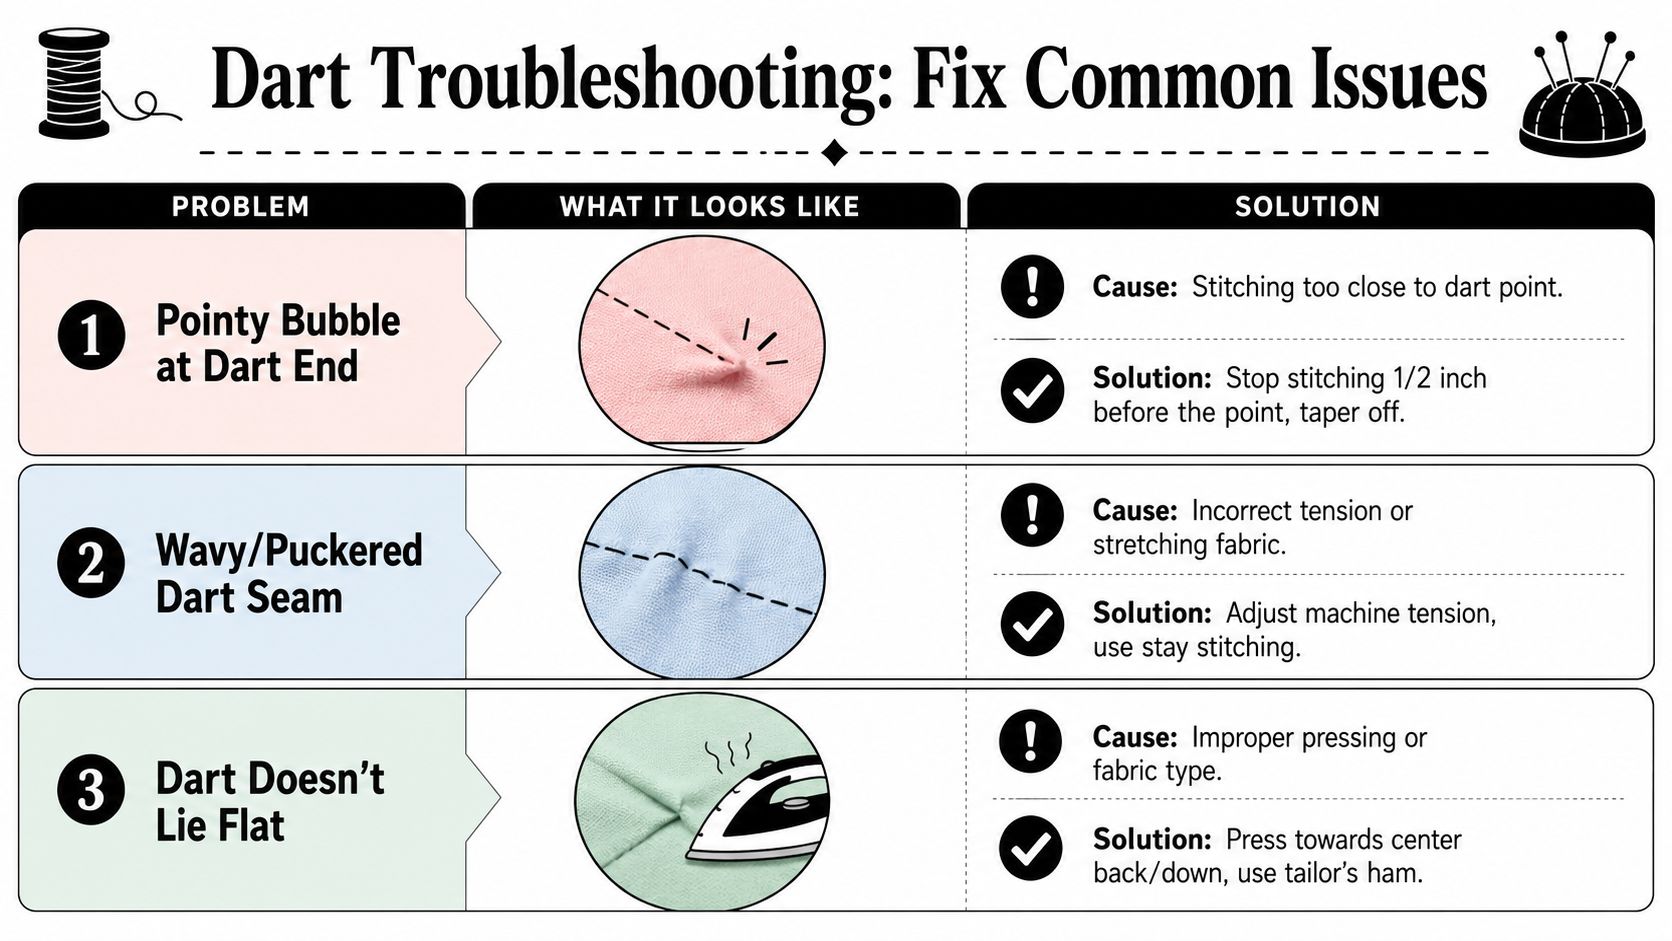
If the dart end looks pointy
This is one of the most common beginner complaints. The blouse fits, but there's a little cone or bubble at the dart tip.
Possible causes:
- Backstitching at the point
- An abrupt taper
- Pressing on a flat board instead of a curved support
Try this fix. Unpick the last part of the dart and resew the end with a gentler taper. Leave thread tails and knot them by hand. Then press over a tailor's ham.
If you see puckers along the dart seam
Puckers can come from stitching too quickly, fabric shifting, or a line that wasn't folded precisely before sewing. Sometimes machine tension plays a part, but frequently it's because the fabric stretched slightly while being fed through.
Check these points:
| Problem | Likely cause | What to do |
|---|---|---|
| Tiny ripples near stitching | Fabric shifted while sewing | Hand baste first on slippery cloth |
| Pucker at the tip only | Dart ended too abruptly | Shorten stitch length near the tip and taper smoothly |
| Whole dart looks strained | Markings didn't match | Re-mark the legs and refold accurately |
If the fabric is soft and mobile, a slower pace often solves more than any machine adjustment.
If drag lines point to the bust or waist
This is the fitting clue many home sewists miss. The dart itself may be neatly stitched, but the garment still pulls or wrinkles toward the dart point.
That usually suggests the dart is not ending in the best place for your shape. On a bust dart, the apex position matters. If the dart points too directly at the fullest part, the result can look sharp and strained. If it ends too far away or aims in the wrong direction, the blouse can collapse or form diagonal drag lines.
Try asking these questions while wearing the toile or garment:
- Does the dart aim at your fullest point or drift above or below it?
- Does the dart finish too close, making the shape too pointy?
- Is the dart too low or too high for your bust level?
- Does one side fit better than the other?
Fit check: If the stitching is tidy but the fabric still pulls, stop blaming the machine and start checking dart placement.
A practical approach is to pin out the dart again while the garment is on the body or on a dress form. Shift the tip slightly, smooth the fabric with your hand, and look at the drag lines. When the lines relax, you've usually found a better position or angle.
If the dart feels too bulky
Heavier fabrics can create a ridge inside the garment, especially at the wide end. In a wool skirt or denim bodice, that bulk may show through on the right side.
Possible fixes include:
- Trimming and grading cautiously if the seam allowance is excessive
- Pressing with a clapper or firm press cloth
- Choosing a princess seam instead on future projects when a very heavy fabric needs shaping
The useful thing about learning how to sew darts properly is that you also learn how to judge them. You start spotting whether the issue is stitching, pressing, or fit. That's when your clothes begin to look and feel much more personal.
If you're ready to practise on a new blouse, skirt or dress, More Sewing is a lovely place to browse fabrics, haberdashery and beginner-friendly dressmaking supplies. A good dart starts with clear markings and cooperative fabric, and having the right cloth and tools makes the whole process much more enjoyable.