Dressmaking, Guides
Sew a Skirt on the Bias: Master the Perfect Drape
You know the skirt. It slips past on someone in the street or catches your eye on a mannequin, and the hem seems to move half a second after the person does. No stiff flare, no obvious shaping, just that liquid drape that makes a simple top look expensive.
A lot of home dressmakers assume a skirt on the bias belongs in the category of “beautiful, but not for me”. I don't think that's true. It can be fiddly, yes. It can also reward care better than almost any straightforward skirt project.
What makes the difference isn't bravery. It's knowing where bias sewing goes wrong in real life. Fabric grows. Waistlines creep. Hems drop unevenly. Deadstock that looked like a bargain suddenly feels far too precious to cut diagonally. Those are the problems worth solving, because they decide whether your finished skirt becomes a wardrobe favourite or a garment that stays on the hanger.
The Allure of the Bias Cut Skirt
A good bias skirt rarely looks complicated, and that's part of its appeal. The cut does the styling for you. Pair it with a knit, a crisp shirt, or a cardigan, and it still keeps that soft line through the hips and hem.

The reason sewists keep coming back to it is simple. A woven fabric, cut at a 45-degree angle to the grain, falls more fluidly and gains a different kind of movement than it has on the straight grain. That technique became a defining part of 1930s fashion in the UK, and it still feels modern because the effect is so clean and body-skimming when it's done well.
Why it feels trickier than it is
Bias has a reputation for misbehaving because it shifts while you cut it, stretches while you sew it, and changes length after hanging. All of that is true. It's also manageable once you stop expecting it to behave like a standard A-line on straight grain.
Practical rule: Treat the fabric as if it will move, because it will. Every smart step in bias sewing is about guiding that movement, not fighting it.
That's why a skirt on the bias is less about rushing through construction and more about making a series of sensible choices. Pick the right cloth. Cut it with support. Stabilise what needs stabilising. Let gravity finish part of the job before you hem it.
What makes a handmade one better
Ready-made bias skirts often disappoint because they're cut too meanly, handled too roughly, or finished before the fabric has settled. A home dressmaker can do better by paying attention to the awkward bits commercial production tends to skip.
That's the pleasure of this project. You're not only sewing a pretty skirt. You're making one that still hangs properly after wear, sits comfortably when you're living in it, and hasn't wasted half your fabric in the process.
Choosing the Right Fabric for Flawless Drape
The fabric decides almost everything. Before pattern choice, before hemming method, before waistband finish. If the cloth doesn't have the right combination of drape, weight and recovery, the skirt will tell on you immediately.
What bias grain actually means
Every woven fabric has a lengthwise grain and a crosswise grain. The bias runs diagonally between them. When you cut on that diagonal, the cloth becomes more fluid and more willing to mould around the body.
That's the magic, but it's also the warning. A firm fabric can turn stiff and odd on the bias, while a very loose fabric can become slippery, clingy or unstable. The sweet spot is a woven with movement, but not so little structure that it collapses.
Bias skirts were already being worn in the 1930s and stayed popular into the 1940s, with period pattern references showing the same basic cut across both decades, as noted in this period-pattern discussion of late-1930s and 1940s bias skirts. That history matters because those garments relied on drape, not bulk.
Fabrics that usually behave well
If you're choosing fabric for your first skirt on the bias, favour cloth that has visible fluidity when you hold it from one corner. If it falls in a soft column rather than sticking out in folds, you're in the right territory.
| Fabric Type | Drape Quality | Sewing Difficulty | Best For |
|---|---|---|---|
| Viscose | Soft and fluid | Moderate, can shift | Everyday bias skirts with good movement |
| Tencel or lyocell | Fluid with a bit of weight | Moderate | Clean, modern skirts with a smooth fall |
| Silk satin | Very fluid with shine | High | Occasion skirts and classic bias glamour |
| Crepe | Soft, slightly textured drape | Moderate | Skirts that need movement without too much cling |
| Slinky jersey | Fluid, stretchy drape | Moderate to high | Casual versions if you already sew knits confidently |
How I'd choose between them
Viscose is often where people start, and for good reason. It gives that lovely swish and doesn't have to look formal. If you want a plain-language primer on how viscose feels, washes and wears, this viscose guide for modern women is useful background before you commit to a dressmaking length.
Tencel and lyocell blends can be excellent for a skirt on the bias because they have weight. Weight helps the skirt fall well. The trade-off is that weight also encourages dropping and stretching, so they reward accurate preparation.
Silk satin gives a special result, but I wouldn't hand it to a nervous beginner. It shows every handling mark, every ripple in stitching, every blunt pin. If you love the look, consider making the pattern first in a less expensive drapey woven.
Crepe is often underrated here. It can be easier to wear than satin because the surface doesn't shout. It also tends to skim rather than flash every contour.
Fabrics that sound right but often disappoint
Some fabrics are lovely in the shop and frustrating at the machine.
- Crisp cottons: They may hold shape better than you want, so the skirt loses that signature liquid line.
- Heavy coatings or dense suiting: Too much body can make the bias feel bulky rather than elegant.
- Loose weaves with poor recovery: These can bag out quickly and never quite come back.
- Very clingy synthetics: They may drape, but they can also grab tights, static up, and exaggerate every seam.
If the fabric only looks good when it's pressed flat on the bolt, it may not be the best candidate. Bias needs a fabric that still looks graceful when it's hanging freely.
A practical buying test
Before cutting into your good fabric, unroll a bit and let it hang off the edge of a table. Scrunch it gently in your hand, then release it. You're looking for two things. First, does it fall nicely? Second, does it recover reasonably, or does it stay rumpled and distorted?
If you're undecided, buy a swatch. For a skirt on the bias, a swatch tells you more than a product description ever will.
Pattern Prep and Economical Fabric Layout
The expensive mistake with bias sewing usually happens before the scissors come out. A lot of advice stops at “place the pattern at 45 degrees”, as if that solves the whole problem. It doesn't. The actual challenge is getting the cut you want without turning half your fabric into odd triangles.
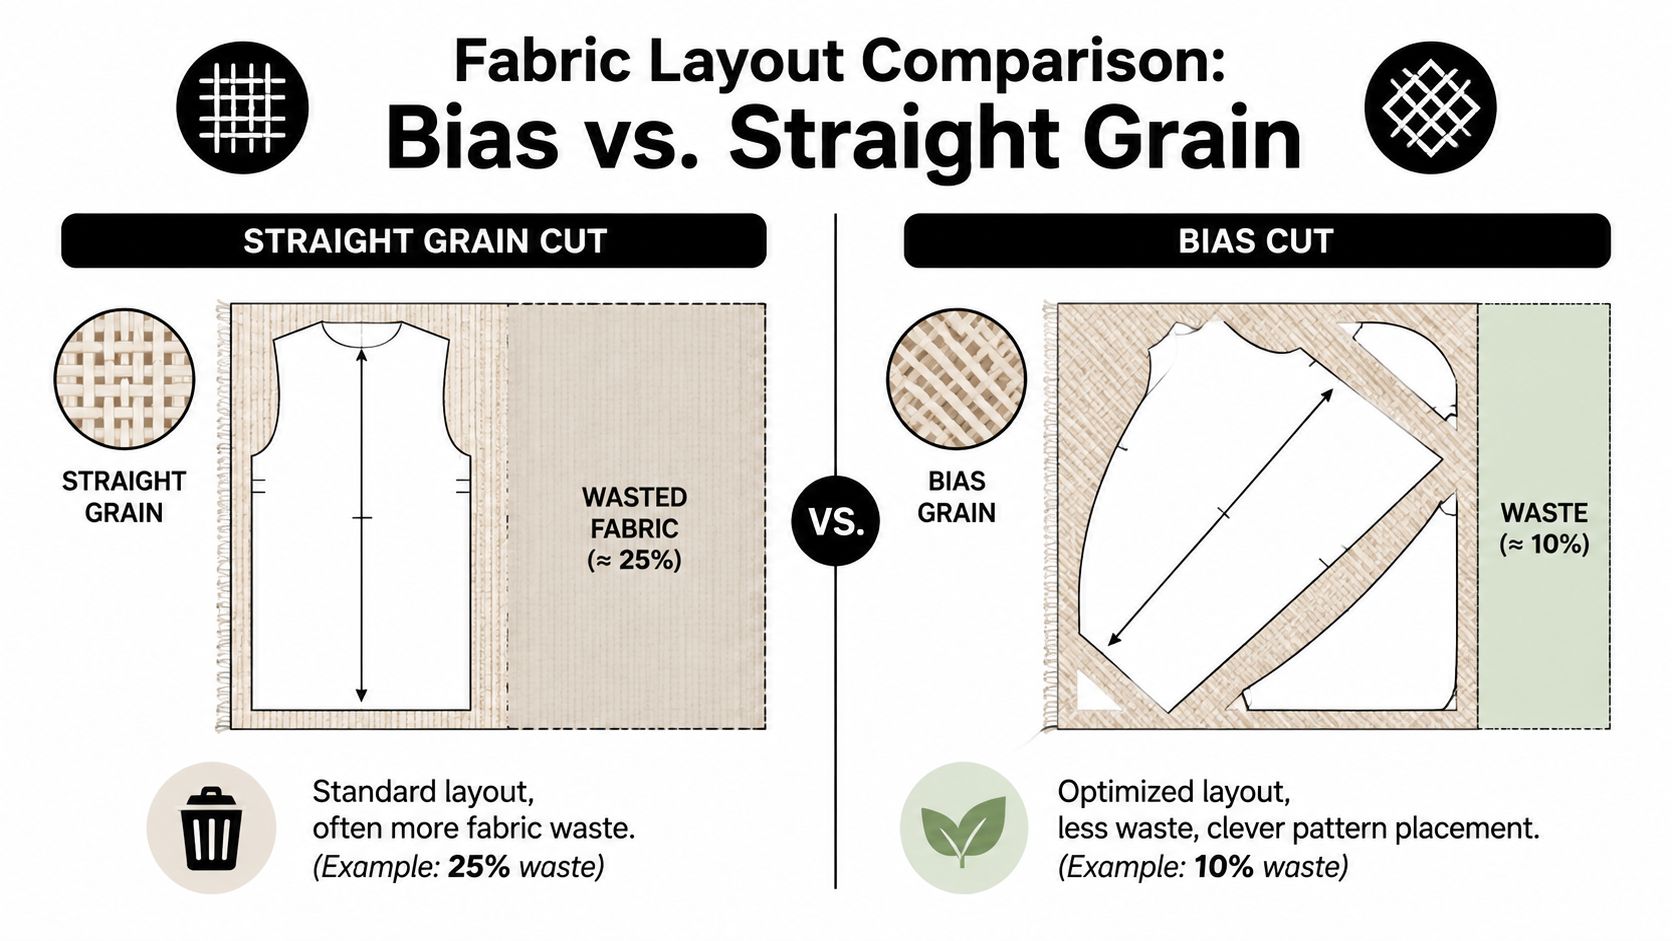
Why layout matters more on bias
Bias cutting uses more fabric than straight grain cutting, and existing advice rarely answers how much extra you'll need or how to re-jig a pattern for narrow or expensive deadstock, as discussed in this sewing discussion on bias layout, waste and body-shape trade-offs. That's why pattern prep deserves more attention than it gets.
When fabric is precious, don't unfold and cut impulsively. Work on paper first. If your pattern has large pieces, trace them so you can move them around without damaging the original. Deadstock often comes in awkward lengths or widths, so flexibility matters.
Smarter ways to save fabric
A few layout habits can make a genuine difference.
- Cut in a single layer: This is slower, but it lets you rotate pieces accurately and nest them more tightly.
- Flip pieces where the design allows: Plain fabrics and non-directional prints give you more freedom than obvious one-way motifs.
- Check whether a seam is worth keeping: Extra panels may help fitting on a straight-grain skirt, but they can interrupt drape on bias and consume more cloth.
- Make a paper mock layout first: Brown paper, pattern paper or even newspaper taped together can save a costly cutting error.
Don't assume bias flatters everyone in the same way
Bias is elegant. It is not automatically kind to every preference or every body shape. Some sewists find it too clingy through the hip and thigh, especially if the pattern relies on lots of shaping seams or darts to force a fit.
In many cases, fewer seams give a better result. The fabric can drape as intended instead of being interrupted by over-engineering. If you're fuller through the hips and want a cleaner line, try evaluating side-seam shape first before reaching for darts.
More shaping isn't always better on the bias. Sometimes the prettiest fit comes from leaving the fabric enough freedom to fall.
A practical pattern check before cutting
Run through this before you commit:
Look at seam count
A skirt with fewer panels is often easier to cut economically and may drape more cleanly.Check print direction
Directional florals, nap, stripes and obvious diagonals reduce your layout options fast.Decide your compromise early
If the fabric is narrow or limited, ask whether a shorter hem, a simpler waistband or a different skirt style would use the cloth better.Think realistically about wearability
If you already know you dislike cling, choose a pattern with ease through the lower body instead of trying to “fix” it after cutting.
The economical way to make a skirt on the bias isn't squeezing the impossible from too little fabric. It's matching the pattern to the cloth before you start.
Cutting and Assembling Your Bias Skirt
Cutting bias fabric neatly feels more like handling pastry than handling calico. It wants support, it dislikes being tugged, and it shows every rough movement. The calmer you are here, the better the sewing goes later.
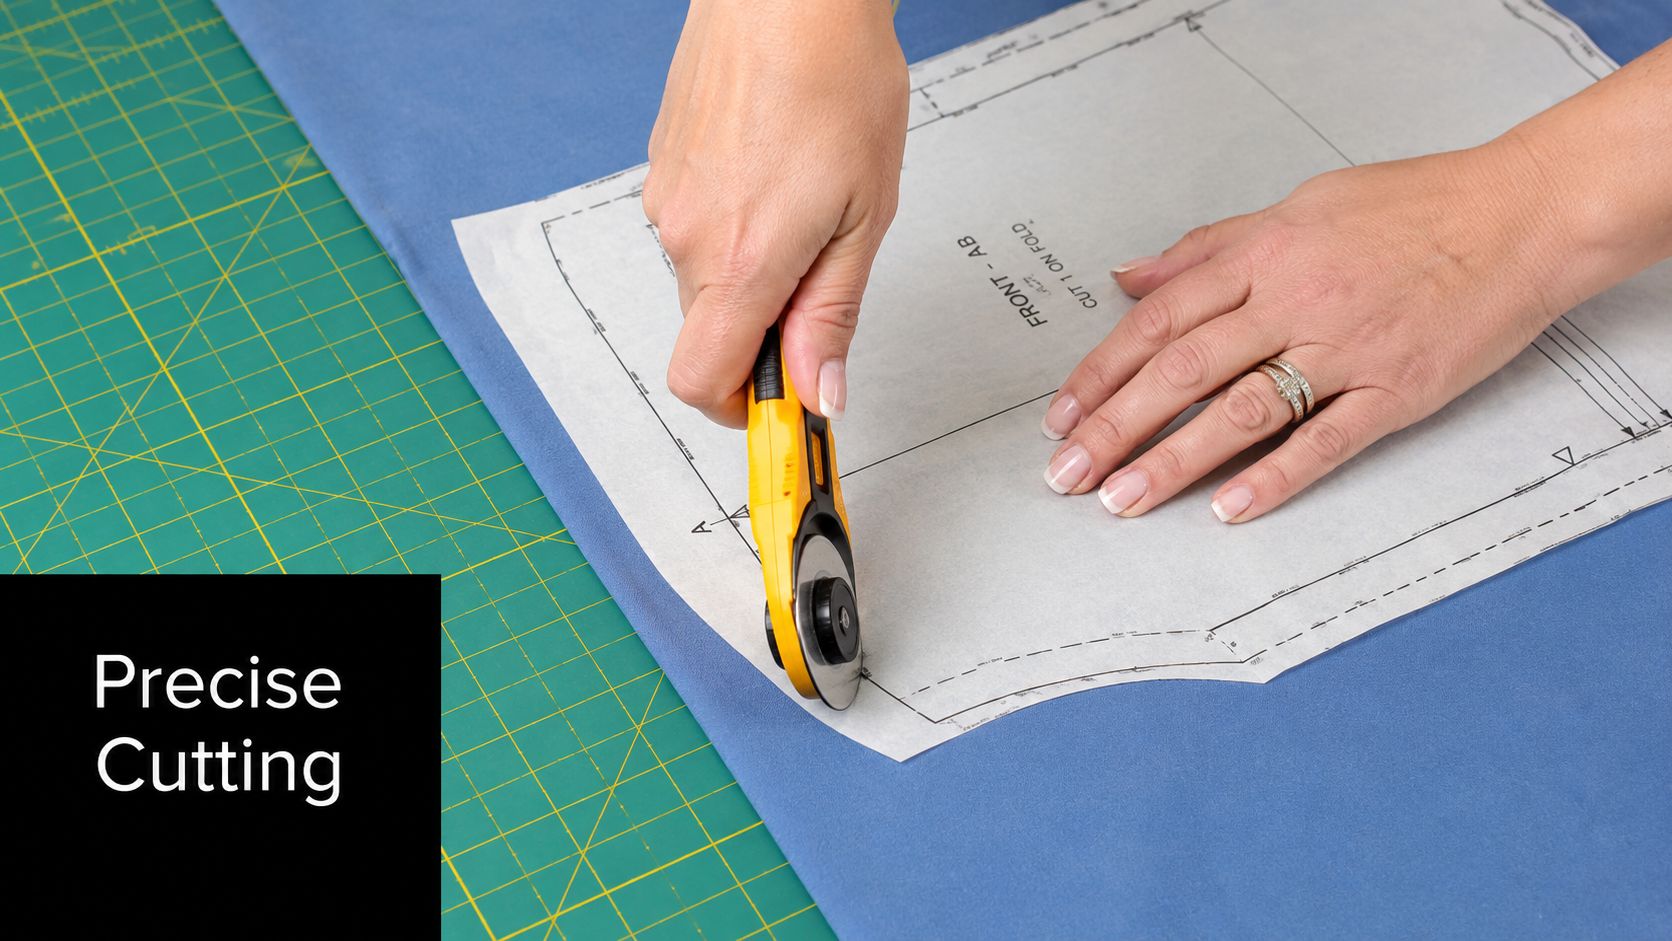
How to cut without distortion
Use a large flat surface if you can. Lay the fabric in a single layer, let it rest, and avoid lifting it repeatedly to “improve” the position. Bias edges distort with too much handling.
My preferred setup is pattern weights, a rotary cutter and a cutting mat. Pins can work, but weights usually distort delicate drapey fabrics less. If the fabric keeps creeping, step away for a minute and smooth it again rather than forcing it into place.
A few practical choices help:
- Fine, sharp tools: A fresh rotary blade or very sharp shears matter more on bias than on stable cotton.
- Appropriate needle: A Microtex needle is a sensible choice for tightly woven, slippery fabrics such as silk or satin.
- Gentle handling: Don't let cut pieces dangle off the table for long before sewing.
Construction details that are worth following
True bias often makes a garment narrower and tighter in wear, so hip and seat measurements should be checked while seated, not only standing. Technical fitting guidance also recommends adding enough ease for a bit of “squish factor”, plus staystitching 1.3 cm from the top edge, using a 7 mm seam allowance on side seams, and cutting elastic to waist size with a 2.5 cm overlap reduction for a stable finish, according to this Threads fitting discussion on changing a straight skirt to bias.
That seated check matters more than many sewists realise. A skirt that looks sleek in front of the mirror can feel restrictive the second you sit down for lunch, drive, or climb stairs.
A sewing order that keeps things under control
Staystitch first
As soon as the pieces are cut, stabilise the top edge. This is not optional. It stops the waist from lengthening before you've even attached a waistband.Sew seams without stretching
Guide the fabric through the machine. Don't pull from the front or back. Let the feed dogs do the work.Choose a seam finish to suit the cloth
French seams are lovely in lightweight silks and satins. Overlocking works well when you want a quicker finish or your fabric frays badly.Press carefully
Lift and place the iron rather than dragging it. Dragging can ripple a seam before you've even worn the skirt.
If you'd like a visual walkthrough of handling and assembly, this demonstration is a helpful companion once your pieces are cut:
Waist finishes that work
An elastic waist can be excellent on a bias skirt because it allows movement and forgives the fabric's natural give. A clean waistband can also work, but only if the top edge has been stabilised properly and the fit has been checked in real life, not just standing still in a fitting room pose.
If your waist starts creeping or twisting after the first wear, the issue is usually overfitting at the top combined with ignored bias stretch. In other words, the skirt was asked to stay rigid where the fabric wanted to move.
The 24-Hour Hang for a Perfect Hem
This is the step that separates a homemade-looking bias skirt from one that hangs beautifully. Once assembled, the skirt needs time to relax under its own weight before you level the hem.
Why the hem drops
The bias cut became such a defining technique because fabric cut at 45 degrees gains fluidity, but that same structure is unstable. The cloth stretches and drops under gravity. That's why UK-facing sewing instructions commonly recommend waiting 12 to 24 hours before levelling the hem, as explained in this sewing guide on bias-skirt hemming and hanging.
If you hem too soon, the skirt often looks fine on the table and uneven on the body. One area has dropped more than another, and the hemline tells the story immediately.
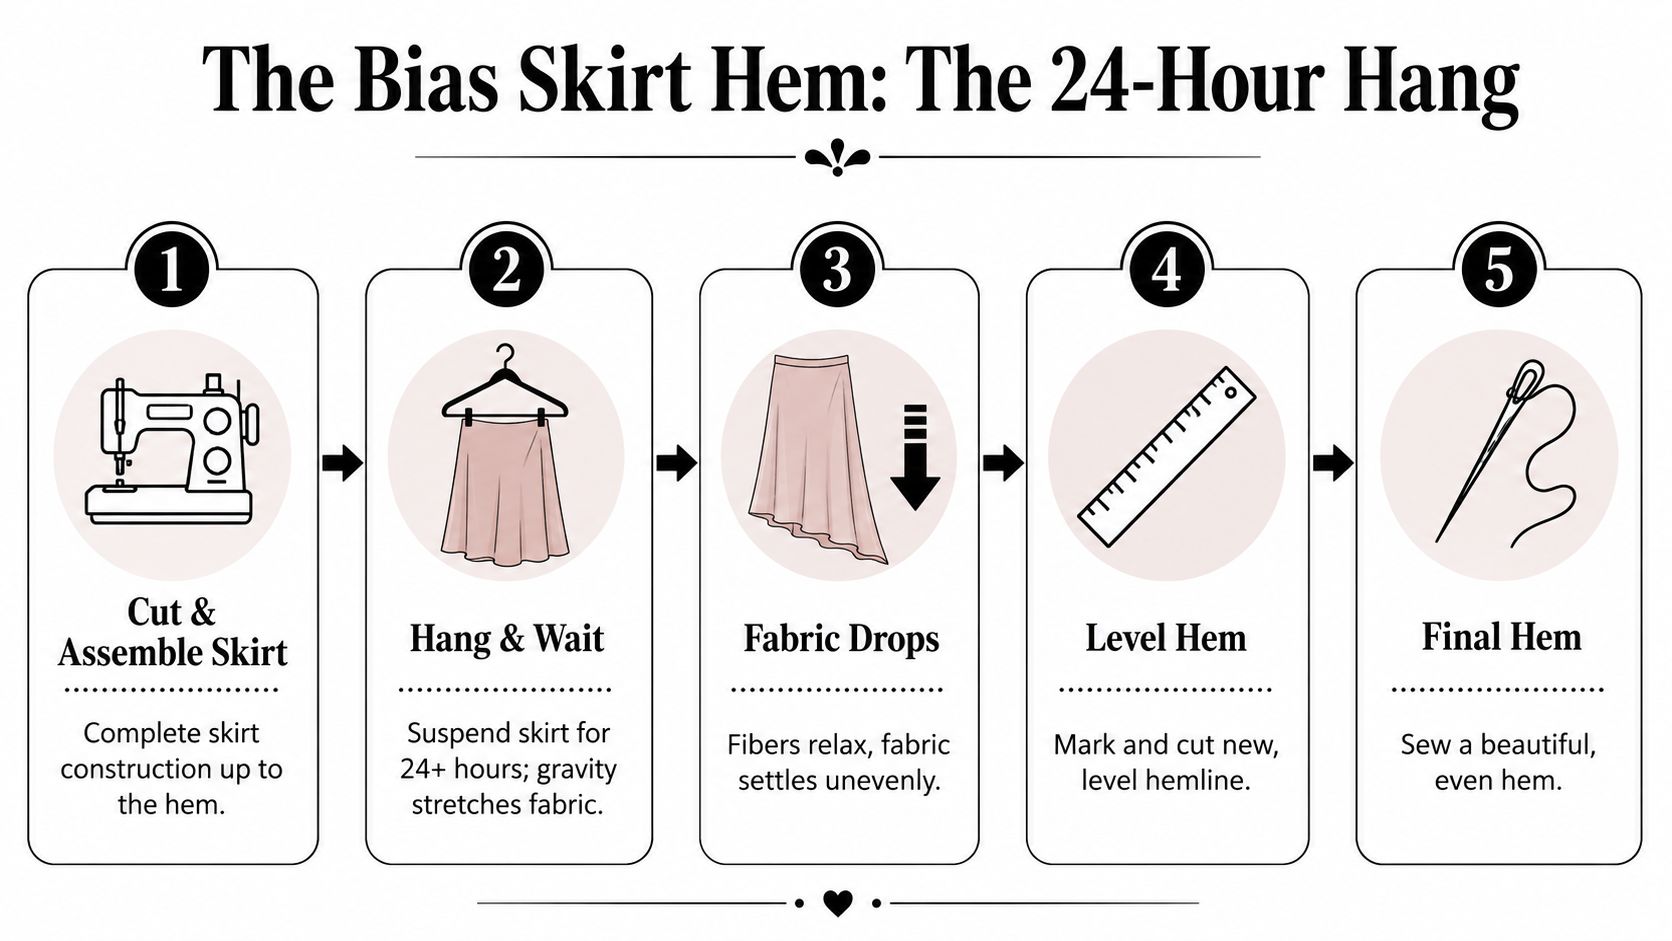
How to hang it properly
Hang the skirt from its most stable point, usually the waistband. Don't drape it over a chair. Don't clip it haphazardly from the side seam. Let gravity act evenly.
A few habits help here:
- Use a proper hanger: Support the waist evenly so the skirt doesn't twist while hanging.
- Leave enough space around it: If it's crushed against other garments, it won't settle cleanly.
- Resist the urge to keep checking: Every time you handle it, you introduce fresh distortion.
Leave the skirt alone long enough for the fabric to show you where it wants to be.
Levelling and hemming without a fight
Once the hanging time is up, put the skirt on the wearer if possible. A friend can mark from the floor up, or you can use a skirt marker. Trim carefully. Don't aim for speed here.
Then choose a hem finish that suits the fabric.
- Narrow rolled hem: Best on very light fabrics where a heavier fold would show.
- Machine-turned narrow hem: Practical for many everyday viscose or crepe skirts.
- Hand-finished hem: Worth considering if the fabric is delicate and every machine stitch shows.
What doesn't work well
Deep hems often fight the drape. Heavy fusible products can leave ridges. Pressing too hard can flatten the life out of the lower edge. If a hem starts waving, it's often because too much fabric was forced into too little space, or because the edge was handled roughly before it had settled.
Patience feels old-fashioned here, but it works. On a bias skirt, the clock is one of your tools.
Fitting Final Touches and Long-Term Care
The sewing may be finished, but the success of a skirt on the bias is really decided in wear. Does it still hang nicely after sitting through dinner? Does it recover after washing? Does the seat stay smooth, or does it bag out by lunchtime? Those are the questions many tutorials never answer.
Fit it for a real day, not a fitting-room moment
Bias garments often feel different after an hour than they do at the mirror. That's why I like to test the finished skirt properly. Sit down. Walk up stairs. Stand up again. If the skirt pulls hard across the seat or twists around the body, something is off.
Fabric choice plays straight into this. A frequently under-answered issue with bias-cut garments is how to stop them stretching out of shape during wear and after washing, particularly in drapey fabrics such as viscose and Tencel, which can grow several centimetres, as noted in this Bernina sew-along discussion of bias-skirt wear and maintenance.
How to reduce bagging and growth
You won't eliminate movement entirely, and you shouldn't want to. Bias is meant to move. The aim is controlled movement.
- Choose fabric with some recovery: Drape alone isn't enough if the cloth never springs back.
- Consider a lining when the outer fabric is very unstable: It can help the skirt skim better and reduce clinging.
- Avoid overhandling in laundering: Cool, gentle washing is kinder to fibres that already like to grow.
- Store with care: Folding is often safer than long-term hanging for a bias skirt, especially in heavier drapey fabrics.
A bias skirt that lives on a hanger for months may lengthen in places you never intended. Store it as thoughtfully as you made it.
A quick troubleshooting checklist
If the skirt isn't behaving, diagnose before unpicking everything.
Twisted side seams
The fabric may have shifted during cutting or pressing. Check whether one seam was stretched more than the other.
Waistline creep
The top edge may not have been stabilised enough, or the waist was fitted too tightly for a fabric that needs to move.
Bubbly hem
Usually a sign that the hem was finished before the skirt had fully dropped, or that the hem allowance is too bulky for the cloth.
Bagging at seat or knees
Often fabric-related. Some cloths relax more in wear, especially if they're soft and heavily draped.
If the fix is beyond your confidence, a skilled alterations specialist can rescue a lot. For readers who need professional help rather than a home workaround, expert Gold Coast alterations offer the kind of finishing and adjustment support that's useful when a favourite garment needs refining rather than replacing.
A well-made bias skirt becomes one of those pieces you keep reaching for. It feels easy, but it never looks careless. That's why the extra thought at the fitting and care stage is worth it.
If you're ready to make your own skirt on the bias, More Sewing is a strong place to start for quality dressmaking fabrics, deadstock finds, haberdashery and practical supplies that make this kind of project far more enjoyable.