Dressmaking, Guides
How to Sew Invisible Zip: A Perfect Finish Every Time
You finish the dress, skirt, or top, hold it up, and there it is. The zip sits proud of the seam, the stitching shows, the waist seam doesn’t quite match, or the fabric has gone faintly wavy. It’s one of the most common moments in dressmaking. The garment is lovely, but the fastening gives away the struggle.
That’s why learning how to sew invisible zip properly changes the look of your sewing so quickly. A neat invisible zip doesn’t just close a garment. It lets the fabric and fit take centre stage. No clunky teeth, no obvious topstitching, no bumpy finish running down the back of a handmade piece you’ve spent hours making.
The good news is that invisible zips are far less mysterious than they seem. They reward careful preparation much more than bravery. If you can sew an accurate seam and press precisely, you can sew an invisible zip well. And if the first attempt goes wrong, it’s usually fixable.
The Secret to a Professional Handmade Wardrobe
A visible zip can look perfectly fine on the right project. On a casual skirt, a sturdy denim make, or a utility-style dress, it can even be part of the design. But when you want a clean back seam on a party dress, a polished side opening on a skirt, or a refined finish on a fitted bodice, an invisible zip does a different job.
It disappears into the seam. That’s the whole appeal.
Most sewists hit a rough patch with them early on. The first side goes in well, the second side shifts. Or the zip closes, but the seam line sits slightly offset at the waist. Sometimes the coils weren’t pressed open enough, so the stitching sits too far away and the zip becomes visible from the outside. None of that means you’re bad at zips. It usually means one small preparatory step was skipped.
Practical rule: An invisible zip is a pressing job and a positioning job before it’s a sewing job.
That’s the mental shift that makes the technique feel manageable. Instead of seeing the zip as a fiddly finishing step, treat it as part of the garment’s structure. Stabilise the seam, mark your seam allowances, line up the key points, and sew close enough to the coil for the zip to vanish into the seam.
The payoff is huge. A handmade garment with a smooth invisible zip looks sharper, hangs better, and feels more deliberate. It’s one of those techniques people notice without knowing why. They register that the garment looks clean and expensive.
If you’ve avoided invisible zips because they seem unforgiving, this is the point to drop that idea. They’re precise, yes. Unforgiving, no. With the right method, they become repeatable.
Gathering Your Supplies for Zipper Success
A good result starts before the machine is threaded. The supplies matter, but the matching matters more. The right zip in the wrong fabric, or the right fabric with no stabilising, can still give you a disappointing finish.
Choose the zip with the garment in mind
Invisible zips come in different lengths, weights, and colours. Pick the length that suits the opening, not just the one you already have in the drawer. Too short, and dressing becomes awkward. Too long, and you’ll need to manage extra tape neatly.
Colour matters more than many beginners expect. Even when the zip is properly inserted, the pull and top edge may still show slightly at the opening. Match the zip to the fabric as closely as you can.
Look at these basics before you start:
- Zip length: Match it to the pattern opening and the body movement the garment needs.
- Zip quality: A smooth-running zip is easier to install accurately than one that catches or twists.
- Tape softness: A very stiff tape can fight lightweight fabrics.
- Pull size: Bulkier pulls can feel clumsy at the top edge of fine garments.
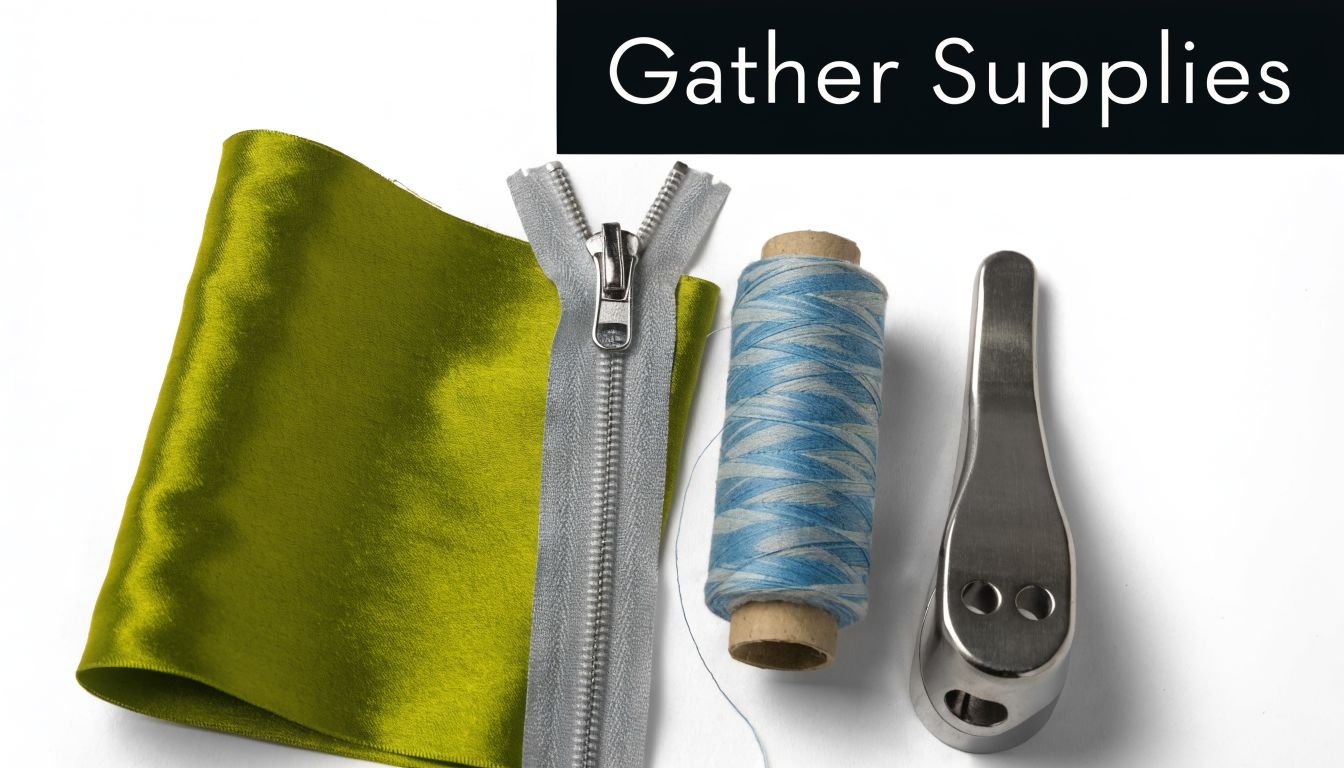
The tools that make the job easier
You can technically insert an invisible zip without a dedicated invisible zipper foot, but I wouldn’t recommend making life harder. That foot is shaped to guide the coils while you stitch very close to them. That closeness is what creates the “invisible” effect.
Set out the following before you begin:
- Invisible zipper foot: This is the key tool. It helps the machine stitch close to the coil without riding over it.
- Regular zipper foot or standard presser foot: You’ll need this for sewing the seam below the zip.
- Fine pins or clips: Useful for accurate placement, especially at seam intersections.
- Iron and pressing surface: Pressing is part of the construction, not an optional tidy-up at the end.
- Seam ripper: Keep it nearby. Even experienced dressmakers use one.
- Marking tool: A removable pen or chalk helps with seam allowances and matching points.
- Interfacing or stabiliser: Particularly important on fabrics that shift or stretch.
Match the preparation to the fabric
Many tutorials fall short here. Fabric type changes everything.
UK home dressmakers working with premium jersey blends, viscose, and Tencel often find that these fabrics shift during stitching, which leads to puckering or misaligned teeth. Stabilisation and suitable interfacing make a real difference, as noted in the More Sewing blog on fabrics and sewing.
A simple way to think about it is this:
| Fabric type | Main risk | Best preparation |
|---|---|---|
| Viscose or Tencel | Slipping, growing, rippling at seam | Lightweight fusible along seam allowance |
| Jersey or knit | Stretching out, zip waviness | Knit interfacing or stabilising strip |
| Cotton lawn or poplin | Usually manageable, but can still pucker | Light stabiliser if the fabric is soft |
| Delicate synthetics | Heat sensitivity and drag | Test pressing first, use light support |
Press and fuse before the zip goes anywhere near the seam. Trying to rescue unstable fabric halfway through rarely works well.
Small choices that prevent bigger problems
Thread and needle choice matter too, though the “best” combination depends on the fabric. For a stable woven, a standard fine dressmaking needle often works well. For jerseys, use a needle suited to knits so you don't damage the fabric while stitching.
If you're unsure whether your setup is balanced, test on scraps cut on the same grain as the garment seam. Include the zip tape in that test. Sewing into scrap fabric alone doesn't tell you how the machine will behave once the zipper coils and tape are involved.
That little rehearsal saves far more frustration than it costs.
The Machine-Sewn Method for a Flawless Invisible Zip
The method below is the one I'd hand to any sewist who wants reliable results. It's tidy, repeatable, and works well on most dressmaking fabrics when the seam has been stabilised properly.
Professional UK sewing commonly uses a 1.5cm seam allowance for invisible zips, and pressing the zipper coils away from the tape before stitching close to the coil is central to a clean finish, as shown in Maven Patterns' invisible zip guide.
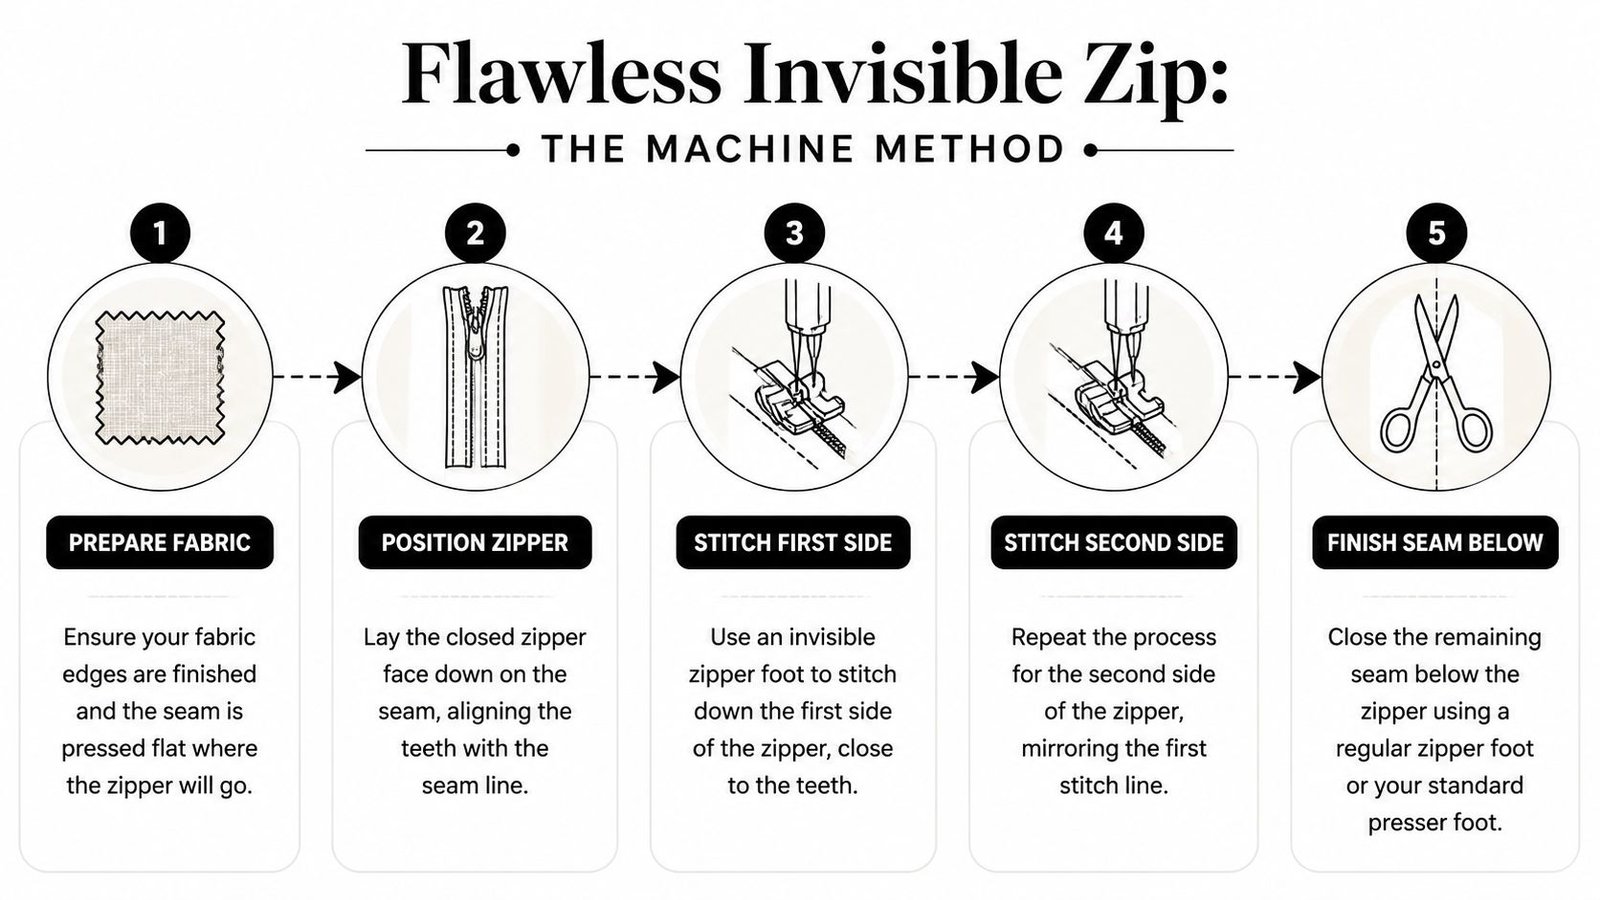
Prepare the garment and the zip
Finish the raw edges of the seam where the zip will be inserted. Then press the seam area flat. If the fabric is unstable, apply your interfacing or seam stabiliser first.
Now prepare the zip itself. Open it fully and gently press the coils away from the tape using a synthetic setting. The aim is to uncurl the coil enough that the machine can stitch right beside it. Don't linger with the iron. You want the coils opened out, not damaged.
Mark the top seam allowance on both sides of the garment. If your garment has a waist seam, yoke seam, or any horizontal seam that must match, mark that point clearly on both fabric pieces and on both sides of the zip tape.
If you skip matching marks, you're relying on guesswork. Guesswork is why one waist seam ends up higher than the other.
Stitch the first side
Place the first garment piece right side up. Lay the open zip right side down on the fabric so the coil sits exactly on the seam line and the top stop sits below the seam allowance at the top edge.
Pin it in place, keeping the tape flat and the fabric smooth. Avoid stretching the fabric to “help” it fit. Let the seam edge and the tape sit naturally.
Attach the invisible zipper foot. Stitch from the top down using a stitch length in the 2.0 to 2.5 range. Keep the foot guiding the coil so you sew very close to it. Stitch down to the zipper stop, then backstitch neatly.
A quick visual tutorial can help if you like seeing the order of operations before sewing:
Secure the second side without twisting
This is the side that catches people out. Lay the second garment piece right side up, then position the other side of the zip right side down against it. Double-check that the top edges match and that any seamlines line up.
Before you sew, close the zip mentally in your head and make sure the fabric won't twist once opened out. This sounds obvious, but many mis-inserted zips come from rushing this check.
For anyone still building confidence with precision work, practising mastering basic hand sewing skills can help your control when pinning, basting, and handling fiddly seam areas. Invisible zips are machine sewn most of the time, but neat hand-basting habits improve the result.
Sew the second side from the top down in the same way, keeping the stitching line close to the coil. Try not to stop and start unless you need to. A smooth, continuous seam tends to sit flatter.
Close the seam below the zip
Once both sides are stitched, close the zip and check the front. If the seam matches and the zip disappears well, turn the garment wrong side out again.
Switch to a regular zipper foot or your standard presser foot. Pull the loose end of the zip tape out of the way and stitch the seam below the zip, starting as close as possible to the end of the zip stitching. Aim to overlap neatly so there isn't a little bubble or gap at the base.
This part often decides whether the finish looks homemade or refined.
A clean sequence looks like this:
- Check before sewing: Close the zip first and inspect the outside.
- Start high enough: Begin the lower seam close to the last zipper stitches so there's no break in the line.
- Press after stitching: Press the seam open or to the chosen side without crushing the zip area.
Final pressing and inspection
Press the seam carefully from the wrong side first. Then close the zip and give the area a light final press from the right side if the fabric allows. Use a pressing cloth on delicate fabrics.
Run through this checklist:
| Check | What you want to see |
|---|---|
| Top edge | Even on both sides |
| Seam matching | Waist or style seams align |
| Zip visibility | Minimal to none from the outside |
| Base of zip | No bump, gap, or drag line |
| Movement | Zip opens and closes smoothly |
If one side looks slightly more visible than the other, it usually means the stitching line drifted a fraction too far from the coil. That's fixable, and the repair method is worth knowing.
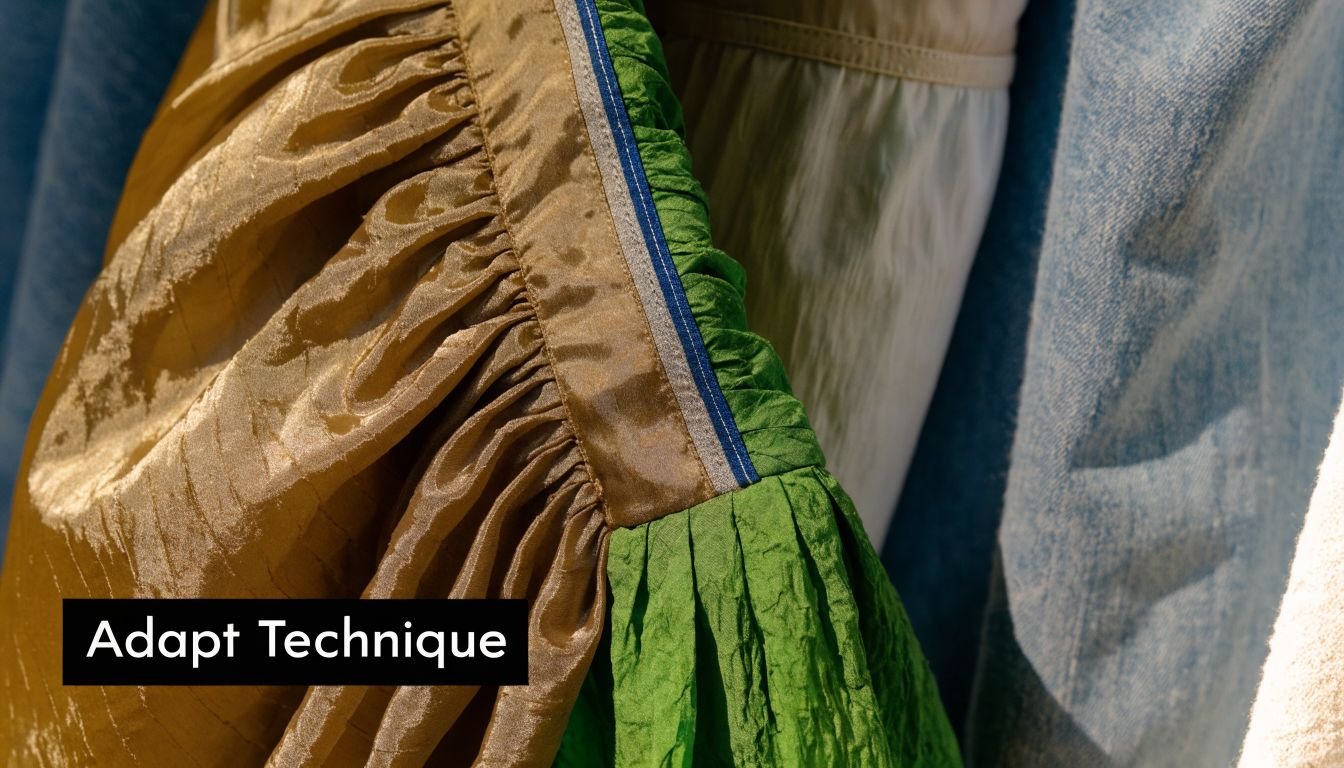
Adapting the Technique for Linings and Skirts
Once you can insert an invisible zip into a plain seam, the next challenge is garment construction. Linings, waistbands, vents, and delicate fabrics all ask for slight adjustments. The core principle stays the same, but the order of assembly changes.
Working with a lining
For a lined bodice or dress, sew the invisible zip into the outer garment first. Keep the lining free until the zip is secure and the outer layer sits correctly. If you try to catch everything at once, bulk and shifting make accuracy harder.
Then attach the lining by folding its seam allowance under and securing it neatly by hand around the zip tape. This gives you a clean inside finish with no obvious machine stitching around the opening.
This approach works especially well on fitted party dresses and sleeveless bodices where the inside matters almost as much as the outside.
- Outer first: Get the structural zip insertion right before enclosing anything.
- Grade the layers: Trim bulk where needed so the top edge doesn't feel thick.
- Hand-finish the lining: A careful slip stitch often looks better than forcing a machine finish.
Inserting into skirts with a vent or split
A skirt with a back vent needs a little planning at the lower end of the zip. The zip should end cleanly above the vent opening, with the seam below finished so the transition looks intentional.
Sew the invisible zip as usual down to the point where the closed seam will begin. Then sew the lower seam, stopping where the vent starts. Press the vent carefully so the opening sits flat and doesn't drag the zip area off line.
A useful habit is to mark the vent start and the zip end separately. They aren't the same thing in every pattern, and confusion there creates messy finishes.
A hand-sewn option for delicate fabrics
Some fabrics don't enjoy repeated machine handling. Silk-like cloths, pile fabrics, and very delicate dress fabrics can behave better when parts of the job are done by hand.
A hand-sewn invisible zip isn't usually my first choice, but it can be the right one when:
- The fabric marks easily: Multiple machine passes leave tracks.
- The pile shifts: Velvet and similar fabrics can crawl under the foot.
- You need more control: Hand stitching lets you ease tiny areas gradually.
Use a fine needle and small, neat stitches close to the coil, catching the tape securely without letting stitches show through to the right side. It takes longer, but the control can be worth it.
Slow work is often the fastest way to save a difficult fabric.
Troubleshooting and Fixing Common Zipper Mistakes
The best invisible zip tutorial in the world won't stop mistakes from happening. Fabric moves. Marks slip. A seam gets slightly off. What matters is knowing which problems are cosmetic, which are structural, and how to put them right without chewing up the garment.
According to a 2024 survey, home dressmakers reported a 78% first-try success rate when they basted the second side of an invisible zipper before final stitching, which helped avoid mismatched waist marks, according to Bethany Lynne Makes' invisible zipper article. That tells you something useful straight away. A lot of zip problems come from trying to sew the second side “live” without a trial hold.
Problem solving by symptom
Use the finished garment to diagnose what went wrong. The symptom usually points to the cause.
| Problem | Likely cause | Fix |
|---|---|---|
| Zip looks visible from outside | Stitching was too far from the coil | Unpick and resew closer to the coil |
| Seamlines don't match | Second side shifted during pinning or sewing | Re-mark match points and baste before stitching |
| Fabric is wavy beside zip | Fabric stretched or lacked stabilising | Remove, stabilise seam allowance, resew without stretching |
| Bump at base of zip | Lower seam didn't meet zip stitching neatly | Restitch lower seam closer to zip end |
| Zip catches in fabric | Tape or seam allowance is interfering | Trim, press, and resew if necessary |
Wavy or puckered zip
This is common with viscose, jersey, and soft blends. The fabric stretches slightly as you sew, while the zip tape stays firm. The result is a rippled seam.
What works:
- Fuse a light stabiliser to the seam allowance before reinstalling.
- Let the machine feed the layers. Don't pull from the back.
- Press after each stage, not only at the end.
What doesn't work:
- Tugging the fabric flat while sewing.
- Pressing harder and hoping the ripple disappears permanently.
- Leaving the problem because “it might relax later”.
Mismatched waist or seam intersections
This usually comes from sewing the second side a fraction too high or too low. It doesn't take much to throw off the eye.
A better method is to baste the second side first, zip it up, and inspect the seam alignment before permanent stitching. That small pause is often the difference between calm satisfaction and immediate unpicking.
Baste the second side whenever the garment has a waist seam, yoke seam, or any stripe or print that needs to meet.
A gap or lump at the bottom
If the seam below the zip starts too low, you'll get a tiny hole or puff at the base. If it starts awkwardly, you'll see a bump.
The fix is usually straightforward. Open a short section of the lower seam and resew it so the stitching begins nearer the zip stitching line. Press the area over a seam roll or folded towel so you don't create a hard ridge.
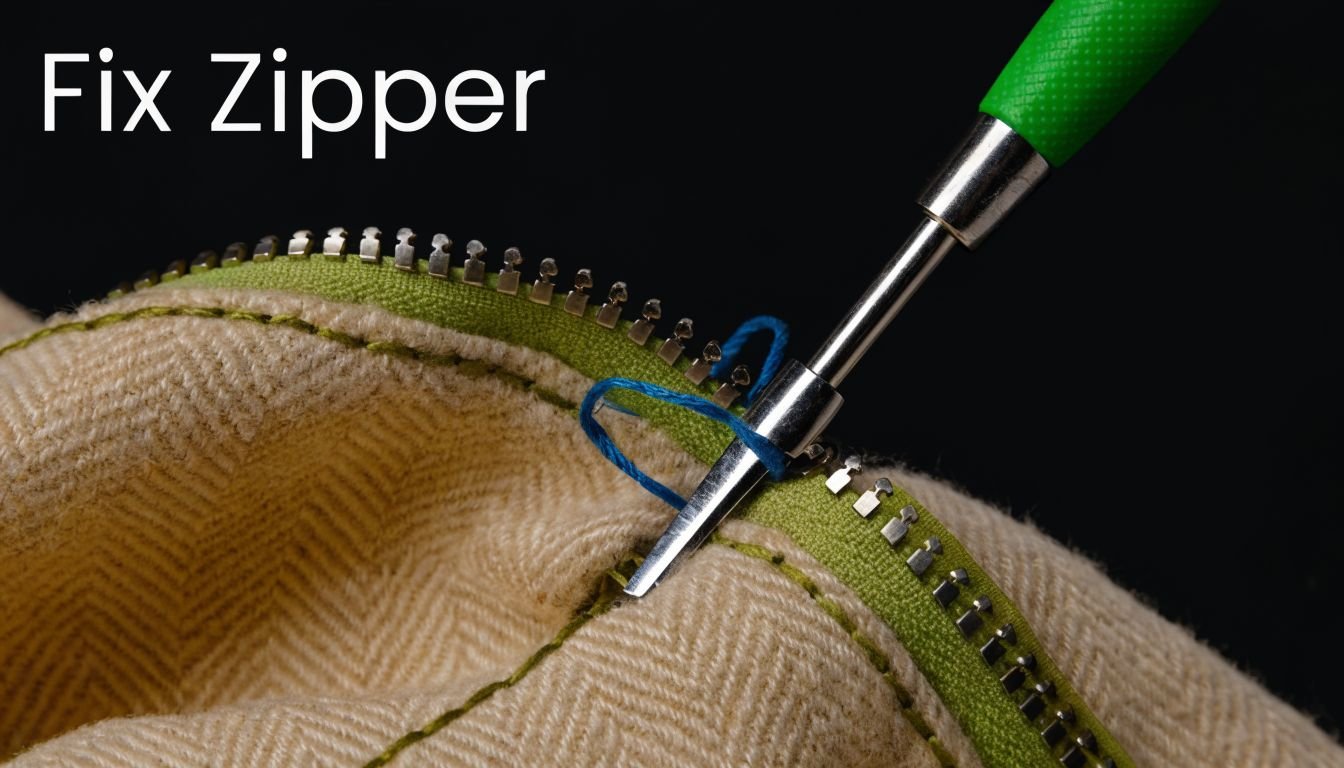
How to safely unpick and resew
This is the part most sewists need and few guides explain clearly. If the zip is wrong, don't rip at it aggressively from the fabric side. That's how seam allowances get nicked and delicate cloth gets stressed.
Use this order instead:
- Open the zip fully so the tape lies flatter and the stitches are easier to reach.
- Work from the tape side where possible. Slide the seam ripper under every few stitches rather than every stitch.
- Stop often and pull threads away gently instead of dragging the ripper along the seam.
- Press the seam allowance flat after removal. Distorted seam allowances make the next insertion worse.
- Re-stabilise if needed before sewing again, especially on soft or stretched fabric.
If the original stitching sat very close to the coil, you may need fine tweezers to pull out stray thread bits. Take your time. A careful fifteen-minute repair is better than turning the seam edge fuzzy and weak.
When to resew and when to leave it
Not every imperfection deserves surgery. Decide based on visibility and function.
Resew it if:
- the zip won't open smoothly
- the seam mismatch is obvious from the front
- the fabric is dragging or buckling
- the zip teeth show prominently
Leave it alone if:
- the top edge is off by a hair only you can see
- the inside looks untidy but the outside is clean
- extra handling is likely to damage a fragile fabric more than help it
That judgement gets better with experience. The goal isn't perfection in a vacuum. It's a garment that looks polished, wears well, and doesn't keep announcing its fastening.
Your Next Steps to Zipper Mastery
A good invisible zip isn't magic. It comes from three things. Careful preparation, accurate placement, and the willingness to baste or unpick when needed. Once those habits are in place, the technique becomes much less dramatic.
If you want a first project to practise on, choose something with a simple seam and stable fabric. A cushion cover is excellent for learning the mechanics. An A-line skirt is a strong next step because it adds garment shaping without overwhelming the process. If you're ready for dressmaking, a simple sleeveless dress with a centre back zip gives you plenty to learn without too many extra construction puzzles.
Keep your first attempts honest. Test on scraps. Press every stage. Mark seam matches. Baste when accuracy matters. That's how a supposedly tricky technique turns into one of the most satisfying finishing skills in sewing.
If you're ready to practise with beautiful fabrics and reliable notions, take a look at More Sewing. You'll find dressmaking fabrics, invisible zips, threads, kits, and practical haberdashery for your next project, whether you're sewing your first skirt or refining the finish on a special-occasion dress.