Guides
Labels For Sewing: Your Ultimate Guide 2026
You’ve finished the garment. The last thread is trimmed, the hem is pressed, and you hold it up thinking, “It looks good… but it still needs something.” Often, that something is a label.
For home dressmakers, labels for sewing can feel optional at first. Then you add one to a handmade blouse, a quilted jacket, or a child’s pinafore, and the whole piece changes. It looks more considered. More finished. More like it belongs in a wardrobe rather than on the ironing board waiting for “one last job”.
Labels also solve practical problems. They help you remember the back from the front on simple tops. They stop gift recipients asking which side is the neckline. If you sell your work, they become part of how customers recognise you. Even if you only sew for yourself, a label can say, “I made this on purpose.”
Why a Sewing Label Is Your Signature
A sewing label does more than fill an empty corner inside a garment. It acts like a signature on a painting or a maker’s mark on pottery. It says someone designed this, chose the cloth, matched the thread, unpicked the wobbly bits, and finished it with care.
That’s why labels for sewing matter even on everyday makes. A basic jersey T-shirt feels more polished with a soft side-seam label. A linen apron feels more personal with a small cotton tag near the pocket. An expertly sewn skirt with a neat waistband facing almost asks for a discreet inside label.
More than a name tag
Some labels identify a maker. Some carry care information. Some add character. A child’s coat might have a bright label in the neck so it’s easy to spot at school. A wedding guest dress might need a tiny satin label hidden inside the side seam so nothing interrupts the line of the garment.
The best label choice usually answers one question: what do you want this garment to say?
- Pride in the make means a visible brand or name label.
- Comfort first means a soft label tucked away from the skin.
- Quiet luxury means a subtle woven tag in a seam or facing.
- Useful information means a proper care or fibre label if the garment will be sold.
A good label doesn’t fight with the garment. It finishes the story the fabric already started.
Labels have a long history in UK clothing
This isn’t a modern trend borrowed from online branding. In the UK, labels became important in a formal way with the Merchandise Marks Act of 1887, which established a legal requirement for clothing manufacturers to attach durable labels with essential information about materials, origin, and manufacture, according to this history of clothing labels and the Merchandise Marks Act.
Before that, labels were often basic paper tags that didn’t survive wear and washing. The Act helped push the move towards more durable woven labels in the late nineteenth century. Those labels could include brand names, sizes, logos, and material details, which is one reason labels became associated with both quality and accountability.
That history still shapes how we think about labels now. A label isn’t only decorative. It has roots in trust, identification, and workmanship.
Why sewists often leave labels too late
Many makers treat labels as a last-minute extra. That’s when problems start. You’ve made a floaty viscose blouse, then realise the only labels you have are stiff and bulky. Or you’ve sewn a baby cardigan and only have a scratchy woven label that would sit right at the neckline.
It helps to choose your label the same way you choose buttons, interfacing, or topstitching thread. Think about it while planning the project.
A few examples make this easier:
| Project | What usually works well | Why |
|---|---|---|
| Baby cardigan | Soft woven or satin label in side seam | Gentle against skin |
| Denim jacket | Cotton, leather-look, or sturdy woven label | Matches the weight and character of the fabric |
| Bias-cut camisole | Small satin or printed label | Light and unobtrusive |
| Tote bag | External patch, woven tag, or metal tag | More room for decorative branding |
Once you start seeing labels as part of the design, not an afterthought, your makes feel more complete from the beginning.
Your Guide to Common Sewing Label Types
The easiest way to understand labels for sewing is to separate them by how they’re made. Construction affects the look, the feel, the level of detail, and how the label behaves after washing.
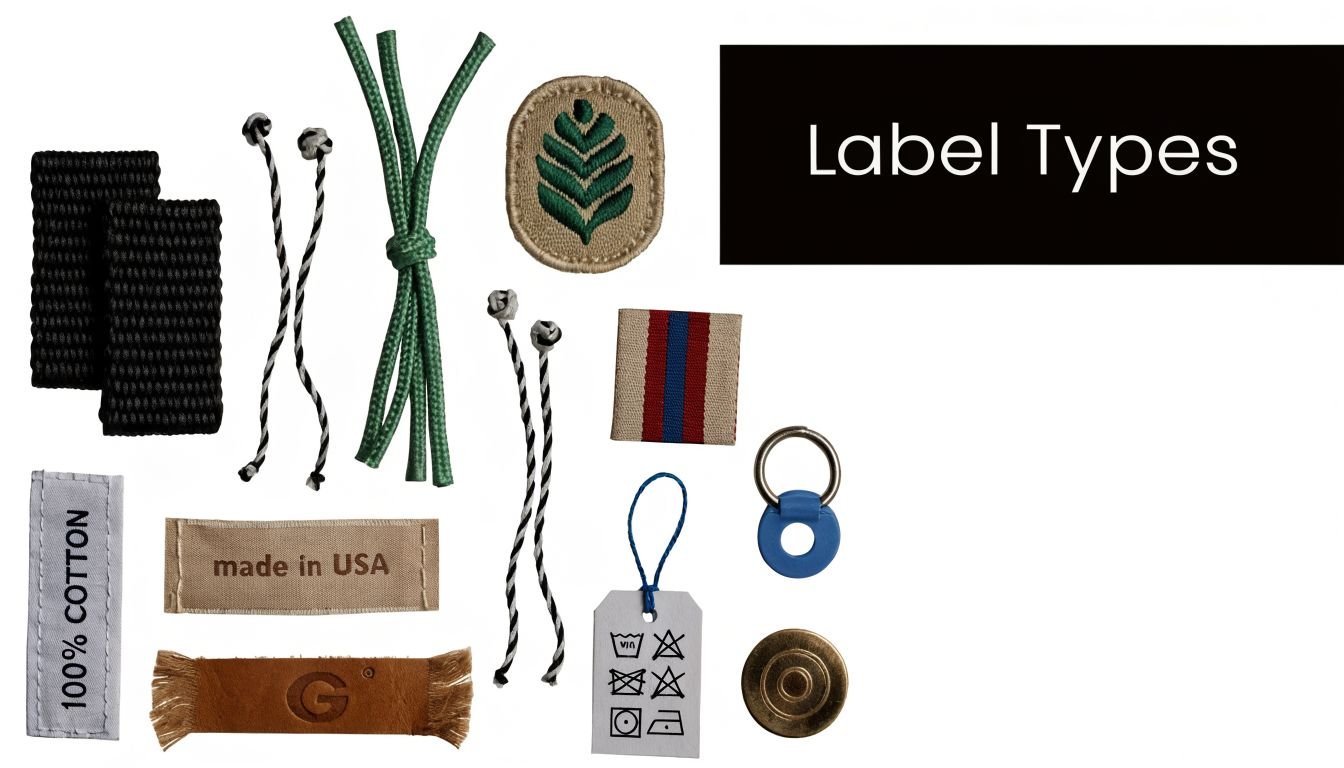
Woven labels
Woven labels are made by weaving the design into the label itself, rather than printing on top. Think of them as a tiny piece of patterned fabric made specially for your garment.
Modern woven labels come from a long line of textile innovation. The rise of Jacquard looms in the early nineteenth century transformed label production by allowing complex woven designs, and by the late nineteenth century Jacquard techniques were used for durable woven labels in materials such as damask and satin, as described in this overview of Jacquard looms and woven label history.
Common woven styles include:
Damask
Fine detail, crisp designs, and a professional look. Good for brand names, logos, and neat typography.Satin woven labels
Softer and smoother, often a good choice where the label may touch the skin.Taffeta woven labels
Firmer and more structured. Often used where durability matters more than softness.
Use woven labels when you want the label to feel permanent, refined, and built into the garment.
Printed labels
Printed labels start with a plain base material, then the design or information is printed onto it. They’re often easier to order in smaller batches and are handy when you need text-heavy information like care instructions.
They can work well for:
- fibre content
- washing instructions
- size markings
- simple branding
- temporary or small-run collections
A printed satin label usually feels softer than a crisp printed synthetic tape. A printed cotton label can suit rustic, natural-looking garments like aprons, overshirts, and bags.
Leather and faux leather labels
These labels add texture straight away. They’re less about softness and more about visual identity. You’ll often see them on denim, outerwear, bags, hats, and heavier casual garments.
Real leather develops character over time, but faux leather gives a similar look with easier handling and a wider range of finishes. If you’re making a waxed canvas bag or a pair of utility-style trousers, a leather-look patch can feel exactly right. On a lawn cotton nightdress, it would feel odd.
Practical rule: Match the label’s visual weight to the garment’s fabric weight.
Metal tags and rivet-style branding
Metal tags are usually decorative branding elements rather than traditional information labels. They suit bags, coats, and structured accessories more than soft dressmaking. They can look sharp on a canvas rucksack or a boiled wool jacket, but they’re usually too rigid for anything drapey or close-fitting.
A simple way to choose
If you’re standing at the cutting table unsure, use this quick guide:
| Label type | Best quality | Best projects |
|---|---|---|
| Woven | Durable, polished, premium | Dresses, blouses, knitwear, children’s wear |
| Printed | Informative, flexible, accessible | Care labels, size labels, short runs |
| Leather or faux leather | Textural, rugged, decorative | Denim, bags, jackets |
| Metal | Strong visual branding | Accessories, outerwear |
Most sewists don’t need every type. Usually, one soft internal label and one sturdier decorative option will cover a lot of projects.
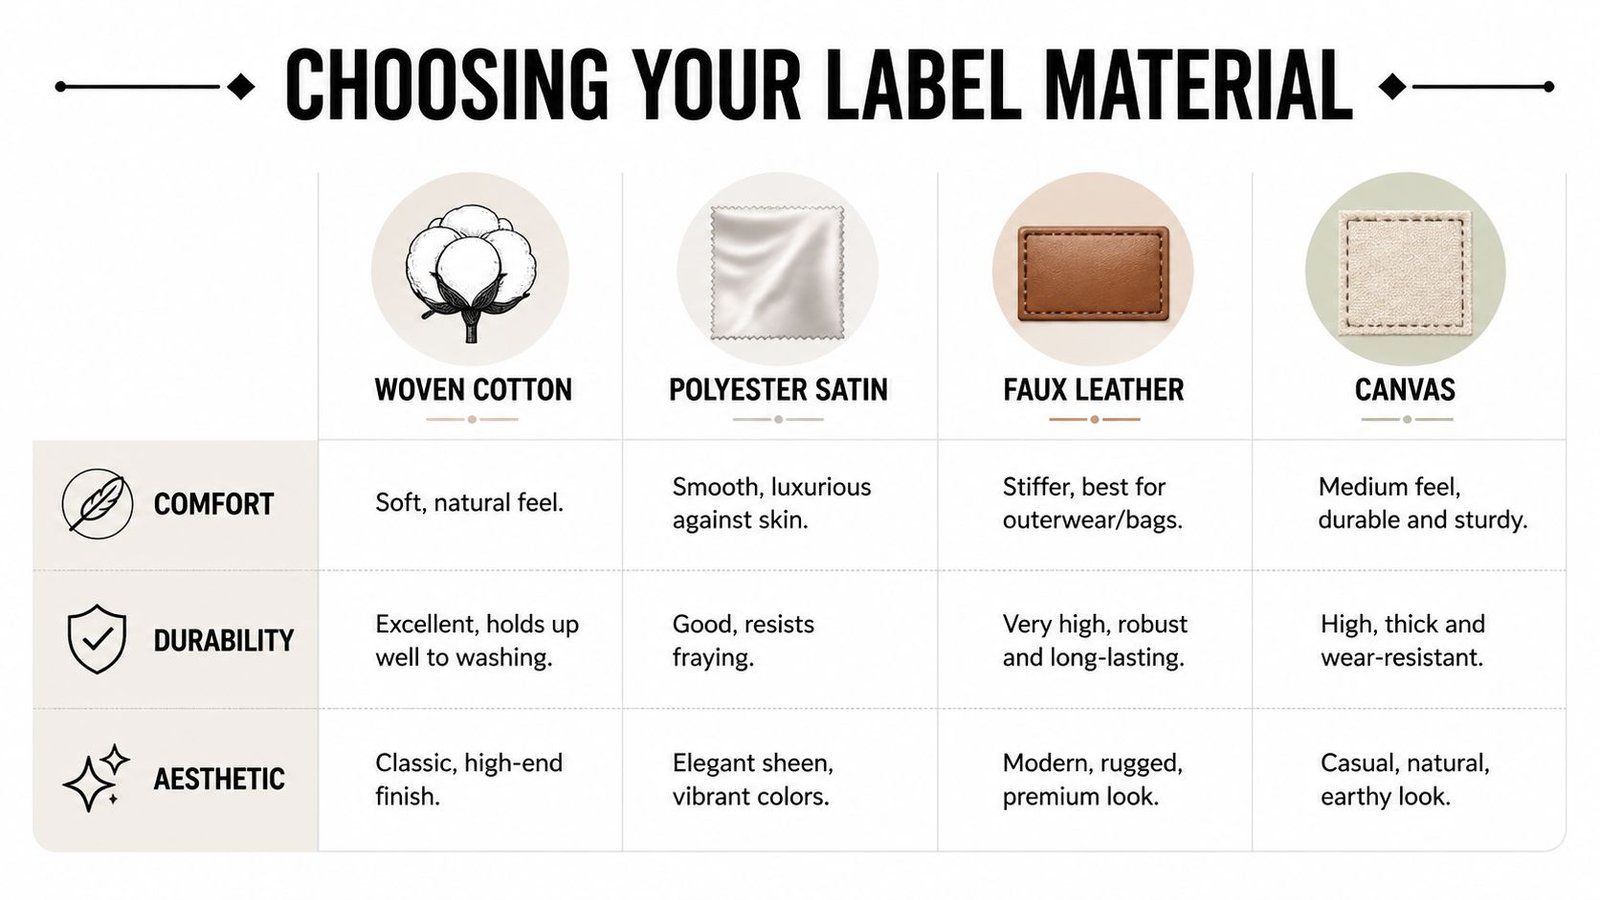
Selecting the Perfect Label Material
Material choice shapes more than comfort. It changes how your garment is read.
A crisp woven name label in the back neck tells one story. A soft printed satin care label in the side seam tells another. A cotton tag on a linen apron feels honest and handmade. A faux leather patch on a waxed canvas bag feels more like branding. If you sew for yourself, this is part of your design language. If you sew for sale in the UK, it also affects wash performance, fibre-content labelling, and whether your finished piece feels considered from the first wear to the fiftieth.
A simple way to choose is to match the label to the life of the garment. Ask three questions. Will it touch skin? Will it be washed often? Does the label need to whisper, or be seen?
Polyester satin and polyester taffeta
Polyester labels often get unfairly lumped together, but finish makes a big difference.
Polyester satin is smooth, flexible, and usually the kinder option for labels that sit near the neck, under the arm, or against bare skin. It suits blouses, jersey tops, slips, pyjamas, and children’s clothes. If a customer in the shop says, “I want it to feel soft, not plasticky,” satin is often where I start.
Polyester taffeta feels crisper and a little papery by comparison. That sounds less appealing until you remember what it is good at. It holds printed care information clearly, keeps its shape, and copes well with regular washing. That makes it useful for care labels, size tabs, schoolwear, workwear, and everyday garments that need practical information to stay readable.
As noted by Dutch Label Shop’s guide to label materials, polyester satin is commonly chosen for softness, while nylon and polyester taffeta are often used where a clean print and wash resistance matter. For a small brand, that difference matters. Your main brand label might be chosen for comfort and appearance, while your care label is chosen for clarity and wear.
Cotton and canvas labels
Cotton labels bring a quieter look. They are matte rather than shiny, and they often suit garments made from natural fibres because they do not fight with the cloth.
They work especially well on linen dresses, cotton shirts, aprons, utility skirts, children’s wear, and home sewing projects where you want the finish to feel thoughtful rather than overly manufactured. If your garment already has a soft, natural character, a cotton label usually supports it.
Canvas labels sit at the firmer end of the cotton family. They have more body, so they suit projects that can carry that extra weight without pulling or bunching.
Cotton and canvas labels are often a good fit when you want to:
- blend visually with linen, denim, cotton poplin, or brushed cotton
- stamp, screen print, or hand-print labels for small batches
- give handmade or small-brand pieces a grounded, tactile finish
They are less suited to slinky fabrics. A canvas tag inside a silk camisole or bias-cut satin skirt will usually feel out of place, much like putting a chunky coat button on a delicate blouse.
Leather, faux leather, and suede-look labels
These materials behave more like trim than traditional internal labels. They add texture, weight, and visible branding, so they belong on the outside of a garment or accessory far more often than the inside.
They suit:
- denim jackets
- backpacks
- corduroy overshirts
- wool coats
- project bags
- structured hats
They rarely suit:
- underwear
- baby clothes
- close-fitting knit tops
- floaty blouses
- lightweight sleepwear
If you are building a small brand, label choices allow storytelling to really shine. A recycled faux leather patch says something different from a printed cotton label or a shiny woven damask tag. In the UK market, many customers now notice material choices straight away, especially if sustainability is part of your brand message. If that matters to you, ask suppliers what the label is made from, whether recycled fibres are available, and what inks or finishes have been used.
Sewing Label Material Comparison
| Material | Feel Against Skin | Durability | Best For | Example Use Case |
|---|---|---|---|---|
| Polyester satin | Smooth and soft | Good for frequent wear and washing | Neck labels, side-seam labels, branded labels | A viscose blouse or jersey T-shirt |
| Polyester taffeta | Firmer, less silky | Very durable | Care labels, size labels, practical garments | Children’s school trousers |
| Cotton | Natural, matte, comfortable if soft-washed | Good, depends on weave | Handmade-style labels, casual garments | Linen apron or cotton dress |
| Canvas | Structured and sturdy | High on sturdy projects | Bags, aprons, workwear-style makes | Tote bag or tool roll |
| Faux leather | Stiff, best away from skin | High for outer applications | Decorative branding patches | Denim jacket hem patch |
Questions customers often ask
Some label worries come up all the time at the cutting table.
“What feels least scratchy?”
Usually polyester satin, especially if the cut edges are finished well. If you are sensitive to back-neck labels, a side-seam label often feels better even when the material stays the same.
“What holds up best on children’s clothes?”
Choose a material that washes well and stays readable. Polyester taffeta and well-made woven labels are often reliable choices for garments that will be washed often, pulled on in a hurry, and handed down.
“What looks the most premium?”
A fine woven label usually gives that impression fastest, but the answer depends on the garment. On a minimalist linen dress, a simple cotton label can look more refined than a shiny synthetic one. Expensive-looking labels are usually the ones that suit the project, not the ones shouting for attention.
“How do I choose for a small batch or micro-brand?”
Start with the job the label needs to do. Use a soft brand label where the garment touches skin. Use a separate printed care label if you need fibre content and care information to stay clear. That split often gives a better result than asking one label to do every job.
Match the label to the fabric, the wearer, and the story you want the garment to tell.
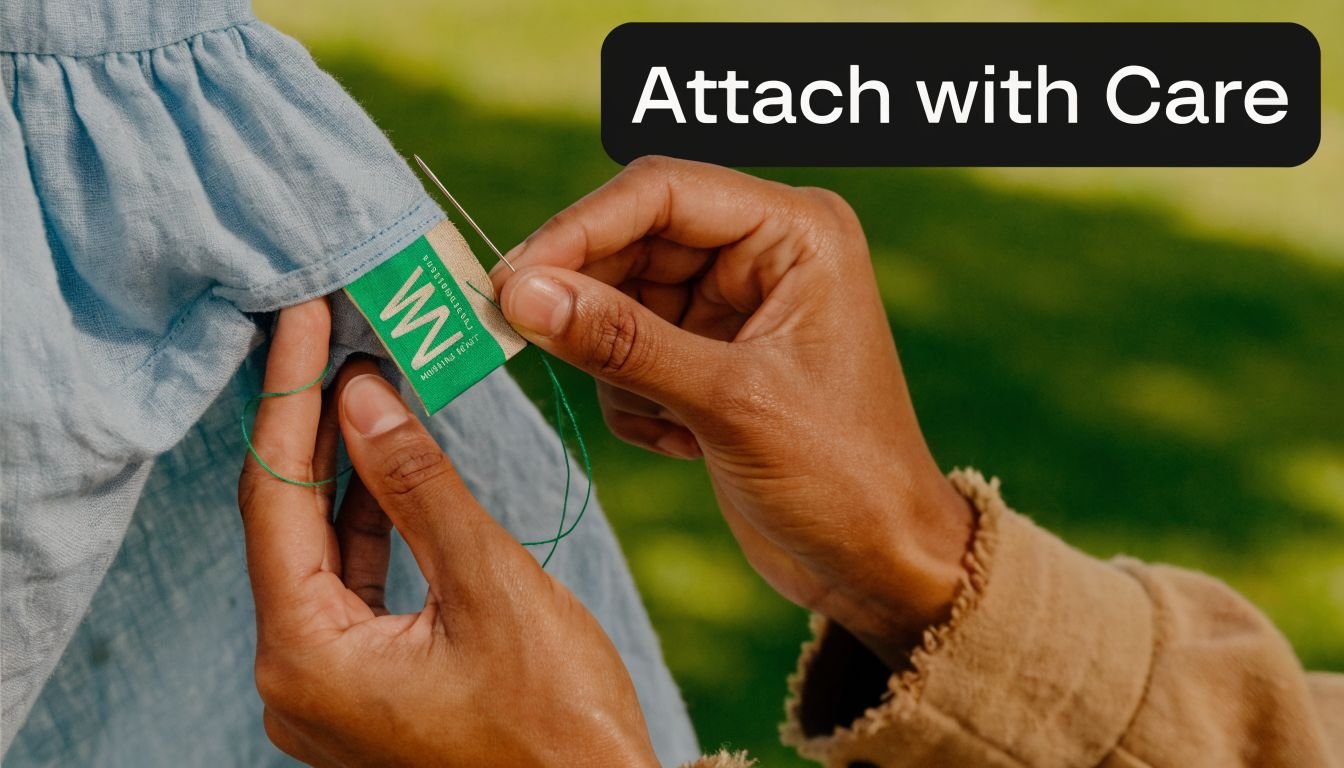
Flawless Placement and Attachment Methods
A beautiful label can still look clumsy if it’s put in the wrong place. Placement changes comfort, visibility, and how “professional” the finished make feels. It also affects how easy the label is to sew in cleanly.
Centre back neck
This is the classic position. It works well for dresses, shirts, tops, jackets with facings, and lined garments. It’s the obvious choice when the label helps identify the back of the garment.
It works best when:
- the label is soft enough not to irritate the neck
- the seam area is stable
- the garment isn’t very sheer
- the inside finish is tidy enough to support it
For a woven centre-fold label, catch each folded end into the stitching line or topstitch the two sides neatly after the neckline is finished. If the fabric is lightweight, test the placement first with pins and try the garment on. A label that feels fine on the table can feel annoyingly stiff once worn.
Side seam and hem placements
These are often the most comfortable options. A small label inserted into a side seam can be almost invisible to the wearer, especially on knit tops, pyjamas, loose dresses, and children’s clothes.
A hem label is more decorative. It’s great for sweatshirts, shirts, pinafores, and bags where you want the label seen from the outside. If you’re making a reversible garment, side seam placement usually makes more sense than a neck label.
A few reliable examples:
| Placement | Good for | Watch out for |
|---|---|---|
| Centre back neck | T-shirts, dresses, shirts | Scratchiness, visible stitching on sheer fabrics |
| Side seam | Blouses, pyjamas, reversible garments | Must catch neatly in seam allowance |
| Hem or cuff | Sweatshirts, jackets, bags | Can look bulky on very fine fabric |
| External patch | Denim, canvas, outerwear | Scale must suit the garment |
Easy attachment methods
Hand sewing gives the most control. It’s ideal for delicate garments, awkward placements, or labels you may want to reposition. Use a fine needle and small slip stitches or tiny fell stitches around the edge.
Machine sewing is quicker and very secure. A standard straight stitch close to the edge works for most flat labels. For centre-fold labels inserted into a seam, machine stitching often gives the cleanest result.
Try these methods:
Centre-fold insertion
Folded label ends sit in the seam. Good for side seams and neck seams.End-fold label topstitched on
The raw sides are hidden by folds. Good for visible labels on facings, hems, and pockets.Flat patch label
Sew all four edges down. Best for decorative labels, canvas tags, and faux leather patches.
Here’s a useful visual demonstration of label sewing in action:
Neat finishes that make a difference
If you want the label to look shop-bought, these small details matter:
- Press first so the label lies flat before stitching.
- Use matching thread if you want the stitches to disappear.
- Switch to contrast thread only when you want the label to be decorative.
- Stitch a sample on scrap fabric if the garment is delicate, stretchy, or loosely woven.
- Trim bulk in the seam allowance if the label sits inside a heavy seam.
Sew the label on at the stage when the garment is easiest to handle, not when it’s hardest to reach.
That usually means before a lining is closed, before a hem is stitched, or before a side seam is fully enclosed.
DIY Labels or Professional Custom Orders
Some labels are best made at home. Others are worth ordering properly. The right choice depends on quantity, finish, budget, and how much time you want to spend making labels instead of sewing garments.
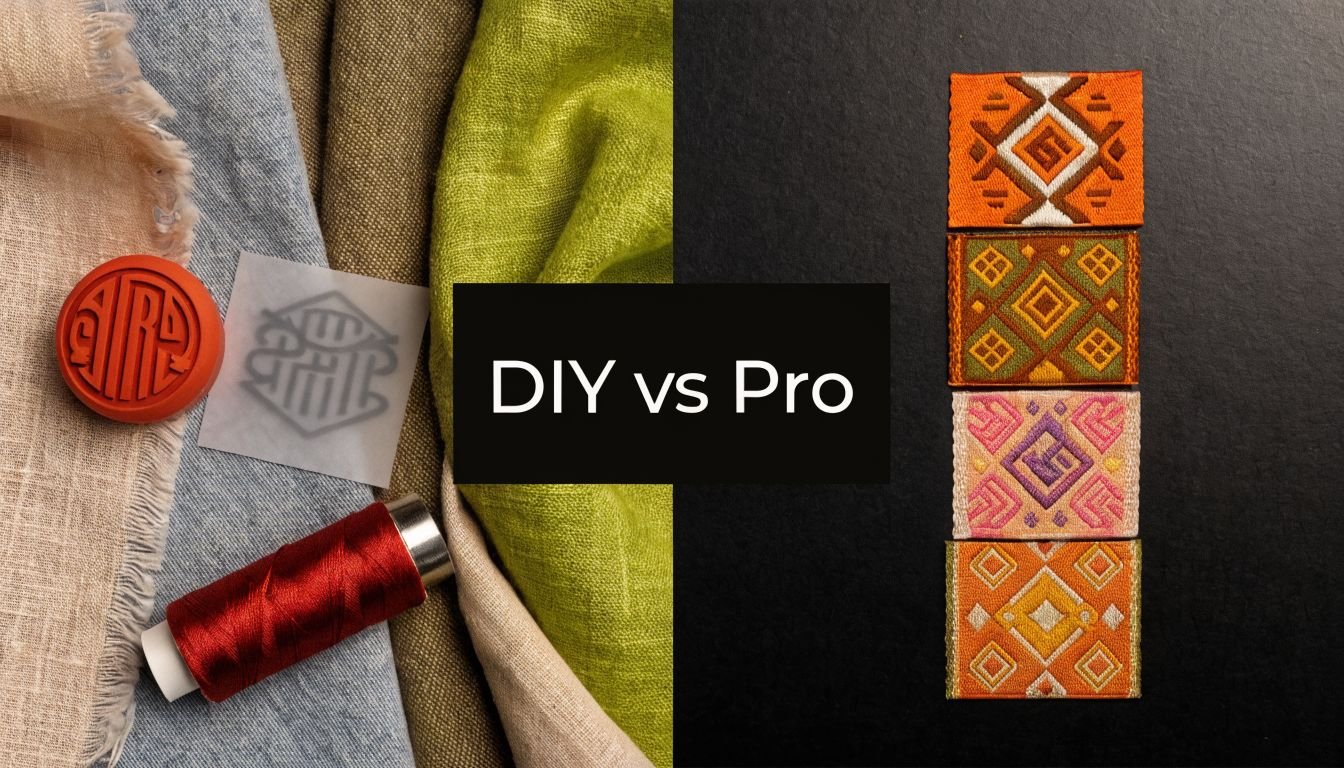
When DIY labels make sense
DIY is brilliant for one-off garments, gifts, student collections, and anyone still working out their style. You don’t need to commit to a logo forever, and you can make tiny batches that suit one project at a time.
Good DIY options include:
- Stamped cotton tape with fabric ink for aprons, bags, and casual clothing
- Printed ribbon or twill tape for simple name labels
- Machine embroidery for initials, motifs, or short names
- Hand embroidery for heirloom projects, baby clothes, and visible bespoke details
- Fabric scrap labels cut from contrast cloth and stitched into seams
DIY labels often look best when they lean into the handmade quality. A neat stamped cotton label on a linen pinafore can be charming. The same label on a sharply structured formal dress might not feel coherent.
Where DIY can frustrate you
Home-made labels can eat time. Ink can blur. Edges can fray. Tiny text can become unreadable. If you need consistent branding across many garments, DIY methods can start to feel fiddly very quickly.
They’re also harder to standardise. If you sell your work, each label should look intentional rather than slightly different depending on your energy level that evening.
When professional labels are worth it
Professional custom labels earn their keep when you want consistency. They’re usually the better route for small brands, market sellers, repeat gift makers, and anyone sewing in batches.
Printed labels are often the most accessible place to start. According to this guide to printed and woven garment labels, screen printing is the industry-standard method for high-volume UK label manufacturing, with 1,000+ units being the practical threshold where that method becomes economical. The same guide notes that printed labels generally offer faster turnaround times, lower minimum order quantities, and lower per-unit costs than woven labels, while woven polyester labels tend to offer stronger longevity.
That matters if you’re deciding between:
- a small run of printed care labels for garments you’ll sell soon
- woven brand labels for a longer-term identity
- a mix of both, which is often the most practical answer
A side-by-side comparison
| Option | Best for | Strengths | Limitations |
|---|---|---|---|
| DIY labels | One-offs, gifts, learning, experimentation | Flexible, personal, low commitment | Time-consuming, variable finish |
| Professionally printed labels | Small brands, care info, shorter runs | Faster, lower MOQ, practical | Can feel less premium than woven |
| Professionally woven labels | Established branding, durable finish | Polished and long-lasting | More commitment to design and setup |
A sensible middle ground
Many sewists eventually do both. They use a professionally made brand label and add DIY touches for special garments. For example, a woven name label plus a handwritten size or “made in Brighton” note on soft cotton tape can feel both polished and personal.
If you’re unsure, start by asking two questions:
- Will I make this label design again and again?
- Do I need consistency more than flexibility?
Your answers usually point you in the right direction.
Navigating Care Labels and UK Regulations
You finish a lovely linen dress, stitch in your brand label, and pack it for a customer in Leeds. Then a practical question pops up. Have you told them what the fabric is, how to wash it, and anything else the law expects to stay with the garment?
That is the part many small makers leave until the end, but it works better as part of the design process. Your label is not only a legal detail. It is part of the garment’s story. It tells the wearer what they are buying, how to care for it, and what kind of maker you are.
For UK sellers, the clearest starting point is fibre content. The UK Government’s guidance on textile fibre names and labelling explains that textile products must use recognised fibre names, and the fibre composition should be given in percentages in descending order by weight. If a garment includes parts made from animal materials that are not textile fibres, the label must state: “Contains non-textile parts of animal origin”.
In practice, that often looks like this:
- 80% Cotton, 20% Polyester
- 55% Linen, 45% Viscose
- Contains non-textile parts of animal origin
A good rule is to write the composition label as plainly as you would write a fabric note for a customer at the cutting table. Clear wording wins. Trade names usually do not.
What each label is actually for
Newer makers often bundle every label into one mental category, which is where confusion starts. These labels do different jobs.
A brand label identifies you.
A care label gives washing, drying, and ironing instructions.
A composition label states the fibre content.
A size label helps the customer recognise the garment at a glance.
Sometimes one folded label can carry several of those jobs. Sometimes splitting the information makes more sense, especially if you want the neckline to stay comfortable and the text easy to read.
| Label type | Main job | Common placement |
|---|---|---|
| Brand label | Maker identity | Back neck, side seam, facing |
| Care label | Washing and ironing guidance | Side seam, lower inside seam |
| Composition label | Fibre content | Side seam, attached to care label |
| Size label | Size identification | Back neck or attached to brand label |
Make the legal information easy to live with
A garment can meet the rules and still annoy the wearer if the label feels scratchy or bulky. That is why placement matters so much. A side seam often works like the utility drawer in a kitchen. It keeps the practical information close by without putting it in the middle of the room.
That approach is often a good fit for:
- soft jersey tops
- children’s clothing
- dresses with facings
- unlined skirts and trousers
- garments with a clean neckline where a back-neck label would distract or irritate
Keep the visible brand label where it supports the design. Put the technical details where they stay readable and comfortable.
UK details small brands often miss
This is also where story and responsibility meet. If you are building a small brand in the UK, your label choices say something about how carefully you make decisions.
A few examples:
- If you buy deadstock or second-hand fabric, record the fibre content before you cut. “I think it’s cotton” is not enough for a sold garment.
- If you use wool, silk, leather trims, horn buttons, or similar details, check whether the animal-origin statement applies.
- If sustainability is part of your brand story, ask label suppliers what the label itself is made from, where it is produced, and whether the inks or fibres are recycled or certified. A beautifully made organic cotton dress with a harsh, low-quality polyester label feels like the story changed at the last step.
Customers may never praise a composition label out loud. They do notice when a garment feels well considered from hanger to hem.
Common mistakes to avoid
These are the ones I see trip people up most often:
- guessing fibre content instead of checking the fabric specification or supplier record
- using brand or trade names instead of generic fibre names
- printing text too small to read without a struggle
- choosing labels that fray, fade, or stiffen badly in the wash
- putting every detail at the back neck when a side seam would be more comfortable
If you sell even short runs, keep a simple worksheet for each style. Note the fabric composition, care instructions, trims, and exact label wording. It saves time, helps you stay consistent, and makes reorders much less stressful.
Good labels do two jobs at once. They satisfy the rules, and they make the garment feel finished, trustworthy, and thoughtfully made.
Pro Tips to Make Your Labels Stand Out
You finish a blouse, turn it right side out, and the outside looks lovely. Then you catch the label inside the neck. It is scratchy, slightly crooked, and a little too bright for the fabric. That tiny detail can change the whole feeling of the garment.
A label works like the sign above a good local shop. Small, yes, but it tells people what kind of care sits behind the work. For a home sewist, it can make a gift feel personal. For a small UK brand, it becomes part of the garment’s story, right alongside fabric choice, fit, and finish.
Keep the design simple
Small labels have very little room to do their job. If you crowd them, the message gets lost.
Start with the one thing you want the label to say most clearly. Usually that is your name, brand name, or a simple mark. If you add a logo, test it at the finished size before ordering. A logo that looks crisp on a screen can turn into a blur once it is woven into a 3 cm tag.
A few choices usually make labels look more considered:
- One clear name or symbol reads better than several competing elements
- Good contrast helps the text stay legible
- Colours that suit the garment feel more intentional than colours chosen in isolation
- Space around the design makes a small label look calm and finished
Match the label to the garment’s character. A soft floral nightdress may suit a fine woven label in muted tones. A workwear jacket can carry a bolder tab label with stronger lettering. The goal is not to make the label louder. It is to make it belong.
Use the label to tell a story
Many sewists overlook a lovely opportunity that labels provide. A label does more than identify the maker. It can also place the garment in a context.
For example, a label that says “Handmade in Yorkshire” tells a different story from one that shows a business name. A tiny printed motif, repeated from your packaging or swing tags, can make a small batch feel coherent. If you sew heirloom childrenswear, your label might be gentle and traditional. If you make modern linen separates, a clean folded label may fit better.
Layering helps too. Instead of forcing every detail onto one tiny piece, separate the jobs:
- a main brand label
- a size tab
- a care or composition label placed elsewhere
- a special message for limited runs or gifts
That approach gives each label a clear purpose, and the garment feels better organised inside.
Think about sourcing as part of the design
If sustainability is part of your story, the label should support it rather than contradict it. A beautiful garment made from natural fibres can feel less thoughtful if the label is stiff, shiny, and poorly matched to the rest of the piece.
You do not need grand claims. You do need good questions.
Ask suppliers what the label is made from, where it is woven or printed, how it will feel after washing, and whether minimum orders make sense for the way you sew. UK-based makers often find that local or small-batch suppliers are easier to work with because sampling, reorders, and communication are simpler. Search interest on marketplaces also points to growing demand for imperfect, handmade-style options, as shown by Etsy results for sewing labels made imperfectly.
Practical ways to make better choices include:
- ordering smaller runs if you are still refining your branding
- choosing recycled or natural-feel options when they suit the garment type
- using fabric labels from project scraps for one-off pieces
- checking how the label ages after washing, drying, and pressing
- matching the quality of the label to the life of the garment
A hard-wearing coat needs a label that can keep up. A delicate occasion blouse needs something softer and less bulky.
Small details customers remember
People notice the finishing touches that affect comfort and trust. They notice whether a label sits flat, whether it scratches, and whether the text is easy to read without squinting. They also notice whether the inside of the garment feels as well planned as the outside.
That matters even more if you sell your work. In the UK, labels often carry part of the practical story as well as the creative one. Fibre content, care information, and country-related wording all need care if you are selling garments rather than sewing only for yourself. The best labels handle both jobs neatly. They support compliance, and they strengthen the identity of the piece.
Good label choices rarely shout for attention. They make the whole garment feel believable, finished, and true to the maker.