Dressmaking
Women Clothes Patterns
You've found a pattern you love. The cover sketch looks promising, the fabric shelf is calling your name, and you can already picture the finished dress, blouse or pair of trousers.
Then you turn the envelope over.
Suddenly you're staring at size charts, fabric codes, view letters, notions lists, finished measurements and layout diagrams. If you're new to dressmaking, or even if you've sewn for years but still feel unsure when buying women clothes patterns, that moment can stop you in your tracks.
That's normal. Sewing patterns have their own language, and nobody is born knowing how to read it.
The good news is that patterns become much less mysterious once you know what each part is trying to tell you. After that, you stop guessing. You start choosing better fabrics, cutting the right size, planning sensible alterations, and making clothes you'll wear. That's where sewing becomes more satisfying. Not because every garment is flawless, but because each one teaches you something useful.
Your Guide to Sewing Patterns Starts Here
A customer will often come into a sewing shop holding two things. A pattern they're excited about, and a fabric they've already fallen in love with. Then comes the question: “Do these go together?”
Sometimes the answer is yes. Sometimes the answer is, “They can, but only if you want a very different result from the one on the envelope.”
That's one of the biggest turning points in learning to use women clothes patterns well. A pattern isn't just a picture of a garment. It's a set of instructions, proportions and assumptions. It assumes a type of fabric. It assumes a certain amount of shape. It assumes ease. It assumes where the garment should sit on the body. Once you understand those assumptions, your choices get much smarter.
There's a long history behind that little paper packet too. The earliest documented sewing-pattern publication relevant to women's dressmaking is usually traced to 1580, when Juan de Alcega published Libro de geometria practica y traca. In Britain, English-language pattern books appeared later, in 1769, and tissue patterns began to be sold in England in the later nineteenth century, moving pattern knowledge from specialist tailoring towards wider home sewing use, as noted in this history of sewing paper patterns.
Sewing patterns started as technical tools, and they still are. The more you treat them that way, the better your results.
If you've ever thought, “I must be bad at sewing because this size didn't fit,” or “I liked the design but hated the finished garment,” the pattern probably wasn't the problem on its own. More often, the issue sits in one of these places:
- Size choice based on shop size instead of measurements
- Fabric mismatch between what the pattern expects and what you bought
- Missing fit checks before cutting into your final fabric
- Ignoring the envelope details because they look intimidating
Once you know how to read those clues, patterns become far less frustrating and much more personal.
How to Read a Pattern Envelope Like a Pro
Treat the pattern envelope like a recipe card. Before you cook, you read the ingredients, the method, and the timings. Before you sew, you read the garment details, the fabric requirements, and the fitting information.
That small habit saves a lot of disappointment.
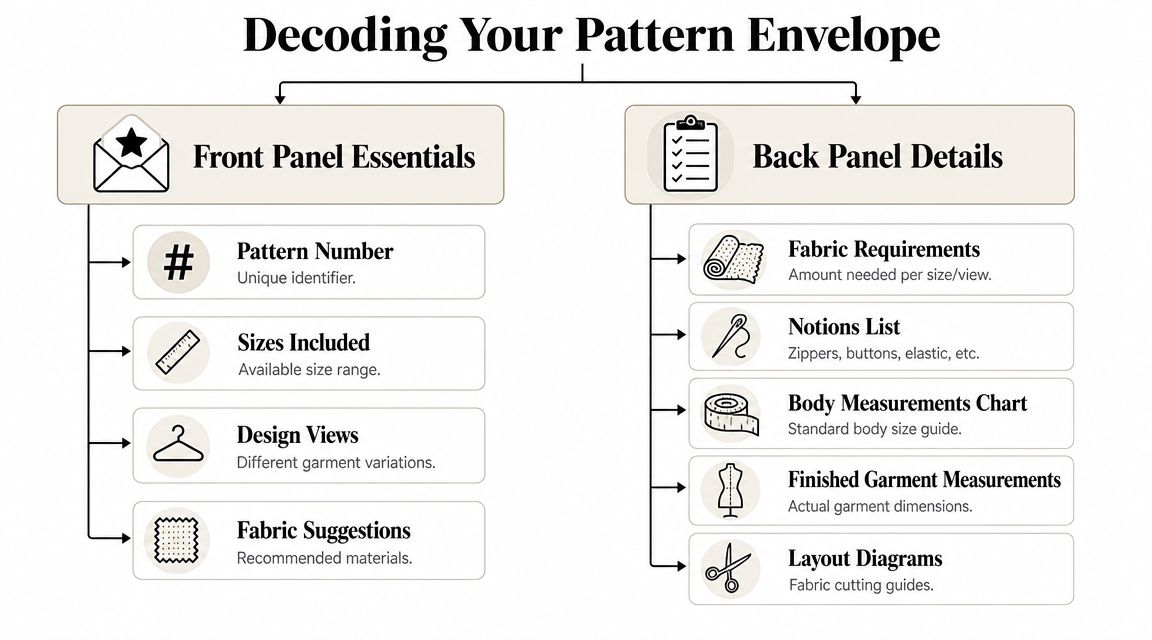
Start with the front
The front is there to help you decide whether the pattern suits your taste and skill level.
Look first at the line drawing, not just the styled illustration or photo. Line drawings show the garment's actual seams, darts, neckline, hem shape and sleeve length without distracting fabric prints or styling tricks. If a dress has a waist seam, gathered sleeve head, or back zip, the line drawing reveals it clearly.
Check the design views too. A single pattern often includes several versions. One may have long sleeves, another sleeveless. One may have a collar, another a simple neckline. Such variety means a pattern can be far more versatile than the cover first suggests.
Then note the size range included in the packet. Don't decide yet which size you are. Just confirm the range includes your measurements.
Turn it over and read it slowly
The back of the envelope is where the technical decisions live.
UK sewing references emphasise that the pattern envelope usually includes a fabric-consumption table, recommended fabric types, and construction details, and that you should treat them as technical specifications rather than sales language. They also note that finished-garment data and adjustment notes may be split between the envelope and the instructions, as explained in The Sewing Directory's guide to understanding sewing patterns.
Here's what to check.
| Envelope item | What it tells you | Why it matters |
|---|---|---|
| Body measurement chart | The size the company assigns to bust, waist and hip measurements | Helps you pick a starting size |
| Fabric suggestions | The types of cloth the pattern was drafted for | Affects drape, shape and comfort |
| Fabric requirements | How much fabric each view needs | Prevents underbuying |
| Notions list | Extras such as zips, buttons, elastic or interfacing | Lets you shop properly before starting |
| Finished measurements | The actual garment dimensions | Helps you judge fit and ease |
Fabric suggestions are not decoration
A common challenge for many sewists emerges: If a pattern recommends soft, drapey fabrics, it's because the garment shape depends on fabric that falls close to the body. If you swap that for a stiff cotton drill, the finished garment can stand away from you, pull oddly at seams, or lose its intended movement.
A few simple examples make this easier:
- Blouse with gathers at the yoke works nicely in viscose, Tencel or a soft cotton lawn.
- Structured skirt with topstitching suits denim, corduroy, twill or canvas better.
- Relaxed knit top needs jersey or another fabric with similar stretch and recovery.
- Crisp shirt dress can handle poplin or linen blend if the pattern supports a bit of structure.
Practical rule: If the envelope says drapey and your fabric holds its own shape on the bolt, pause before buying.
Use the fabric chart before you shop
Fabric requirements change with size, view, sleeve choice and fabric width. A sleeveless top may need much less fabric than the long-sleeved version. A full skirt may need more than you expect, especially if the fabric has a directional print or nap.
When customers ask how much fabric to buy, I always suggest bringing three things to the cutting table: your pattern, your chosen view, and your intended size. Without all three, you're guessing.
A final tip. Read the notions list before you leave the shop. There's nothing more irritating than getting home, laying out your fabric, and realising you still need interfacing, a zip, matching thread and the right width of elastic.
Choosing the Right Pattern for Your Style and Fabric
Some patterns are fun to sew once. Others become wardrobe workhorses.
That difference matters. If you want women clothes patterns that earn their place in your sewing room, choose designs that match the way you dress, the fabrics you enjoy sewing, and the weather you live in.
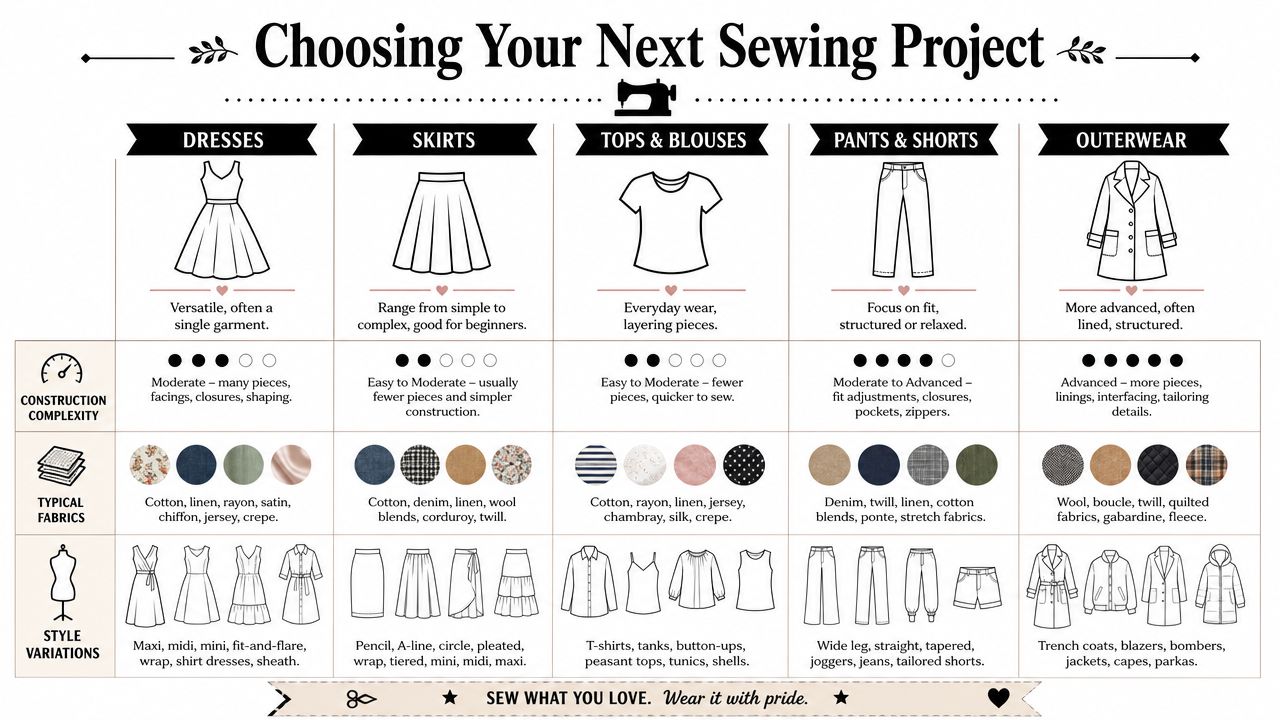
Dresses that change with fabric
A dress pattern can look completely different depending on silhouette and cloth.
An A-line dress is usually forgiving through the hips and easy to layer. It works well in mid-weight cotton, needlecord, linen blends or soft denim if you want a bit of shape. A wrap dress gives adjustability at the waist and often suits drapier fabrics because the front needs to fall neatly rather than bunch. A shirt dress can sit anywhere from crisp and polished to relaxed and casual depending on whether you sew it in poplin, chambray or a fluid viscose.
If you're building a practical wardrobe for Britain, a sleeved dress that also works with tights, boots, a cardigan or a jumper often gets worn more than an occasion-only style.
Tops and blouses that do more than one job
Tops are often the most useful patterns to repeat because they slot into everyday outfits so easily.
A simple set-in sleeve blouse can be office-ready in one fabric and weekend-friendly in another. A boxy top is beginner-friendly and tends to work well in stable woven fabrics. A gathered blouse wants softness. If you choose a fabric with too much body, the gathers can become bulky rather than graceful.
Some body-shape notes help here, but don't take them as rules. A V-neck can open up the upper body visually. A peplum can emphasise the waist. A dropped shoulder gives a softer, roomier fit through the upper arm. Those are useful starting points, not strict instructions.
Skirts and trousers need different thinking
Skirts are often easier than people expect because you can fit the waist and hip without also managing bust, shoulder and sleeve fit.
A straight skirt in denim or twill gives a clean shape. A gathered skirt suits lighter fabrics and can feel bulky in anything too heavy. A bias-cut skirt needs a fabric with fluid movement, otherwise it won't skim the body as intended.
Trousers are different. Here, fit matters more than trend. A wide-leg trouser in a fluid fabric can be very wearable, but if you choose something too crisp, the leg may stand out rather than fall cleanly. A tapered trouser often benefits from a fabric with a little give or softness through the hip and thigh area.
A useful UK wardrobe often starts with layering
A nuanced view of versatile patterns for the UK is that the most useful ones often aren't the most fashion-forward. They're the styles you can sew in viscose, Tencel, jersey or mid-weight cotton and then layer through changing weather, as reflected in Closet Core's dress pattern collection notes on versatile fabrics and wearability.
That's why these pattern types tend to stay in rotation:
- Sleeved dresses you can wear alone or over tights
- Blouses and shirts that work under knitwear
- Pull-on trousers in fabrics that suit trainers in spring and boots in autumn
- Simple skirts that pair with jumpers, T-shirts and jackets
The most versatile pattern is often the one you can picture in three fabrics and at least two seasons.
If you're trying to sew more thoughtfully, that's a useful test. A dramatic pattern may be exciting, but a well-cut top or dress in a fabric you love often gives you far more mileage.
The Secret to a Perfect Fit Is Not Your Size
You bring home a pattern in your usual shop size, choose a fabric you love, sew with care, and the finished garment still feels off. The mistake usually happens long before the first seam. Pattern sizing and ready-to-wear sizing do not work the same way, so a good fit starts with measurements, not with the number on the envelope.
The printed size is only one clue. Dressmaking patterns are built from body measurements, but the final fit depends just as much on the finished garment measurements and the built-in ease. If we skip those two checks, even a well-sewn garment can end up tighter, looser or boxier than expected.
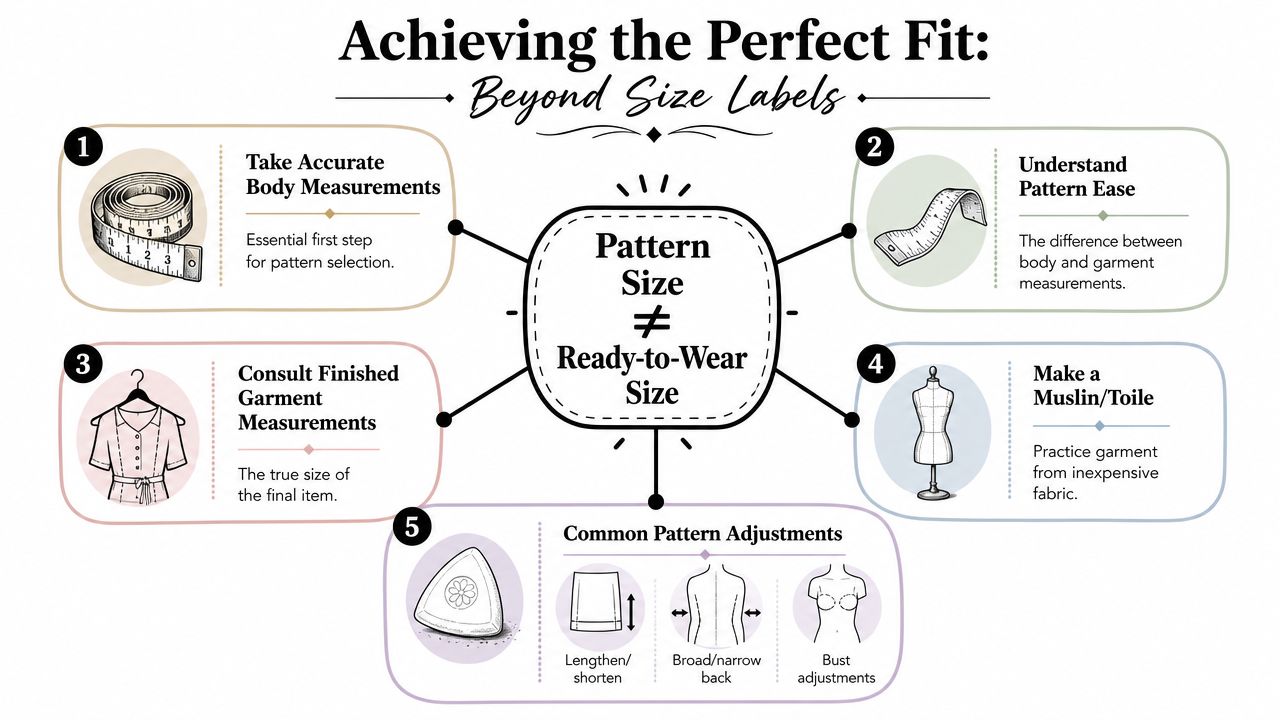
Start with your own measurements
Take your bust, waist and hip measurements with a tape measure held level and close to the body, but not pulled tight. Wear the undergarments you would normally choose with the finished garment, especially for fitted dresses, blouses and trousers. Then write the numbers down. Memory is less reliable than a scrap of paper tucked into the pattern envelope.
In UK dressmaking patterns, you usually choose a starting size from the measurement grid. After that, finished-garment measurements become the more useful guide because they show how much room the garment will have once sewn, as explained in The Geeky Seamstress guide to reading a pattern envelope.
What ease means
Ease is the space between your body and the finished garment.
That space has two jobs. First, it lets you move, sit, breathe and lift your arms. Second, it creates the style of the garment. A fitted shell top needs only a little extra room. An oversized shirt, a layered pinafore or a winter coat needs much more.
A simple way to read it is this:
- Body measurement is your measurement.
- Finished measurement is the garment measurement.
- Ease is the difference between the two.
A pattern works a bit like shoe sizing in winter. Your foot may fit the shoe, but if there is no room for socks and movement, it will never feel right in daily wear. Garments behave the same way.
Don't stop at the size chart
Many sewists pick a size from the body measurement chart and cut straight away. Disappointment often starts at this step.
A pattern can match your measurements on paper and still miss the fit you want. You may prefer a blouse that skims the body rather than floats away from it. You may want a dress with enough room for a thin layer underneath because British weather changes by lunchtime. That is why finished measurements matter so much in a practical wardrobe. They help you choose patterns that will not just fit, but also work across seasons and fabrics.
This video gives a useful visual sense of how fit decisions happen before the final garment is sewn.
A pattern can match your body chart and still feel wrong if the ease doesn't match how you want the garment to wear.
A quick fit check before cutting
Use this short checklist each time you start a new pattern:
- Measure yourself again if your last notes are old.
- Find the finished bust, waist and hip on the envelope, tissue or instruction sheet.
- Compare those numbers with your own measurements.
- Consider the garment type. A coat, blouse and knit top all need different amounts of room.
- Choose your fit preference before cutting. Fitted, skimmed, relaxed or oversized.
This one habit saves fabric, time and frustration. It also helps you build a wardrobe that earns its place. When a pattern fits the way you live, layer and dress through the UK seasons, you are far more likely to sew it again in another fabric and wear it for years.
Essential Fit Adjustments You Can Actually Do
Almost nobody fits a pattern straight out of the packet in every area. That isn't a flaw in you, and it doesn't mean the pattern is bad. It means a flat paper pattern is trying to fit a three-dimensional body with its own proportions.
Skill isn't finding a magical pattern that needs no changes. It's learning a few reliable adjustments and using them calmly.
A key challenge for UK sewists is bridging the gap between commercial pattern sizing and real body shape. The most useful help is often practical comparison between body measurements, finished measurements and alteration steps, rather than just bigger size ranges, as discussed in this article on fit guidance and sewing patterns.
Grading between sizes
A very common example is this. Your bust matches one size, your waist another, and your hips a third.
That doesn't mean you picked the wrong pattern. It means you should grade between sizes. On the pattern, you draw a smooth line from one size to another between the key points. For instance, you might cut a smaller size at the shoulders and bust, then blend out to a larger size at the waist or hips.
This is especially useful for dresses, skirts and trousers.
A few practical pointers help:
- Use a curved ruler or French curve if you have one, especially around the hip.
- Blend gradually, not sharply, or you'll create odd angles at the side seam.
- Check front and back pieces together so the seam lengths still make sense.
Lengthen or shorten where the pattern tells you
Many commercial patterns include printed adjustment lines marked “lengthen or shorten here”. Use them. They're there so you can change the length without distorting the garment shape.
The method is simple.
For shortening, fold the pattern across that line by the amount you need, keeping the fold even all the way across. Then true up the seam lines.
For lengthening, cut along the line, spread the pieces apart by the amount needed, and tape paper underneath. Keep the grainline straight, then redraw the side seams so they flow smoothly.
Good places to use this include:
- Bodices if the waistline sits too high or low
- Sleeves if cuffs land in the wrong place
- Trousers if the knee or hem is out of position
- Skirts and dresses when the finished length doesn't suit your height or style
Small changes count: even a modest adjustment can improve comfort, balance and where the garment sits on your body.
Full bust and small bust adjustments
Bust adjustments sound frightening until you realise the aim is very ordinary. You're adding or removing room at the bust without changing the shoulder, neckline or waist more than necessary.
A full bust adjustment is useful when the upper chest and shoulders fit well, but the garment pulls across the fullest part of the bust, or the side seams swing forward. A small bust adjustment does the reverse. It removes excess room when the upper chest fits but the front looks baggy.
The classic method uses a slash and spread approach.
For a full bust adjustment, you:
- Mark the bust point on the pattern.
- Cut along the adjustment lines from hem or waist towards the bust point and armhole.
- Spread the pattern to add room.
- Add paper behind the opening.
- Redraw the dart or side seam.
For a small bust adjustment, you overlap instead of spreading.
The important thing is not to panic about perfect geometry on your first try. Make the adjustment on traced pattern pieces, not the original tissue, and test it in a toile.
Make a toile when fit matters
If you're sewing a fitted bodice, trousers, or anything with a shaped waist and bust, a toile is worth your time. Use inexpensive fabric with similar behaviour to your final cloth where possible. Mark key lines such as centre front, waistline, bust line and hip line. Those marks tell you far more than just trying the garment on in a mirror.
When you test the toile, ask practical questions:
- Can you sit comfortably?
- Does the waist sit in the right place?
- Do the bust dart points aim correctly?
- Are the side seams hanging straight?
- Is the hem level?
That's how adjustments become manageable. One issue at a time. One small correction at a time.
Mastering Digital and Independent Patterns
You buy a dress pattern in the evening, print it after breakfast, and by lunch you are staring at a pile of A4 pages wondering which edge matches which. That moment is where many sewists decide digital patterns are fiddly. In practice, they are a different format, with their own habits and strengths.
Paper patterns still suit many makers. You open the envelope, find the tissue, and start tracing or cutting. Digital patterns suit a different kind of workflow. You can buy them instantly, print another copy if you spill tea on page 12, and often switch size layers on or off so the lines are easier to follow.
The trick is to choose the format that fits the way you sew, not the one that sounds more modern.
Paper patterns and PDF patterns
A paper pattern works well if you like everything ready in one packet and do not want to deal with printer settings. Many sewists also find tissue easier to pin, fold, and store once they know their system.
A PDF pattern gives you more control. That matters if you often blend between sizes, trace separate versions, or sew the same favourite style more than once. For a practical wardrobe, that can be useful. A simple trouser pattern, shirt dress, or knit top that fits you well can become a repeat project across seasons with different fabrics.
The two PDF formats you will usually see are:
- Print-at-home A4 files for home printers
- A0 copyshop files for large-format printing
If you print at home, start with the test square. It is the pattern equivalent of checking your tape measure before cutting fabric. If the scale is wrong by even a small amount, every seamline and finished measurement will be wrong too.
Assembling a PDF without losing patience
PDF assembly gets much easier once you treat it like careful prep, not wasted time. A jigsaw is the right comparison. Each page looks unremarkable on its own, but the registration marks and page numbers show you where everything belongs.
A few habits help:
- Print only the pages for your size or view if the file allows layers
- Keep the first page nearby so you can check the layout map
- Trim only the sides that need overlapping
- Tape or glue in the same order each time, row by row or column by column
- Assemble the full sheet on a table or hard floor so it stays square
Once the pattern is together, many sewists trace it straight onto pattern paper. That is often the tidiest choice if you expect to shorten the bodice, adjust the bust, or save one version for winter fabrics and another for lighter summer cloth.
Why independent patterns feel different
Independent designers often write instructions in a more conversational style and may focus on specific looks, such as relaxed linen dresses, modern workwear, or stretch basics. Their drafting can feel different too. Some are drafted for a taller frame, some for a fuller cup, and some for a straighter shape through the waist and hip.
That does not make them better or worse than the large pattern brands. It means you need to read them with the same practical eye you would use for a ready-to-wear label.
Look for four things before you buy. Clear line drawings. Finished garment measurements. Fabric guidance that tells you how much drape, stretch, or structure the design needs. Instructions that match your confidence level.
That last point matters more than many beginners expect. A beautiful pattern with sparse instructions can feel like being handed flat-pack furniture with one sheet of diagrams. A simpler pattern with clear steps often teaches you more and leads to a better finished garment.
For UK sewing, it also helps to think beyond the first make. Ask whether the pattern can work in brushed cotton, denim, wool blends, viscose, or lighter linens so you can wear versions of it across changing weather. A versatile pattern earns its place in a sustainable wardrobe because you use it again, rather than chasing a one-off project that never quite suits your life.
Some sewists like to buy patterns, fabric, interfacing, thread, and needles from the same shop so they can plan a project in one go. More Sewing is one example of that kind of practical shopping, especially if you want to match a pattern to suitable dressmaking supplies without hunting through several retailers.
The best pattern format is the one you can print, trace, cut, and sew with confidence.
Paper and digital patterns can both serve you well. The better choice is the one that makes fitting easier, fabric selection clearer, and repeat sewing more likely.
Your Sewing Journey with More Sewing
Once you can read a pattern envelope, judge fabric suitability, check finished measurements and make a few sensible adjustments, women clothes patterns stop feeling like a gamble. They become a tool you can use with confidence.
That changes the whole sewing experience. You buy fabric with a clearer plan. You choose patterns that fit your real wardrobe. You make fewer impulse projects that never get worn. And when something doesn't fit perfectly the first time, you know where to look and what to change.
That's the sort of progress that builds a handmade wardrobe slowly and well. Not by chasing perfection, but by making better decisions from the start.
If you're gathering supplies, it helps to keep the process practical. Match your pattern to the right fabric type. Pick up the necessary notions before you begin. If you're trying a fitted style, add tracing paper, calico for a toile, and a fresh tape measure to your shopping list. If you're sewing for a more flexible, lower-waste wardrobe, look for patterns that can work across multiple seasons and in fabrics you enjoy wearing repeatedly.
At More Sewing, we like that kind of sewing. Thoughtful, useful, creative sewing. The sort that helps you make clothes you'll want to reach for again and again.
If you're ready to put all of this into practice, explore More Sewing for fabrics, haberdashery, dressmaking kits, and practical supplies that support every stage of your next pattern project.