Guides
Why Is My Sewing Machine Skipping Stitches? Solved
You’re stitching along nicely, then the seam starts making that irritating little gap. Needle goes down, fabric feeds, but every so often there’s no stitch. If you’ve landed here wondering why is my sewing machine skipping stitches, you’re in very good company.
At the repair bench, this is one of the most common complaints people bring in. The good news is that skipped stitches usually have a logical cause. The even better news is that many of them can be fixed at home without touching a screwdriver, ordering parts, or assuming the whole machine is worn out.
A skipped stitch happens when the machine fails to catch the top thread loop properly and turn it into a full stitch. That can come from something simple, like the thread not sitting correctly in the tension discs, or something more involved, like timing drifting out. The trick is checking in the right order.
That Frustrating Sound of a Skipped Stitch
It often starts the same way. You’re halfway through a hem, a sleeve seam, or a run of topstitching, and the machine sounds slightly off. Not dramatic. Just wrong. Then you look down and see it. A neat line of stitches interrupted by one little gap, then another.
That’s enough to ruin your confidence fast.
I’ve seen people assume the machine is “broken” after a few skipped stitches, especially if the problem appears in the middle of a project that was going well five minutes earlier. In practice, skipped stitches are usually the machine’s way of telling you that one part of the setup has drifted out of harmony with the others.
Sometimes it’s a fresh piece of jersey that needed a stretch needle, not the universal already fitted. Sometimes it’s a thread path issue after changing reels in a hurry. Sometimes it’s fluff packed around the bobbin area after sewing a linty woven all afternoon.
Most skipped stitches aren’t random. The machine is usually reacting to a mismatch, blockage, or setup error.
The key is not to chase every possible cause at once. Start with the checks that fail most often and take seconds to correct. That saves time, avoids unnecessary tinkering, and usually gets you sewing again far more quickly than stripping the machine down in frustration.
Your First Stop The 'TNT' Diagnostic Checklist
Before you start removing plates or worrying about repairs, check TNT. That means Thread, Needle, Tension. According to sewing machine troubleshooting experts, improper threading accounts for the majority of skipped stitch issues, and 80% of all sewing machine problems are not caused by mechanical failure but by operator error or material setup issues, which is why this method matters so much (fashion-incubator.com on skipped stitches and the TNT approach).
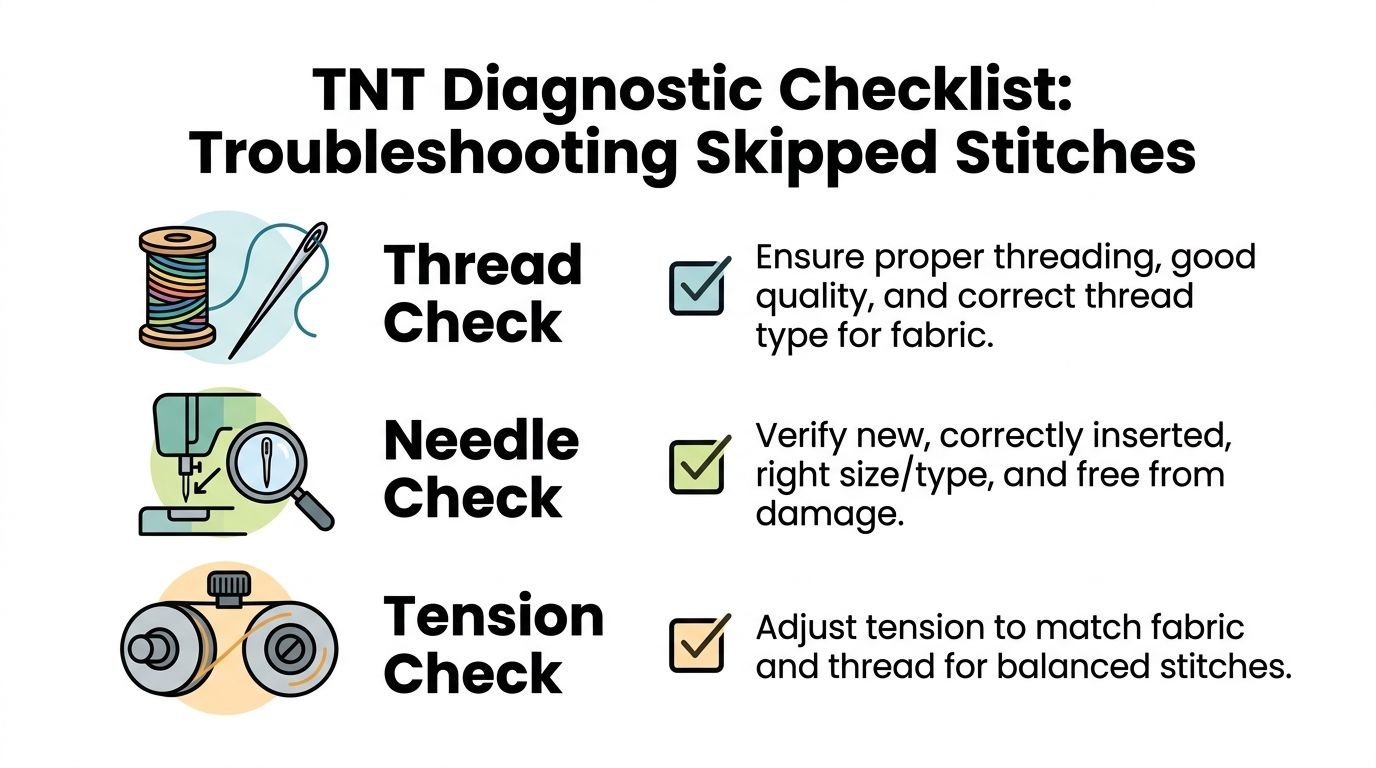
Start with the thread path
If a machine arrives on the bench skipping stitches, rethreading is one of the first things I do. Not because it’s basic, but because it works.
Thread can sit beside a guide instead of through it. It can miss the take-up lever. It can fail to settle between the tension discs. All of those faults can still let the machine sew, just badly.
Work through it slowly:
- Raise the presser foot so the tension discs are open.
- Lift the needle to its highest position.
- Remove the top thread completely. Don’t try to patch-thread from halfway.
- Rethread from spool to needle, following every guide.
- Reinsert the bobbin and check its path according to your manual.
- Hold both thread tails for the first few stitches on a test scrap.
Small details matter here. If the presser foot is down while threading, the thread may not seat properly in the tension discs. If the spool cap is wrong for the reel size, the thread can snag and release unevenly. If the thread is old, fuzzy, or badly wound, it may drag at random points.
A few practical examples:
- Thread jumping off the spool edge can mimic a timing fault.
- Cheap fluffy thread can leave lint quickly and also struggle through the needle eye.
- Metallic or specialty thread often needs slower sewing and a setup matched to it.
Practical rule: If the machine was sewing fine and suddenly starts skipping, rethread it completely before you try anything clever.
Check the needle properly
Needles cause far more trouble than people expect. They’re cheap, easy to overlook, and absolutely central to stitch formation.
Don’t just glance at the needle and decide it “looks fine”. A needle can be slightly bent, dulled, burred after striking a pin, or wrong for the fabric. Any one of those can stop the hook from catching the thread loop cleanly.
Look for these signs:
- A dull point that punches rather than penetrates
- A tiny bend that’s hard to see until you roll the needle on a flat surface
- A nick near the tip after sewing over a thick seam
- The wrong needle type for the fabric under the foot
- Incorrect insertion, especially if it isn’t pushed fully up into the clamp
Remove the old needle and fit a fresh one. Push it all the way up before tightening the clamp. If your machine uses a flat-sided domestic needle, make sure it is oriented as your model requires. On many home machines, people get this wrong after a hurried change.
Test whether the needle suits the fabric
Skipped stitches often show up the moment you switch projects. Cotton was fine. Then you moved to viscose jersey, ponte, denim, or a slippery lining and the trouble began.
Use a quick pairing test on a scrap from the same fabric:
- Woven cotton or lawn often behaves well with a universal needle.
- Jersey and other knits usually need a ballpoint or stretch needle.
- Dense denim or layered canvas may need a sturdier, larger needle.
- Very fine, tightly woven fabric often prefers a sharp needle that pierces cleanly.
If your skipped stitches appear only on one fabric, the machine may not be the problem at all. The setup may not suit the material.
Tension needs testing, not guessing
Tension gets blamed for everything, but random dial-spinning usually makes matters worse.
You’re looking for balanced stitches. The top thread and bobbin thread should lock within the fabric, not pull visibly to one side. If the top thread isn’t under enough control, loop formation can become inconsistent. If the setup is too tight, the thread can struggle to feed smoothly.
Try this:
- Set the machine to a normal straight stitch
- Use a fresh scrap of the project fabric
- Sew a short line
- Inspect both sides
- Adjust in small increments only
What you’re watching for:
| Test result | Likely issue | What to do |
|---|---|---|
| Loops underneath | Top thread not seated or top tension too loose | Rethread first, then adjust slightly |
| Tight, puckered seam | Tension too tight or needle/thread mismatch | Reduce top tension a little and retest |
| Intermittent skips with otherwise neat seam | Needle or thread path issue more likely than pure tension | Replace needle and rethread |
| Skips mainly at seam crossings | Needle struggling with thickness | Slow down and use a more suitable needle |
One thing that doesn’t work well is changing several variables at once. If you change the thread, the needle, and the tension setting together, you won’t know which one fixed it.
Use one scrap. Change one thing. Sew another line. That’s how technicians narrow faults down quickly.
Giving Your Machine a Deeper Clean
If TNT didn’t solve it, the next place I’d look is the bobbin area. That’s where lint, broken thread, and compacted fluff can interfere with smooth stitch formation. According to the British Sewing Machine Dealers Association, lint buildup in the bobbin hook race is responsible for 25-35% of persistent skipped stitches in UK home machines, and 60% of these cases can be resolved with thorough cleaning, though a quarter may need professional timing repairs costing £80-£120 (icanhelpsew.com on lint, cleaning, and timing repair costs).

Natural fibres are especially good at creating this problem. Cotton, viscose, brushed fabrics, and some deadstock dressmaking fabrics can leave a surprising amount behind. The lint packs into corners you can’t see until the plate comes off.
What to clean first
Unplug the machine. Then remove the presser foot and needle if that gives you more room to work safely.
Focus on these areas:
- Under the throat plate where lint compacts around the feed dogs
- Inside the bobbin case area where thread ends and fluff gather
- Around the hook race where the mechanism needs to move cleanly
- Any visible thread scraps wrapped around moving parts
Use a small brush. A firm lint brush or the little brush that came with the machine is ideal. If you have a mini vacuum attachment with gentle suction, that can help lift debris out.
What I wouldn’t recommend is blasting compressed air into the machine. It often pushes lint deeper into the mechanism instead of removing it.
A safe cleaning routine
This is the order that works well for most domestic machines:
- Unplug the machine
- Remove the needle plate
- Take out the bobbin and, if your model allows, the bobbin case
- Brush lint out gently
- Lift out loose fluff with tweezers or low suction
- Check for stray thread wrapped around the hook area
- Reassemble carefully and test on scrap
A common trap is missing compacted lint around the feed dogs. It can look harmless, but when fluff hardens into a little felted clump, feeding becomes less consistent and the stitch cycle can suffer.
Where skips often come from on linty projects
Some projects are just messier than others. If your machine skips only after sewing a specific fabric, pay attention to what that fabric sheds.
Here are patterns I see often:
- Brushed cottons and flannels leave soft lint fast
- Viscose and Tencel blends can leave fine fluff that settles into the bobbin area
- Denim hems create fibre dust and also put more force through the needle
- Deadstock fabrics vary wildly, so one roll may behave beautifully and another may shed much more than expected
This visual gives a good look at the sort of area you’re checking and cleaning:
A clean bobbin area won’t fix every skipped stitch problem, but a dirty one can create all sorts of false symptoms.
If you clean thoroughly, reassemble correctly, and the machine still skips in the same way across multiple fabrics, that’s when I start suspecting something deeper than housekeeping.
Matching Your Needle and Thread to Your Fabric
Needle, thread, and fabric need to cooperate. If one of them is out of place, the whole stitch formation can wobble. Based on data from UK sewing machine technicians, improper needle choice or installation accounts for approximately 40-50% of skipped stitch complaints, and a correct replacement protocol resolves the issue in 85% of cases (YouTube guidance cited for UK needle choice and installation data).
That rings true in day-to-day sewing. A machine may sew woven cotton beautifully, then skip every few stitches on jersey because the needle point is wrong for the fabric structure. The machine hasn’t suddenly become unreliable. It’s being asked to do the wrong job with the wrong tool.
Needle and fabric pairing guide
Use this as a practical starting point:
| Fabric Type | Recommended Needle Type | Recommended Needle Size |
|---|---|---|
| Cotton lawn, poplin, viscose woven | Universal | 70/10 to 80/12 |
| Standard dressmaking cotton | Universal | 80/12 |
| Jersey and stable knit | Ballpoint or Jersey | 80/12 |
| Stretch jersey, activewear, swimwear | Stretch | 90/14 |
| Denim or dense woven cloth | Denim or strong Universal | 90/14 |
| Fine tightly woven fabric | Sharp or Microtex | Fine size appropriate to fabric |
The exact best setup can vary by fabric finish, thread, and seam type, but this gets you close quickly.
What works and what usually fails
Some combinations are much more forgiving than others.
A few reliable pairings:
- Cotton poplin plus universal needle usually behaves predictably.
- Jersey plus stretch needle gives cleaner stitch formation than a standard universal.
- Finer woven fabric plus a sharper needle reduces snagging and skipped penetration.
- Heavier seams plus a stronger, suitable needle help the machine punch through consistently.
And some combinations tend to disappoint:
- Universal needle on slippery knit
- Very fine needle with thicker all-purpose thread
- Old needle used on a new delicate fabric
- Cheap fuzzy thread through a small needle eye
Thread matters more than many people realise. If the thread is too thick for the needle eye, it won’t pass cleanly. If it’s rough or linty, it may drag, fray, or form poor loops. Good thread isn’t about snobbery. It’s about consistency.
Real examples from common home sewing jobs
If you’re hemming a T-shirt and the machine skips every few stitches, fit a stretch needle and test on the same jersey folded as it will be in the hem. Don’t test on plain cotton and assume it’s fixed.
If you’re sewing a crisp blouse fabric, a finer needle often gives a cleaner result than the larger universal left in from your last project.
If you’re handling silk accessories or trying very fine finishing work, the edge treatment affects how the fabric feeds and behaves. Looking at examples of machine rolled silk edges can help you understand why delicate fabrics often need a finer, cleaner needle setup than everyday dressmaking cloth.
The machine can only make a good stitch if the needle creates the right opening and the thread can move through it cleanly.
One more point. Installation matters just as much as needle type. A brand-new needle fitted slightly low or not fully tightened can still cause skipped stitches. If in doubt, remove it, refit it, and test again.
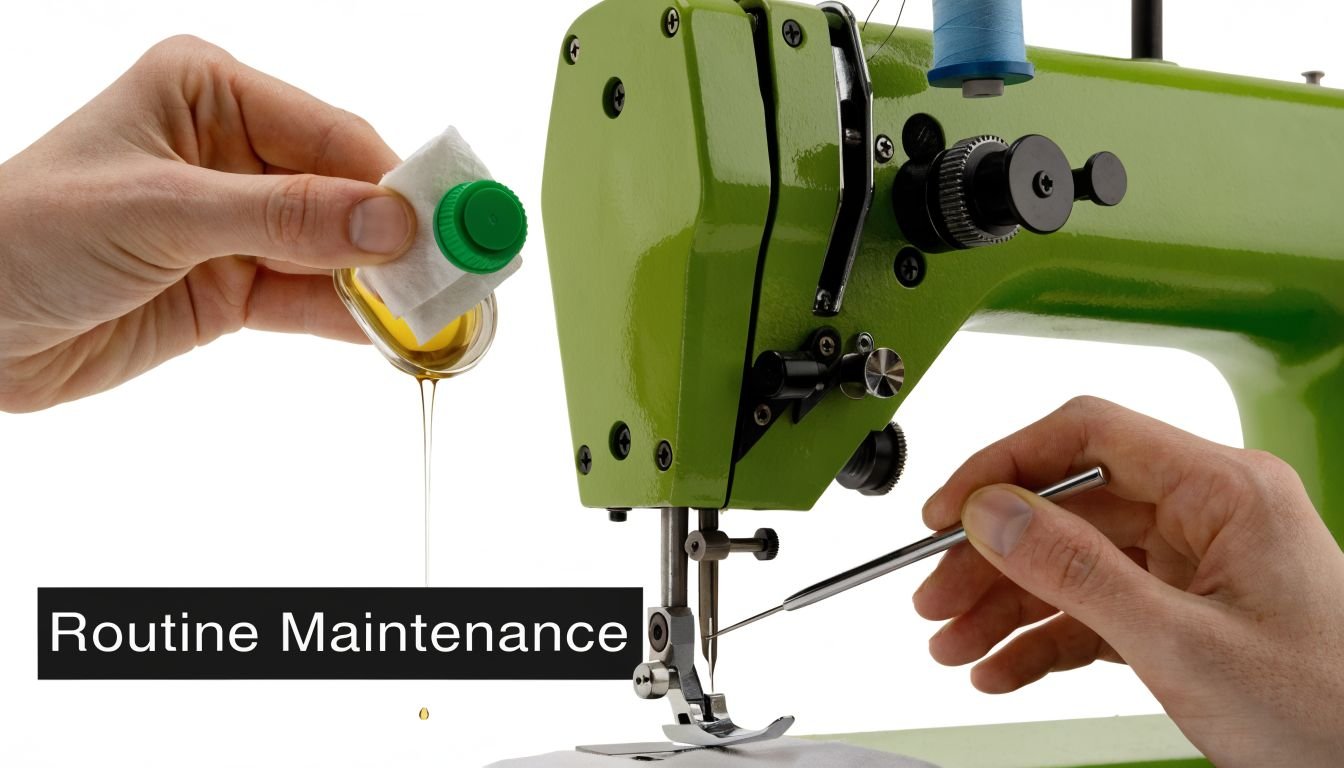
Preventative Care to Stop Skips Before They Start
Often, maintenance is considered only once a machine starts misbehaving. It’s better to treat it like routine care. According to sewing machine guidance, changing your needle after approximately 8 hours of continuous use helps prevent skipped stitches caused by dullness, and annual professional servicing is advised for long-term reliability (threadwerk.com on needle change intervals and annual servicing).
That needle interval catches people out. Needles don’t have to look damaged to perform badly. They wear gradually. The point gets less sharp, the shaft takes stress, and stitch formation becomes less reliable long before the needle looks obviously wrong.
The habits that make the biggest difference
A simple routine does more than a drawer full of gadgets.
- Change the needle regularly rather than waiting for trouble.
- Brush out lint after messy projects so fluff doesn’t compact under the plate.
- Use decent thread that feeds smoothly and leaves less debris behind.
- Test on scraps before a project if you’ve switched fabric type.
- Book a yearly service if you sew regularly.
For many home sewists, the easiest rule is to change the needle before a big project, after a stretch of heavy sewing, or any time the machine starts sounding harsher than usual.
Why prevention beats troubleshooting
Skipped stitches are frustrating partly because they damage momentum. You stop sewing, unpick, test, rethread, and second-guess everything. A fresh needle and a quick clean are far cheaper in time and annoyance than rescuing a half-finished garment.
There’s also less wear on the machine when you aren’t forcing it through unsuitable setups. Sewing slowly over thick joins, cleaning after linty fabrics, and not pushing a tired needle through one more seam all help the machine stay in better adjustment.
A compact maintenance checklist
| Task | When to do it | Why it helps |
|---|---|---|
| Change needle | After roughly 8 hours of sewing or before a major project | Keeps stitch formation clean |
| Brush lint from bobbin area | After linty or fibre-shedding fabrics | Prevents obstruction in moving parts |
| Check threading from scratch | Any time stitches look off | Rules out setup errors quickly |
| Arrange annual service | Regularly, especially for frequent sewing | Catches wear and adjustment issues |
Good maintenance isn’t glamorous, but it’s the closest thing sewing machines have to an easy life.
When Your Machine Needs Professional Help
Sometimes you’ve done everything right. You’ve rethreaded properly, fitted the correct new needle, cleaned the bobbin area, tested on scraps, and the machine still skips. That’s the point where persistence stops being useful and starts wasting your time.
The most common workshop issue behind stubborn skipped stitches is timing. The needle and hook have to meet at precisely the right moment. If that relationship shifts, even slightly, the hook may miss the thread loop and you’ll see regular gaps, broken thread, or unreliable stitch formation across different fabrics.
Signs the problem is no longer a home fix
A few symptoms usually tell the story:
- The machine skips on multiple fabrics, not just one awkward material
- A new needle makes no difference
- The machine has recently hit a pin, zip, or thick seam hard
- You hear knocking, scraping, or rough running
- The stitch problem stays the same after careful cleaning and rethreading
Those faults usually point to adjustment, wear, or damage rather than basic setup.
A UK issue many guides miss
There’s one factor that doesn’t get enough attention in general sewing advice, especially in the South East. Hard water can leave mineral scale in tension discs and bobbin mechanisms, which can interfere with thread flow, and forum data from 2025-2026 suggests up to 25% of persistent skipped stitch complaints, even after servicing, could be linked to scale buildup (weallsew.com on hard water and scale as an overlooked factor).
That doesn’t mean every skipping machine has a water-related issue. It does mean local conditions can affect machines in ways generic guides don’t mention. If a machine keeps developing odd thread behaviour despite sensible care, scale and residue are worth having checked by someone who sees local machines regularly.
If the machine skips on everything after the obvious fixes, stop forcing it. Repeated testing won’t correct a mechanical fault.
A good technician should be able to tell you whether the issue is timing, a worn part, buildup in the tension path, or something simpler. Knowing when to hand it over is part of sewing well too.
Frequently Asked Questions About Skipped Stitches
Some skipped stitch problems are straightforward. Others only show up in very specific situations. These are the questions I hear most often from home sewists.
Quick answers to common problems
| Question | Answer |
|---|---|
| Why does my sewing machine skip stitches only on jersey? | Jersey often needs a ballpoint or stretch needle. A universal needle can pierce the knit poorly and fail to form a reliable loop. Test with the same fabric, same layers, and the same thread you’ll use in the project. |
| Why does it skip after sewing fine cotton perfectly well? | A fabric change often needs a setup change. Needle type, size, and thread choice that worked on cotton may not suit viscose, knit, denim, or slippery lining fabric. |
| Can bad thread cause skipped stitches? | Yes. Rough, fluffy, old, or inconsistent thread can drag through the guides and needle eye, fray, and create uneven loop formation. If you suspect the thread, swap it before blaming the machine. |
| Should I adjust the bobbin tension myself? | Usually no for routine skipped stitches. Most home problems come from threading, needle choice, or lint. Random bobbin adjustments can create a second problem on top of the first. |
| Why does the machine skip at bulky seam crossings? | The needle may be deflecting, the fabric may not be feeding evenly, or the setup may be too fine for the thickness. Slow down, support the presser foot level if needed, and use a suitable fresh needle. |
| Is one skipped stitch enough to mean something is wrong? | Not always. A single skip over a bulky point may be a one-off. Repeated skipping in normal sewing means the setup needs attention. |
| Why does rethreading help so often? | Because the thread path has many points where the thread can sit incorrectly while still appearing threaded. Fully removing and rethreading resets the system properly. |
| My machine was serviced and still skips. What now? | Check the simple variables again with your actual project fabric. If the issue persists, take note of exactly when it happens. Only on knits, only on hems, only with one thread, or on every fabric. That pattern helps a technician pinpoint the fault. |
A few extra workshop notes
People often ask whether sewing more slowly fixes skipped stitches. Sometimes it helps, but mainly because it reduces strain and makes a marginal setup behave a little better. It doesn’t correct the root cause.
Another common question is whether skipped stitches mean the machine is worn out. Usually not. Domestic machines can sew very well for years if they’re cleaned, fitted with fresh needles, and serviced when needed.
If the machine only skips on one project, test the fabric system. If it skips on everything, test the machine system.
The best troubleshooting habit is to change only one variable at a time. Fresh needle. Test. Full rethread. Test. Clean bobbin area. Test. That approach is slower for two minutes and much faster over the whole problem.
If you’ve worked through the checklist and your machine still isn’t sewing cleanly, More Sewing can help with expert sewing machine servicing and repairs in Worthing, along with quality fabrics, needles, thread, and haberdashery for your next project.